(1) Suture materials. Choose the thinnest suture possible.
Nylon or proline is the most appropriate. The correct thickness of the suture material depends on the region of the body to be repaired. Look at these examples of the thickness of suture material and the corresponding part of the body to be repaired:
(a) 6.0–face.
(b) 5.0 or 4.0–arms, legs, trunk, feet.
(c) 5.0 or 6.0–hands.
(d) 4.0 or 3.0–scalp of women.
(e) 4.0 or 5.0–scalp of men (since men may lose their hair).
(2) Needles. Use a small needle for fine work. Choose a large cutting needle for areas such as the scalp where a few large bites will suffice.
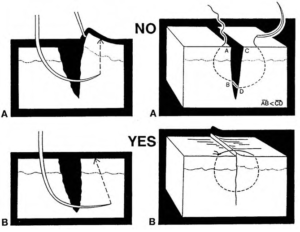
(3) Suture loop configuration. The base of the suture loop should be as wide as or wider than the top of the suture loop (figure 2-4).
This helps in matching the edges of the wound. Avoid having the suture loop narrow at the base of the wound. Instead, have the loop as broad at the base as at the top. When the loop is closed by tying the stitch, the greater tissue in the upper portion will create edge eversion. (If too little tissue is at the base of the loop, the edges will tend to invert.)
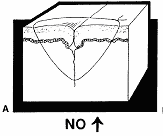
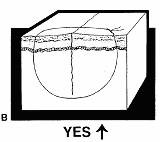
(4) Spacing of sutures. Follow these guidelines in spacing sutures.
(a) The closer the suture is to the wound edge, the better the control over the wound edge.
(b) The suture should enter and exit the skin about two millimeters from the wound edge.
(c) The suture should have a depth of about two millimeters from the surface of the skin.
(d) The distance between sutures should be between two millimeters and six millimeters, depending on the tissue.
(e) Space the sutures an equal distance apart along the entire extent of the laceration.
(f) For better cosmetic effect, use many small stitches set close together.
(5) Technique of suture placement. Follow these steps for suture placement.
(a) Grasp the needle with the needle holder one-third to one-half way down the needle from the point where the needle attaches (figure 2-5).
(b) Hold the needle holder in the palm of your hand, using the index finger for fine control. (This gives you better control than if your fingers were in the needle holder fingerholes.)
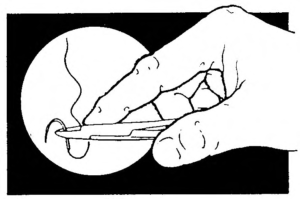
NOTE: In this area, the needles are flattened, giving the needle holders a larger surface to hold onto.
(c) Suture towards yourself, entering at the far side of the wound and exiting on the near side.
(d) Using forceps such as adson forceps, control the edges of the wound.
NOTE: Remember to treat the tissue as gently as possible. When forceps are employed, be sure not to crush the tissue.
(e) Enter the skin with the needle at approximately a 90-degree angle (figure 2-6).
(f) Be sure the suture lies at the same depth on both sides of the wound (figure 2-7). The level at which the needle exits the tissue on one side of the wound must be the same as the level in which the needle reenters on the other side of the wound.
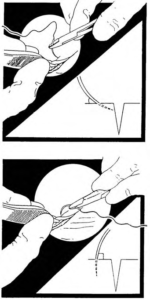
(6) Tying the knot: general principles. Follow these general principles for tying a knot.
(a) Adhere to the proper knot tying procedure strictly.
(b) The strands of suture material need to intertwine in alternate directions with each throw in order for the knot to square. Squaring is essential for the knot to remain tied securely.
(c) For nylon or prolene, use a total of four or five throws per knot.
(d) For silk or cotton, use a total of three throws per knot.
(7) Tying the knot: instrument ties. Follow this procedure for making instrument ties. See figure 2-8.
(a) Make the suture loop in the usual manner.
(b) With the nondominant hand, hold the end of the suture that is swagged to the needle.
(c) Pull on the suture until the free end on the other side of the wound is two to four centimeters in length.
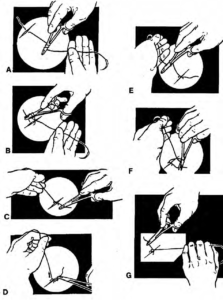
(d) With the dominant hand, hold the needle holder.
(e) Loop the swaged end of the suture twice around the needle holder for nonfilament suture material. A single loop suffices for most braided sutures such as silk or Dexon®.
(f) Grab the free end of the suture with the blades of the needle holder.
(g) Cross the hands so that the hand holding the swaged end is on the far side, and the hand holding the needle holder and the free end are on the near side of the wound.
(h) As you clinch the first throw of the knot, pull upward on the suture ends.
(i) Adjust the tension of the first throw, so that the wound edges come together snugly, but not tightly.
(j) For the second throw of the knot, the needle end is on the far side of the wound, and the free end is on the near side of the wound.
(k) Hold the needle end of the suture in the non-dominant hand and lay the needle holder on top.
(l) Loop the suture only once around the needle holder.
(m) Grasp the free ends with the blades of the holder.
(n) Cross the hands so that the sutures intertwine smoothly.
(o) Cinch down the throw.
CAUTION: Take care not to cinch down too tightly on the second throw, because the tightness will be transmitted to the wound.
(p) Pull the knot to the side so that the knot will not lie directly over the wound.
(q) Repeat the pattern of looping the suture around the holder on alternate sides of the wound. Do this until the desired number of throws have been completed.
(r) Cut the ends of the suture material approximately three to five centimeters long.
