Several conditions indicate a need for venous cut-down.
Use the procedure when it is impossible or hazardous to locate a vein large enough for a needle to pierce unbroken skin; for example, when normally accessible veins are collapsed because of volume depletion or peripheral vasoconstriction and all other means have been exhausted.
The venous cut-down procedure is a last resort, it should be attempted after you have had unsuccessful peripheral IV attempts and have tried intra-osseous without success or you do not have intra-osseous capability. Even under these circumstances, the cut-down is a controversial but necessary procedure.
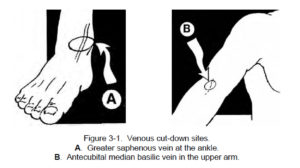
a. Anatomical Considerations. There are two good sites for a venous cutdown procedure: the primary site and the secondary site.
(1) Primary site. The primary site is the greater saphenous vein at the ankle (figure 3-1A). This vein is located at a point approximately two centimeters anterior and medial from the medial malleolus.
(2) Secondary site. A secondary site is the antecubital median basilica vein (figure 3-1B). This vein is located two and a half centimeters lateral to the medial epicondyle of the humerus of the flexion crease of the elbow.

b. Venous Cut-down Procedure. Follow these steps.
(1) Prepare the skin with Betadine® and drape the patient.
(2) Infiltrate the skin over the vein with a local anesthetic. A 0.5 percent solution of lidocaine is recommended.
(3) Make a full-thickness transverse skin incision through the area of anesthesia. Make the incision two and a half centimeters long.
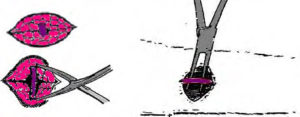
(4) Identify the saphenous vein. Using a curved hemostat, free this vein from the spenous nerve by blunt dissection. The saphenous nerve is attached to the anterior wall of the saphenous vein.
(5) Elevate and dissect the nerve to free the vein from its bed for a distance nof approximately two centimeters (figure 3-2).

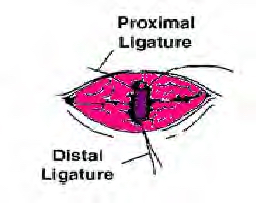
(6) Tie off the vein distally, using a piece of suture material. Leave the suture in place for traction (figure 3-3).
(7) Pass a tie about the vein, proximally (figure 3-3).

(8) Canulate the vein directly as in a regular IV, keeping in mind that you only have to penetrate the vein and not the skin. An alternate method is to make a small transverse cut in the vein and gently dilate the opening with the tip of a closed hemostat.
(9) Introduce a plastic cannula through the opening with the tip of the catheter towards the heart. Secure the cannula in place by tying the upper ligature above the vein and cannula. Be sure to insert the cannula an adequate distance to prevent its coming out.
(10) Attach the IV tubing to the cannula and close the incision with interrupted sutures.
(11) Apply antibiotic ointment to the puncture site.
(12) Apply a dry, sterile dressing.
c. Possible Complications. There may be some complications from the venous cut-down and/or the insertion of a cannula. Some possible complications are listed below.
(1) Cellulitis–a diffuse spreading infection, especially of the subcutaneous tissues.
(2) Hematoma–a localized mass of blood outside of the blood vessels. Such blood is usually found in a partly clotted state.
(3) Phlebitis–inflammation of a vein.
(4) Perforation of the posterior wall of a vein–a back wall of a vein is pierced.
(5) Venous thrombosis–a blood clot in a vein.
(6) Nerve transections–cutting across a nerve.
(7) Arterial transection–cutting across an artery.
NOTE: Fewer complications occur when aseptic technique is used and proper care is taken when the cannula is placed.
