Chest tubes are placed so that air and blood can be removed from the intrathoracic cavity.
Place the chest tube in the appropriate space so that air is removed and the condition is relieved. Chest tubes are placed so that gravity aids suction in fluid removal.
a. Indications for Chest Tube Insertion. Three conditions commonly require the insertion of a tube into the chest. The conditions are hemothorax, pneumothorax, and tension pneumothorax.
- Hemothorax is the accumulation of blood in the pleural cavity.
- Pneumothorax is the accumulation of air in the pleural space. The amount of trapped air or gas determines the degree of lung collapse.
- In tension pneumothorax, air in the pleural space is under higher pressure than air in the adjacent lung and the vascular structures. A patient with tension pneumothorax must have prompt treatment or he will suffer fatal pulmonary and circulatory impairment.
b. Equipment for Chest Tube Insertion. Equipment needed includes the following:
(1) Betadine® or another solution in preparing the site for chest tube insertion.
(2) Sponges for preparation of the site.
(3) 2 large, curved, Kelly clamps.
(4) 6 x 10 millimeter syringes with number 18 and number 25 gauge needles.
(5) Scalpel and blade.
(6) One percent lidocaine.
(7) Suture (to secure the chest tube).
(8) Suture (for wound approximation).
(9) Appropriate chest tube size.
(10) Chest drainage collection device.
(11) Sterile surgical gloves.
(12) Occlusive dressing material.
(13) Sterile drape.
(14) Needle holder.
(15) Tape.
c. Procedure for Chest Tube Insertion. Monitor the patient throughout the procedure. Perform the following steps.
(1) Put on the gloves and mask.
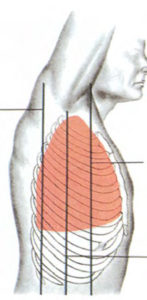
(2) The site is about nipple level (the fifth or sixth intercostal space) on his affected side on the mid to anterior axillary plane. See figure 3-5.
(3) Prepare and drape the patient.
(4) Locally, anesthetize the skin and rib periosteum if the patient’s condition and time permit.
(5) Incise the skin, creating a tunnel. Using a scalpel and blade, make a two to three centimeter transverse incision through the subcutaneous tissues, just over the top of the rib. Create a tunnel by spreading the clamp.
(6) Using the clamp, make a hole into the pleural space. Grip the clamp along its shaft to prevent plunging too deeply into the chest. Make the hole at the top edge of the patient’s rib. Spread the clamp to enlarge the hole and remove the clamp.

(7) Explore the pleural space. With the sterile gloved index finger of your dominant hand, explore the intrathoracic area to confirm that it is free of adhesions or clots. Be careful to guard against extrapleural tube placement.
(8) Insert the chest tube in the following manner.
(a) Grasp the chest tube with the clamp. Bevel the end of the chest tube with scissors to facilitate the passage of the tube through the chest wall. Remove any sharp edges.
(b) Guide the chest tube into the pleural space.
(c) Advance the tube to the apex, leaving no holes external to the pleural space.
(9) Look for fogging of the chest tube when the patient breathes out, an indication of a properly placed tube.
(10) Quickly attach the chest tube to an underwater seal apparatus.
NOTE: If a drainage system is not available, improvise with a Heimlich valve (figure 3-6).

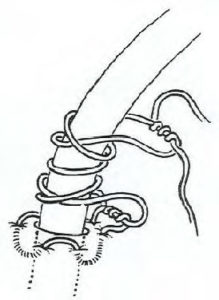
(11) When the tube is properly placed, secure it with a suture attached to the skin. Leave one suture long and tie that suture securely around the chest tube. See figure 3-7.

(12) Apply the dressing. Follow this procedure.
(a) Apply tincture of benzoin to the skin.
(b) Place petroleum gauze around the tube exit site to make an airtight seal.
(c) Cover the gauze with a dry, sterile dressing.
(d) Secure the test tube with adhesive tape.
(13) When it is possible, obtain a chest x-ray to be sure the chest tube has been placed properly.
