Use the following procedures when taking a patient’s oral temperature.
a. Wash Hands.
Perform a patient care hand wash.
b. Gather Materials.
You will need to assemble the following items:
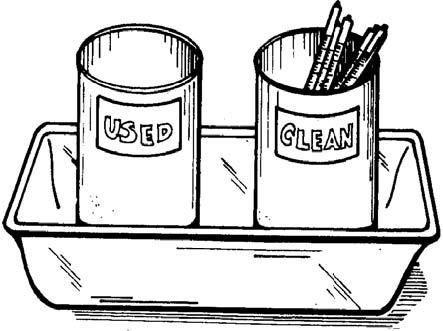
(1) Glass oral thermometer(s). You will normally obtain a tray of clean (unused) thermometers, especially if you are going to take more than one patient’s temperature. Figure 2-7 shows a typical tray. (The term “tray” is used to mean all equipment and supplies carried in the tray as well as the actual tray.) The tray shown consists of a rectangular metal tray (8 inches long, 5 inches wide, and 2 inches deep), a metal container labeled “clean” holding several unused oral thermometers, and a metal container labeled “used” filled two-thirds full with water. Sometimes, the second container is labeled “dirty” instead of “used.”

(2) Gauze pads. You will need at least one gauze pad, usually the 2-inch by 2-inch size, for each oral temperature to be taken.
(3) Time piece. You will need a watch or clock to measure the time that the patient has had the thermometer in his mouth. A clock or watch with a second hand is preferred since a second hand is needed when measuring the patient’s pulse and breathing rates.
(4) Writing materials. You will need a pencil or pen and something on which to write the patient’s temperature reading. A note pad or a sheet of paper is usually sufficient. If you are to write the patient’s temperature on a form, you will be told what from to use. Forms used in recording vital signs are discussed in detail in Lesson 6.
c. Verify That the Oral Route Should Be Used.
Verify that none of these contraindications given in paragraph 2-18b exists before taking the patient’s temperature.
(1) Check patient’s chart. Make sure that there is no order to take the patient’s temperature using the rectal or axillary route.
(2) Observe patient. Some information can be obtained by observing the patient as you approach him. For example, if you see that the patient is coughing constantly, you know that another method of obtaining the patient’s temperature should be used. Awaken any sleeping patient.
(3) Ask patient questions concerning contraindications. Ask the patient if he has smoked, eaten hot or cold foods, drank hot or cold fluid, or chewed gum within the last half-hour. If the patient has done any of these things within the last half-hour, then you must decide whether to wait and take his oral temperature later or take his temperature now using a different procedure (usually the rectal method).
d. Verify Patient’s Identity.
When you are assigned to take a certain patient’s temperature, make sure that the patient is the one you want. If the patient is wearing an identification bracelet, check the name on the band against the name on your form. You may also check his bed card and ask him his name.
If you verify the patient’s identity orally, you should ask, “What is your name, please?” rather than asking, “Are you Mr. Smith?” A mentally confused patient may answer, “Yes,” to the second question without even understanding the question. In the field, check the name on the patient’s identification tag (dog tag) or the name on his uniform.
e. Examine Thermometer.
Make sure that the thermometer you are going to use is actually an oral thermometer and that the thermometer has been shaken down.
(1) Pick up thermometer. Pick up one of the thermometers from the container marked “clean.” Only touch the stem end of the thermometer. If you touch a part of the thermometer that will enter the patient’s mouth, the thermometer is contaminated. Place any contaminated thermometer in the “used” thermometer container and pick up another thermometer from the “clean” thermometer container.
(2) Check type of thermometer. Look at the thermometer to make sure that it is an oral thermometer. The stem end of the thermometer should be colored blue. If you have a rectal thermometer tray, return it and obtain an oral thermometer tray.
(3) Check temperature. Read the temperature shown on the thermometer. If the temperature reading is 94º F or higher, shake down the thermometer until the reading is below 94º F. When shaking down the thermometer, be sure to not touch the part of the thermometer that will go into the patient’s mouth. Also, be careful to keep the thermometer from coming into contact with other objects.
f. Tell Patient About The Procedure.
Tell the patient that you are going to take his temperature. Tell the patient what you need him to do it a courteous, but efficient, manner. Being pleasant to the patient will help to enlist his cooperation (which will make your job easier) and help the patient to relax.
g. Position Thermometer.
(1) Ask the patient to open his mouth. If the patient’s tongue is not raised so that you can insert the thermometer under the tongue, give the patient further instructions to lift his tongue.
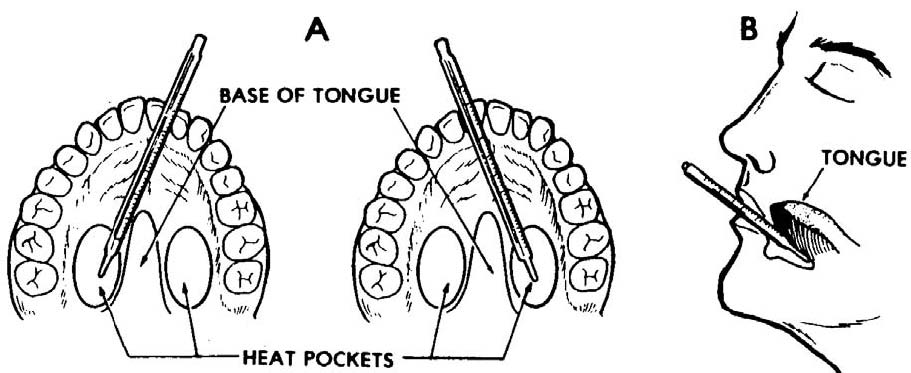
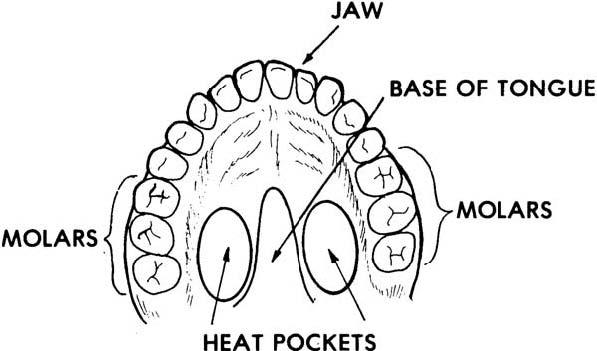
(2) Place the bulb on a heat pocket. The mouth has two “heat pockets” located on the bottom (floor) of the mouth at the base of the tongue (figure 2-8). One heat pocket is location on the right side of the tongue’s base while the other heat pocket is located on the left side. The heat pockets are in line with the molars (teeth used for chewing).
Place the thermometer so that the bulb is on top of one heat pocket with the stem near the front of the mouth on the opposite side of the mouth (figure 2-9). Crossing the center line of the mouth will help keep the thermometer in place.

(3) Secure the thermometer. Once the thermometer is in place, tell the patient to relax his tongue (thus covering the bulb of the thermometer) and to close his lips firmly over the thermometer. Be sure to tell the patient to not bite down on the thermometer. (If the patient bites down on the thermometer with his teeth, he may break the thermometer.)
Once the patient has closed his lips over the thermometer, remove your fingers from the thermometer. If the thermometer slips or droops, you may need to position the thermometer again.
h. Wait At Least Three Minutes.
If the thermometer has been placed properly under the patient’s tongue, three minutes will be sufficient time to obtain an accurate reading. Leaving the thermometer in place more than three minutes will not interfere with the accuracy of the temperature reading.
You can use the three minutes to measure the patient’s pulse rate and breathing rate if you wish. If you are taking the oral temperatures of a group of patients, you may wish to begin taking the temperatures of other patients while you are waiting for the first patient’s temperature reading.
i. Remove Thermometer.
After the three-minute waiting period has passed, remove the thermometer from the patient’s mouth.
(1) Grasp the stem end of the thermometer firmly with your thumb and fingers.
(2) Tell the patient to open his mouth.
(3) Remove the thermometer from the patient’s mouth.
j. Wipe Thermometer.
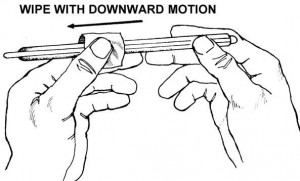
Pick up one of the dry 2 X 2 gauze pads and wipe the patient’s saliva from the thermometer with one quick downward wipe (figure 2-10). Begin at a point above the area that was in contact with the patient’s lips and wipe downward to the bulb end. The bulb itself does not need to be wiped. Discard the used gauze pad into a waste container.

k. Read Thermometer.
Hold the thermometer at eye level and read the thermometer to the nearest 0.2 Fº (or to the nearest 0.1º C, as applicable).
NOTE: If the patient’s temperature reading is unexpectedly low, you may wish to replace the thermometer in the patient’s mouth for a minute or so in order to verify the temperature. A low reading may result from the patient not keeping the bulb of the thermometer securely in place over the heat pocket.
l. Record Patient’s Temperature Reading.
Write the patient’s temperature reading on the paper or form. If the patient’s name is not already on the paper or form, be sure to write his name next to his temperature reading.
m. Place Thermometer in “Used” Container.
Once you have read and recorded the patient’s oral temperature, place the thermometer into the thermometer container marked “used.” The thermometers in this container will be prepared for reuse later.
n. Wash Hands.
Perform another patient care hand wash after you have finished taking the patient’s (or patients’) temperature(s).
o. Turn in Tray.
After you have completed taking the temperatures, turn in the thermometer tray in accordance with procedures given in the local standing operating procedures (SOP).
[/bg_collapse]

