
LESSON OBJECTIVES
3-1. Select the purposes of urinary catheterization.
3-2. Identify three types of urinary catheters.
3-3. Select nursing implications, which apply to care of a patient with an indwelling urinary catheter.
3-4. Select the appropriate equipment and technique used in catheterizing a male patient.
3-5. Select the appropriate equipment and technique used in catheterizing a female patient.
3-6. Select the appropriate equipment and technique used to remove a Foley catheter.
3-1. INTRODUCTION
Catheterization of the urinary bladder is the insertion of a hollow tube through the urethra into the bladder for removing urine. It is an aseptic procedure for which sterile equipment is required.
3-2. PURPOSES OF URINARY CATHETERIZATION
Purposes for urinary catheterization include the following.
a. Relieve Urinary Retention. Urine retained in the bladder for any reason causes the patient discomfort and increases the likelihood of infection. A catheter may be inserted to relieve urinary retention when a patient is temporarily unable to void or has difficulty releasing urine from the bladder due to an obstruction of the urethra or at the meatus.
b. Obtain a Sterile Urine Specimen from a Female Patient. At one time, this was considered necessary to obtain a urine specimen entirely free of contamination. Most physicians now order a collection of a voided, midstream clean-catch specimen.
c. Measure Residual Urine. Catheterization can be done to measure the amount of residual urine in the bladder when voiding only partly empties it.
d. Empty the Bladder Before, During, or After Surgery. A catheter may be inserted before or following abdominal surgery, especially if the patient cannot be up and about. Catheterization to keep the bladder empty of urine during a surgical procedure permits the surgeon a better view and palpation of internal tissue, and prevents accidental injury to the bladder. Catheterization may also be used to prevent urine from touching sutures in the perineum.
3-3. URINARY CATHETER SIZES
The French scale (Fr.) is used to denote the size of catheters. Each unit is roughly equivalent to 0.33 mm in diameter (that is, 18 Fr. indicates a diameter of 6 mm). The smaller the number, the smaller the catheter. A larger sized catheter is used for a male because it is stiffer, thus easier to push the distance of the male urethra. Catheters come in several sizes:
a. Number 8 Fr. and 10 Fr. are used for children.
b. Number 14 Fr. and 16 Fr. are used for female adults.
c. Number 20 Fr. and 22 Fr. are usually used for male adults.
3-4. TYPES OF URINARY CATHETERS
The catheters most commonly used are made of plastic. Each type of catheter (figure 3-1) has a rounded tip to prevent injury to the meatus or the urethra. The Foley catheter is frequently used. It is usually inserted by the nurse. The Malecot four-wing catheter and the dePezzer mushroom catheter are inserted by the urologist using a stylet. The stylet is removed after the catheter has been inserted. Because they are very difficult to sterilize, catheters should be considered disposable and discarded after they have been removed.
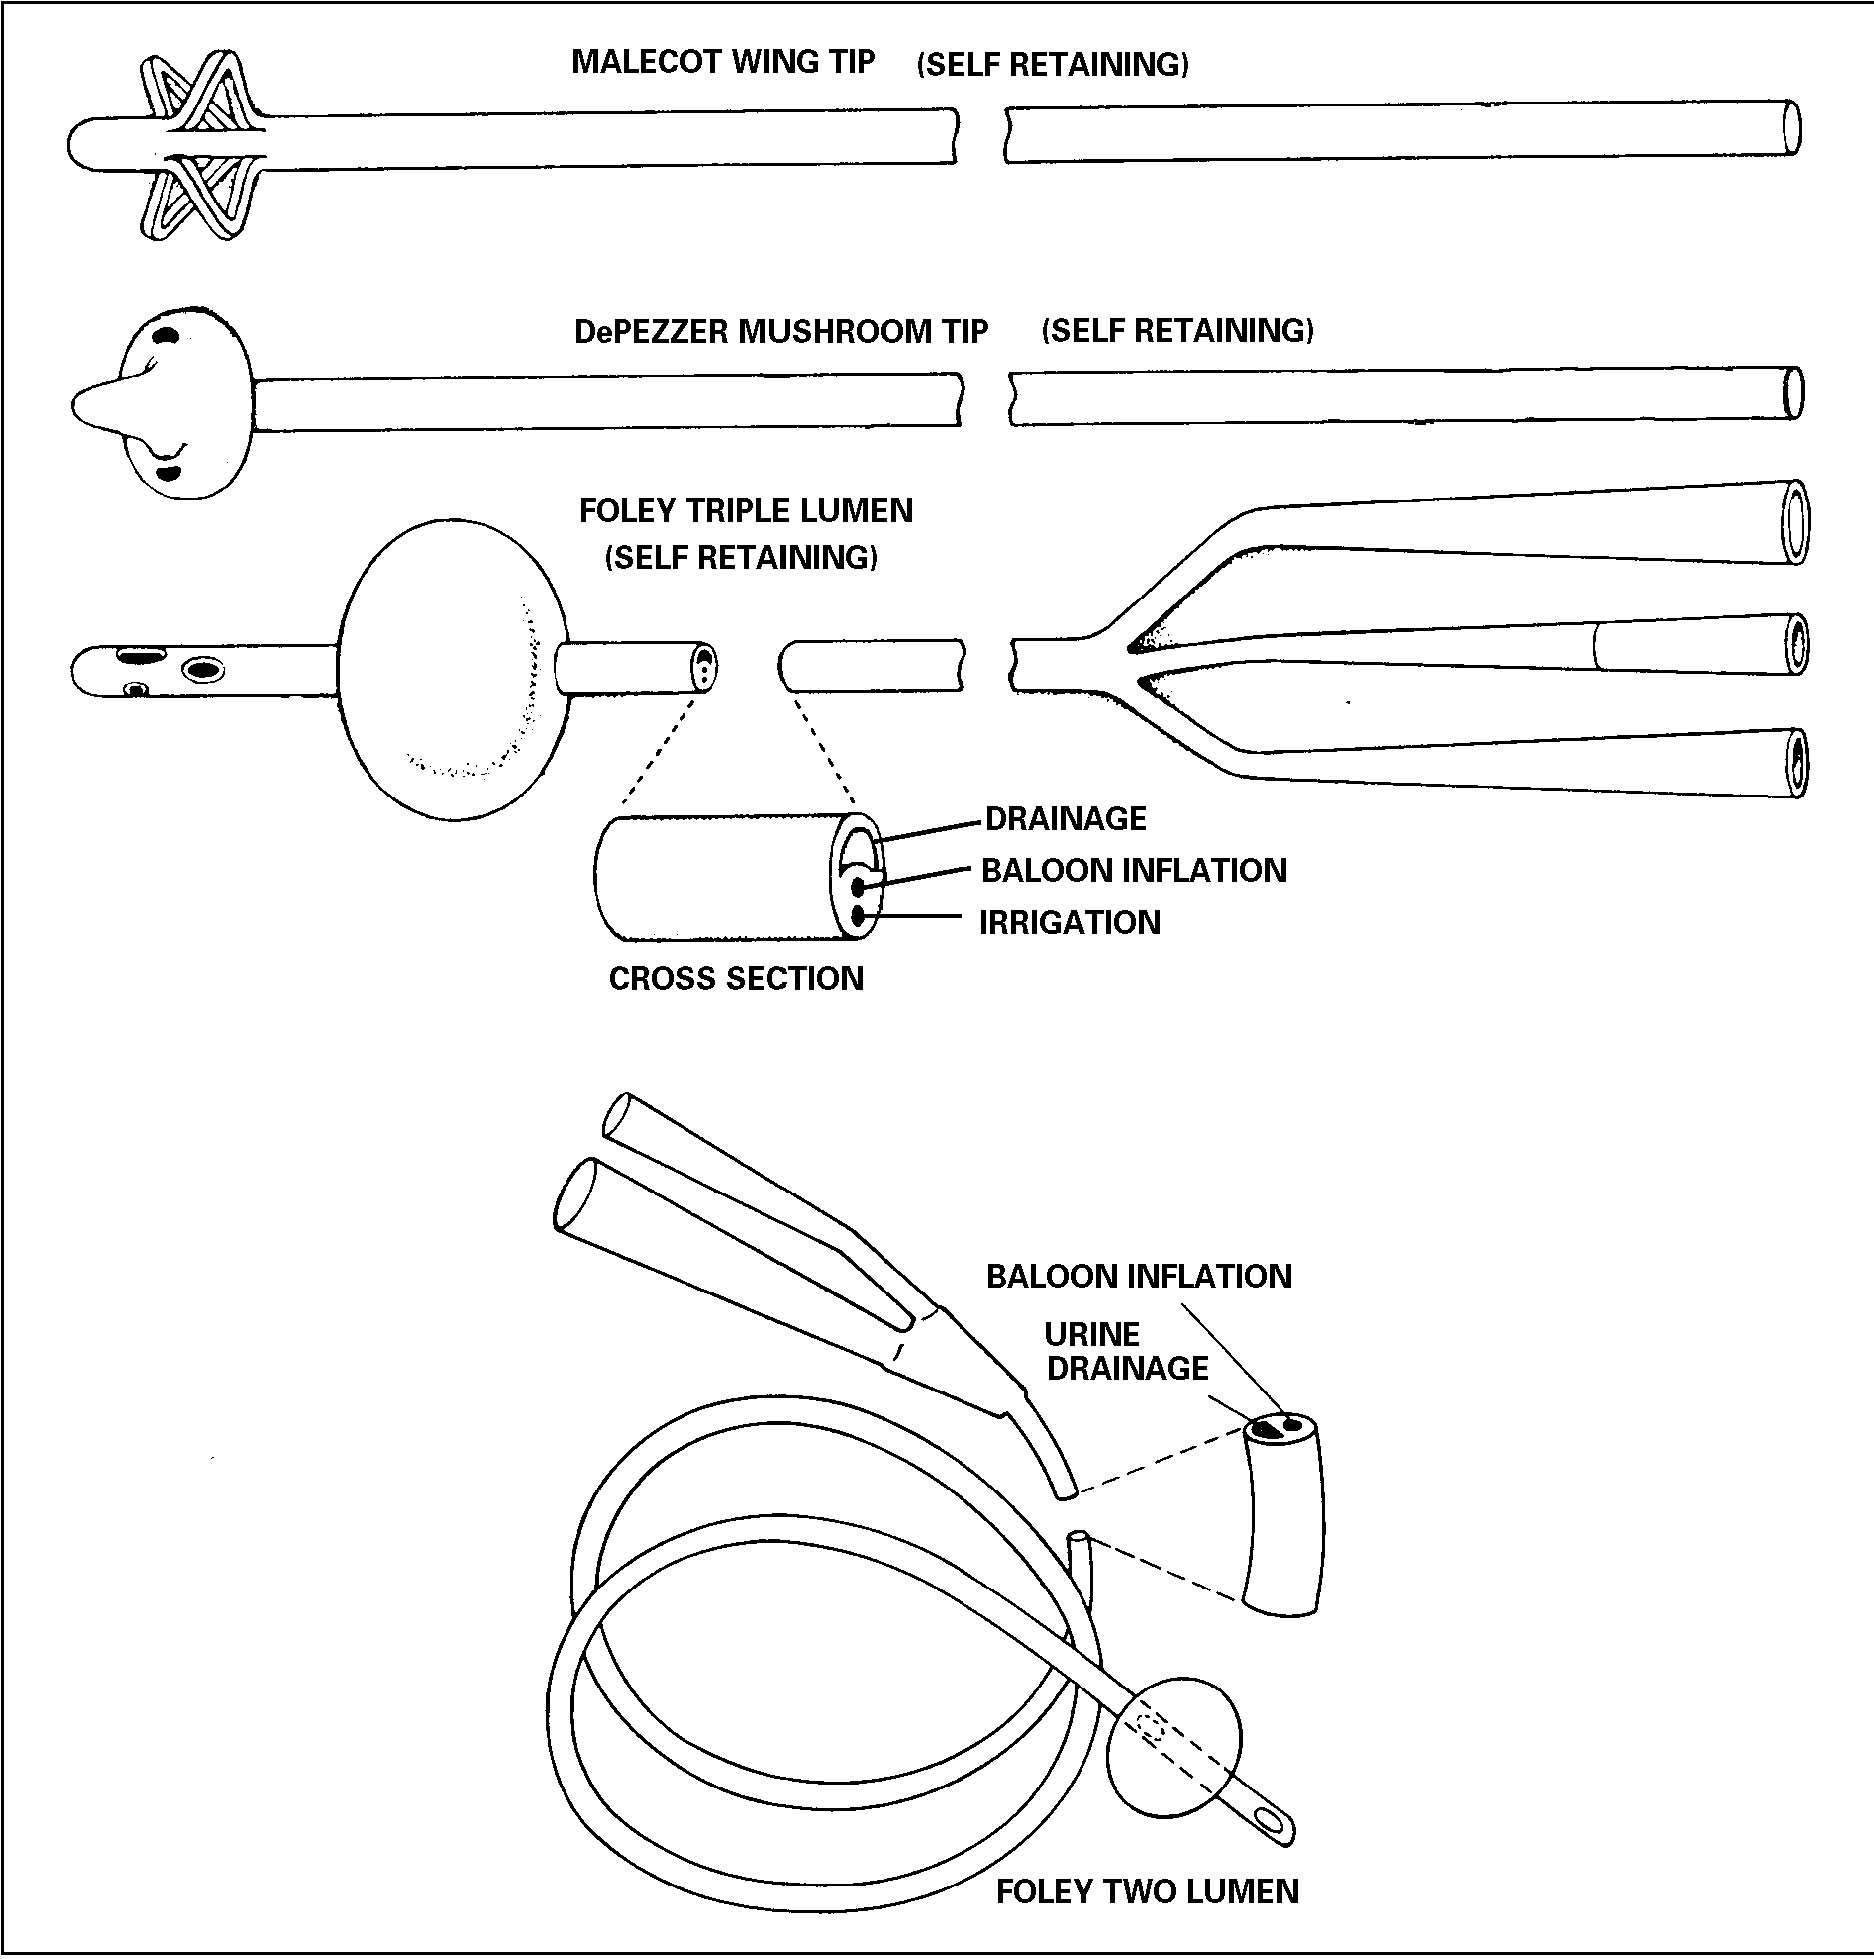
a. Intermittent Catheter. An intermittent catheter is used to drain the bladder for short periods (5-10 minutes). It may be inserted by the patient.
b. Retention/Indwelling Catheter. This type of catheter is placed into the bladder and secured there for a period of time. It is used following surgery, bladder injury, or in bladder infections. It may also be used for an incontinent or nonresponsive patient.
(1) It provides continuous temporary or permanent drainage of urine.
(2) It is used for gradual decompression of an over distended bladder.
(3) It is used for intermittent drainage and irrigation.
(4) The most commonly used indwelling catheter is the Foley catheter. A drainage tube and collection device are connected to the catheter. It has a balloon at the distal end, which is inflated with sterile water or saline to prevent the catheter from slipping out of the bladder. It is multi-lumened (having several passages within the catheter). One lumen provides a passage for fluid to inflate the balloon. This passage may be self-sealing or may require a clamp. The second lumen is the passage through which the urine drains. Some indwelling catheters have a third lumen for instilling irrigation fluid.
c. Supra Pubic Catheter. This type of catheter is inserted into the bladder through a small incision above the pubic area. It is used for continuous drainage.
3-5. PREPARING FOR CATHETERIZATION
A catheter should be used only when absolutely necessary and the catheterization procedure itself should be done only by trained personnel under sterile conditions. Infection is a major risk of urinary catheterization.
a. Gather All Equipment.
(1) Disposable indwelling catheter kit. The kit contains the required equipment needed for catheterization and is packaged to ensure that the equipment is sterile. The kit includes the catheter, a drape, a receptacle to receive urine, materials to clean the area of insertion, a lubricant, a specimen container, and sterile gloves.
(2) Flashlight or lamp.
(3) Urine collection bag.
(4) Velcro leg strap or anchoring tape.
(5) Disposal bag.
(6) Waterproof pad or Chux®.
b. Explain the Procedure to the Patient. Advise the patient that he may feel a burning sensation and pressure as the catheter is inserted, and that he will feel that he needs to void after the catheter is in place. Do not suggest to the patient that he may feel pain; however, introducing a catheter in swollen or injured tissue may cause discomfort.
c. Provide for Privacy and Adequate Lighting.
(1) Close the door or pull the curtain surrounding the patient’s bed and position the flashlight or lamp at the end of the bed.
(2) Position the female patient in a dorsal recumbent position with the knees flexed and the feet about two feet apart. Place Chux® under the patient’s buttocks. Cover the upper body and each leg. Place the catheter set between the female patient’s legs.
(3) Position a male patient in a supine position. Place Chux® under the patient’s buttocks. Drape the patient so that only the area around the penis is exposed. Place the catheter set next to the legs of the male patient.
3-6. INSERTING THE FOLEY CATHETER IN A MALE PATIENT
The following procedures are used to insert the Foley catheter in a male patient.
a. Cleanse the genital and perineal areas with warm soap and water. Rinse and dry.
b. Wash your hands carefully.
c. Open the sterile catheterization kit, using sterile technique.
d. Put on the sterile gloves.
e. Open the sterile drape and place on the patient’s thighs. Place fenestrated drape with opening on the penis.
f. Apply sterile lubricant liberally to the catheter tip. Lubricate at least six inches of the catheter. Leave the lubricated catheter on the sterile field.
g. Pour the antiseptic solution over the cotton balls.
h. Place the urine specimen collection container within easy reach.
i. Grasp the patient’s penis between your thumb and forefinger of your nondominant hand. Retract the foreskin of an uncircumcised male. The gloved hand that has touched the patient is now contaminated.
j. Use the forceps to hold the cotton balls (figure 3-2). This will maintain the sterility of one hand. Using the forceps, pick up one cotton ball and swab the center of the meatus outward in a circular manner.
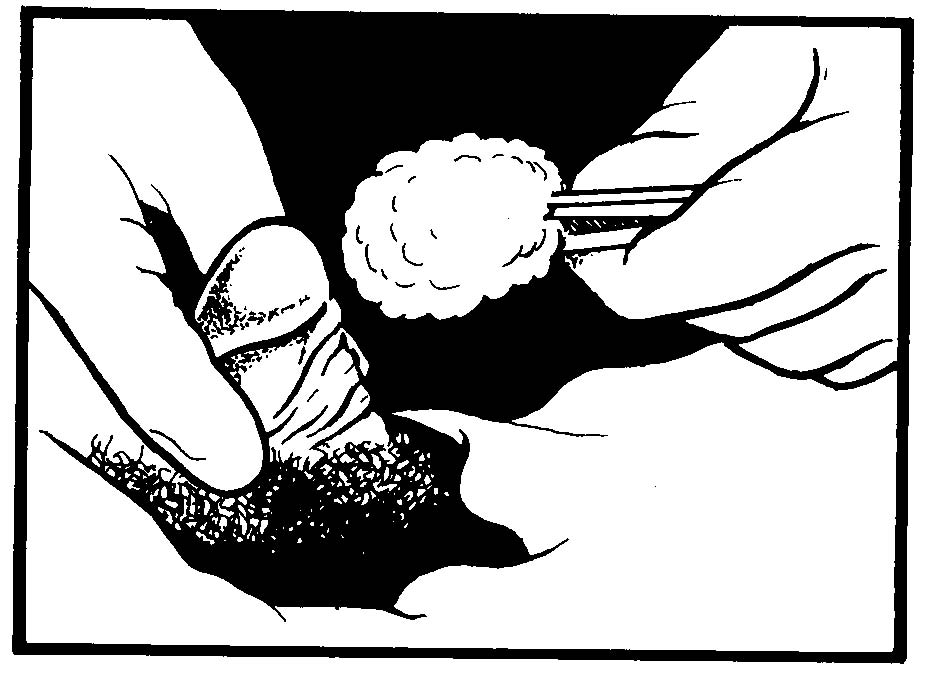
k. Continue outward, using a new cotton ball for each progressively larger circle. Clean the entire glands. Deposit each cotton ball in the disposal bag. After the last cotton ball is used, drop the forceps into the disposal bag as well.
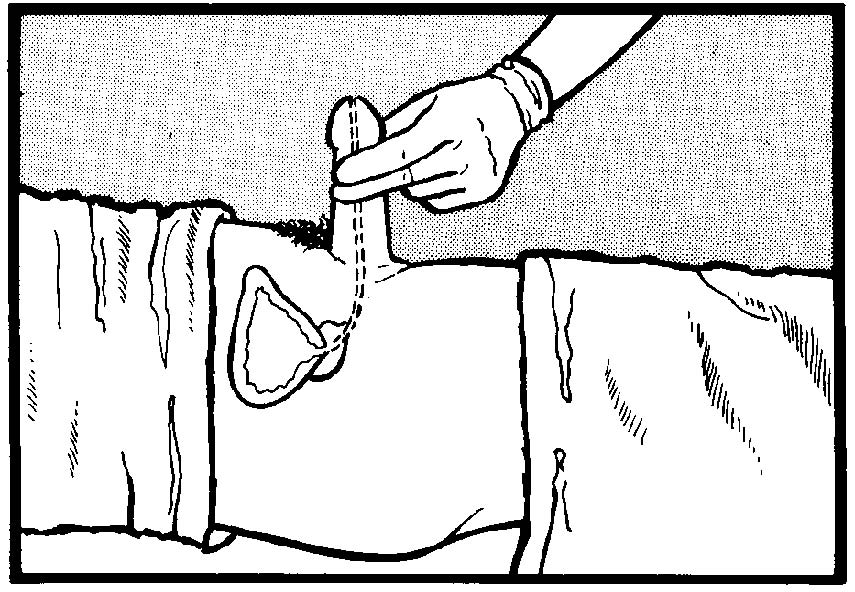
l. Hold the penis at a 90-degree angle (figure 3-3). Advance the catheter into the patient’s urinary meatus. You may encounter resistance at the prostatic sphincter.
(1) Pause and allow the sphincter to relax.
(2) Lower the penis and continue to advance the catheter.
NOTE: Never force the catheter to advance. Discontinue the procedure if the catheter will not advance or the patient has unusual discomfort. Get assistance from the charge nurse or physician.
m. When the catheter has passed through the prostatic sphincter into the bladder, urine will start to flow into the collection bag if it is preconnected. If it is not preconnected, collect a specimen if required, then place the end of the catheter into the tubing of the sterile receptacle.
n. Attach the syringe to the balloon port and inject the water slowly to inflate the balloon. Connect the urine collection bag if it is not preconnected.
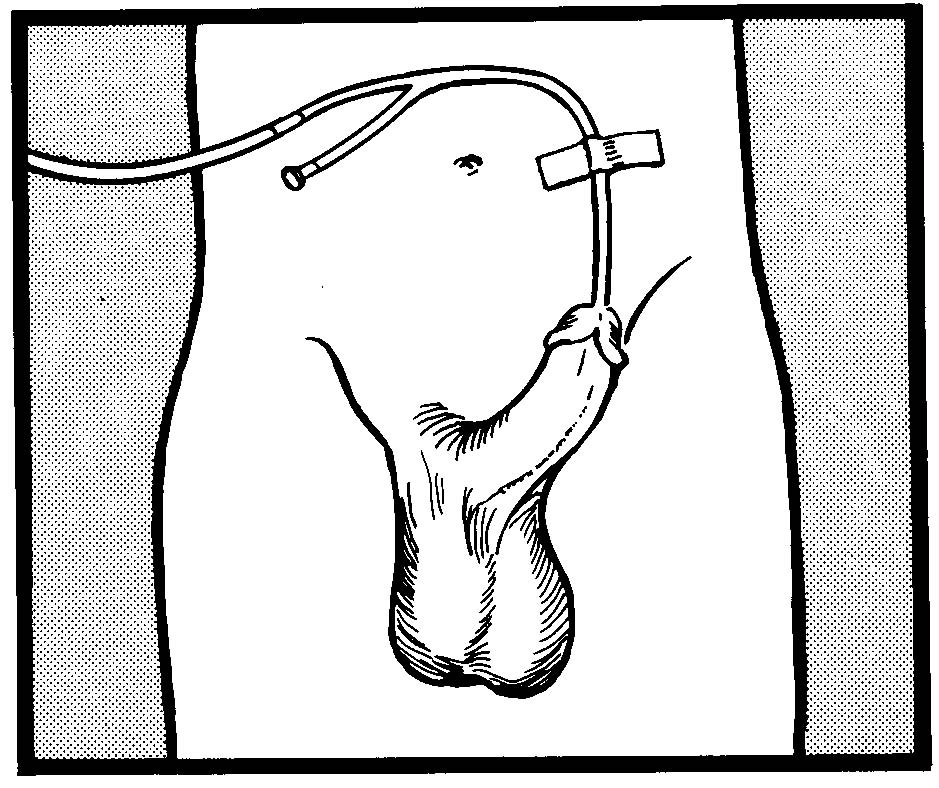
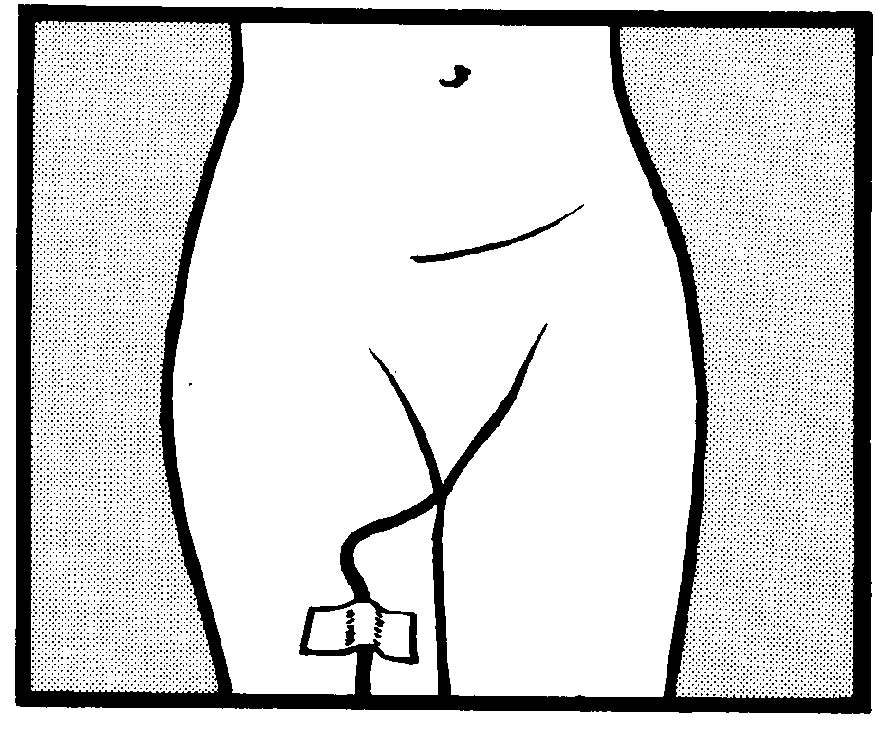
o. Anchor the catheter tubing to the lateral abdomen with tape (figure 3-4).
p. Secure the urinary collection bag below the level of the bladder and off the floor. Coil any extra tubing on the bed.
q. Remove your gloves, the drapes and protectors from around the patient, and any lubricant or antiseptic on the patient’s skin.
r. Discard disposable equipment and return reusable equipment to the appropriate area.
s. Record the time that the procedure was done and by whom, the patient’s reaction to the procedure, all patient teaching done and the patient’s level of understanding. Report any significant observations to the charge nurse to include:
(1) The amount, color, and clarity of the urine.
(2) Any difficulties with the procedure.
(3) The presence of blood in the urine.
3-7. INSERTING THE FOLEY CATHETER IN A FEMALE PATIENT
The following procedures are used to insert the Foley catheter in a female patient.
a. Wash the area around the meatus with warm soap and water. Rinse and dry.
b. Wash your hands.
c. Open the sterile catheterization kit, using sterile technique.
d. Put on sterile gloves.
e. Place the fenestrated drape on the patient with the hole over the female genitalia.
f. Apply sterile lubricant liberally to the catheter tip. Lubricate at least three inches of the catheter for the female. Leave the lubricated catheter over the cotton balls.
g. Place the urine specimen collection container within reach.
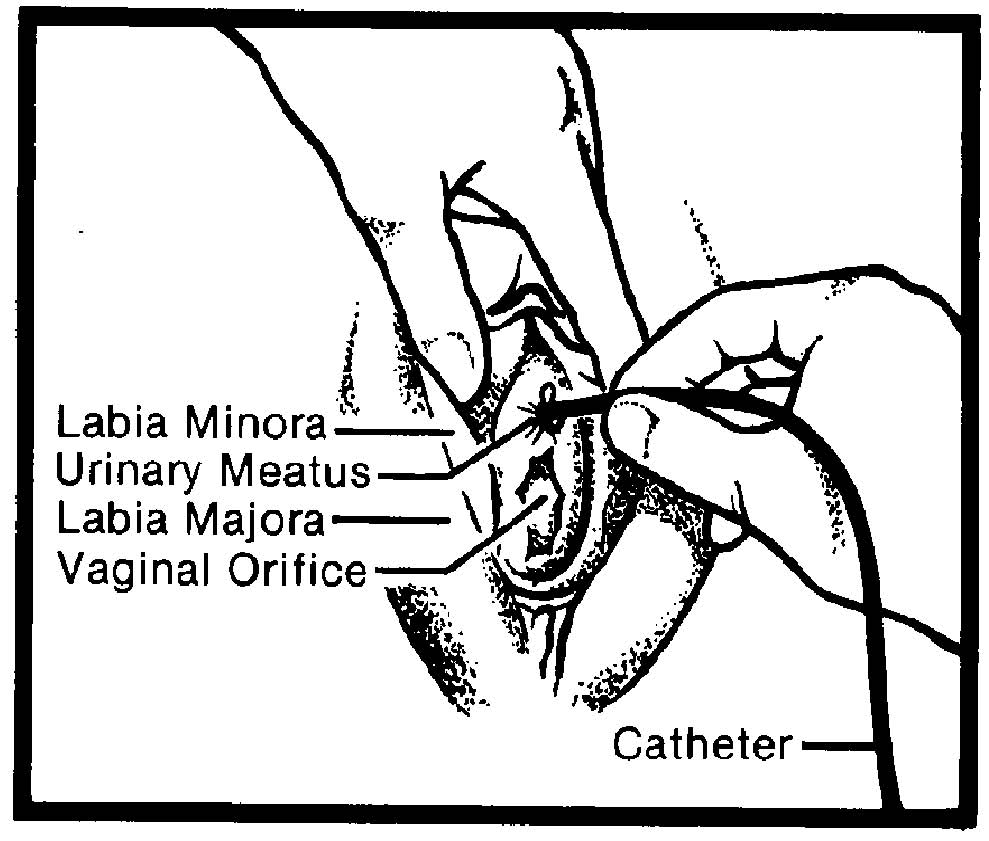
h. Place the thumb and forefinger of your nondominant hand between the labia minora, spread and separate upward. The gloved hand that has touched the patient is now contaminated.
i. Using the forceps, pick up a cotton ball saturated with antiseptic solution. Use one cotton ball for each stroke. Swab from above the meatus downward toward the rectum.
j. Keeping the labia separated, cleanse each side of the meatus in the same downward manner (figure 3-5). Do not go back over any previously cleansed area.

k. Deposit each cotton ball into the disposal bag. After the last cotton ball is used, deposit the forceps into the bag as well.
l. Continue to hold the labium apart after cleansing. Insert the lubricated catheter into the female patient’s urinary meatus (figure 3-6).
m. Angle the catheter upward as it is advanced. If the catheter will not advance, instruct the patient to inhale and exhale slowly. This may relax the sphincter muscle. Do not force the catheter.
n. When urine starts to flow, insert the catheter approximately one inch further. Place the cup under the stream of flowing urine to obtain a sterile specimen if required.
o. Hold the catheter in place while the urine drains into the collection container.
NOTE: If the catheter is inadvertently placed in the patient’s vagina, leave it in place temporarily. Insert another catheter properly by repeating the entire procedure using another sterile set; then remove the catheter from the vagina.
p. Attach the syringe to the balloon port of the catheter. Inject the water slowly to inflate the balloon. If the water will not inject easily or the patient complains of pain, deflate the balloon completely and advance the catheter further, then re-inflate.
q. Remove the syringe. To position the balloon correctly, pull on the catheter gently until you feel resistance.
r. Connect the drainage bag to the catheter. Secure the catheter to the inner aspect of the female patient’s thigh (figure 3-7).
s. Attach the urinary drainage bag to the bed, below the level of the bladder but off the floor. Coil any extra tubing on the bed.
t. Remove any lubricant or antiseptic on the patient’s skin. Remove your gloves, the drapes and the Chux® from around the patient.
u. Discard disposable equipment and return reusable equipment to the appropriate area.
v. Record the time that the procedure was done and by whom, the patient’s reaction to the procedure, all patient teaching done, and the patient’s level of understanding. Report observations to the charge nurse to include:
(1) The amount, color, and clarity of the urine.
(2) Any difficulty with the procedure.
(3) The presence of blood in the urine.
3-8. MAINTAINING AN INDWELLING CATHETER
When an indwelling or retention catheter is inserted, the nurse is responsible for the daily care required to maintain proper drainage and reduce the possibility of an infection occurring. Always have a confident, reassuring, and professional attitude when maintaining the catheter so that the patient will not feel embarrassed.
a. Wash your hands before and after caring for the patient and wear gloves when handling an indwelling catheter.
b. Clean the perineal area with soap and water twice daily and after each bowel movement, especially around the meatus. Use a separate area of the cloth for each stroke.
c. In some cases, an antiseptic may be used for perineal care. Povidone iodine (Betadine) is most commonly recommended.
d. Avoid use of lotions or powder in the perineal area.
e. Arrange for the patient to take a shower or tub bath when permitted. The collecting container may be hung over the side of the tub. The catheter should be clamped temporarily if the collecting container is higher than the bladder.
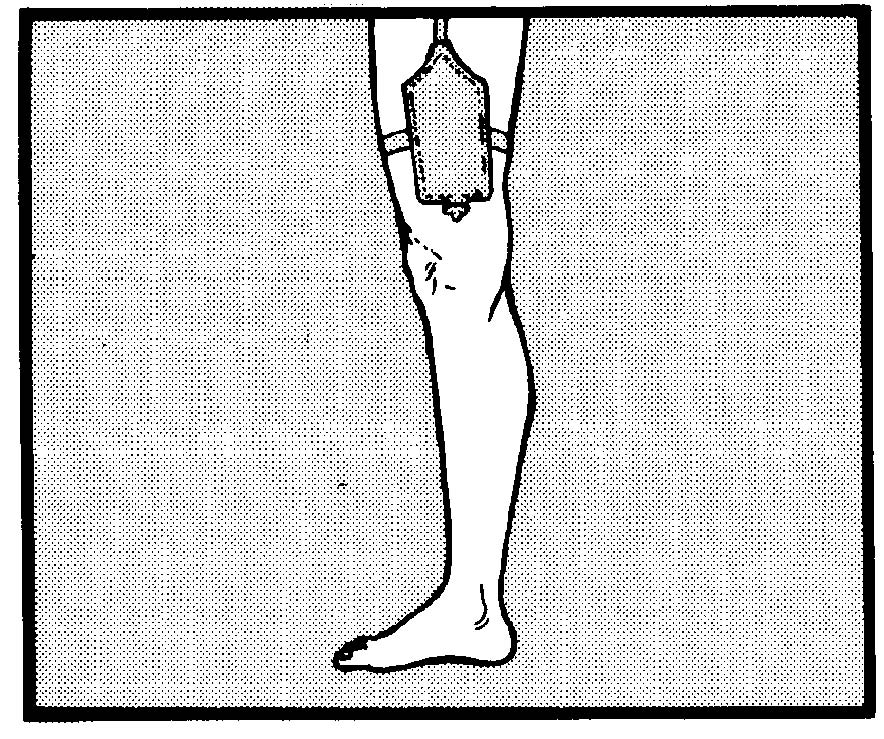
f. A leg bag (figure 3-8) may be worn in the shower. This device allows the ambulatory patient to move about freely and dress in his usual clothing. Keep the tubing intact and free of kinks.
g. Open the port at the bottom of the urinary collecting bag. This permits all the connections and tubing between the catheter and drainage device to remain closed while permitting you to measure and dispose of accumulated urine.
h. Teach the patient to maintain the catheter. Self-care helps the patient develop a feeling of independence and promotes cleanliness. If the patient is ambulatory, instruct him in use of the leg bag. Encourage the patient to intake 2500 cc to 3000 cc of fluid daily.
i. Change the indwelling catheter as necessary or in accordance with local policy.
3-9. IRRIGATING AN INDWELLING CATHETER
The purpose of irrigating a catheter is to remove particles that are interfering with the drainage of urine. A catheter that drains well does not need irrigating, except to instill medication. If the patient has a generous fluid intake (2500 cc to 3000 cc of fluid daily), the increase in urine production will dilute the particles that form and irrigate the catheter naturally; thus, invasive procedures may be avoided. Because the drainage system is opened when irrigation takes place, sterile technique is followed.
a. Gather sterile supplies and equipment:
(1) Asepto syringe.
(2) Basin.
(3) Tubing protector.
(4) Gauze moistened with antiseptic.
(5) Sterile normal saline (or other irrigation solution).
b. Using gauze moistened with antiseptic solution, wipe the area where the catheter and tubing join.
NOTE: Some catheters have a self-sealing port with a separate lumen through which irrigation solution may be instilled (see figure 3-9). This allows irrigation without separation of the catheter from the collecting device and reduces the possibility of contamination.
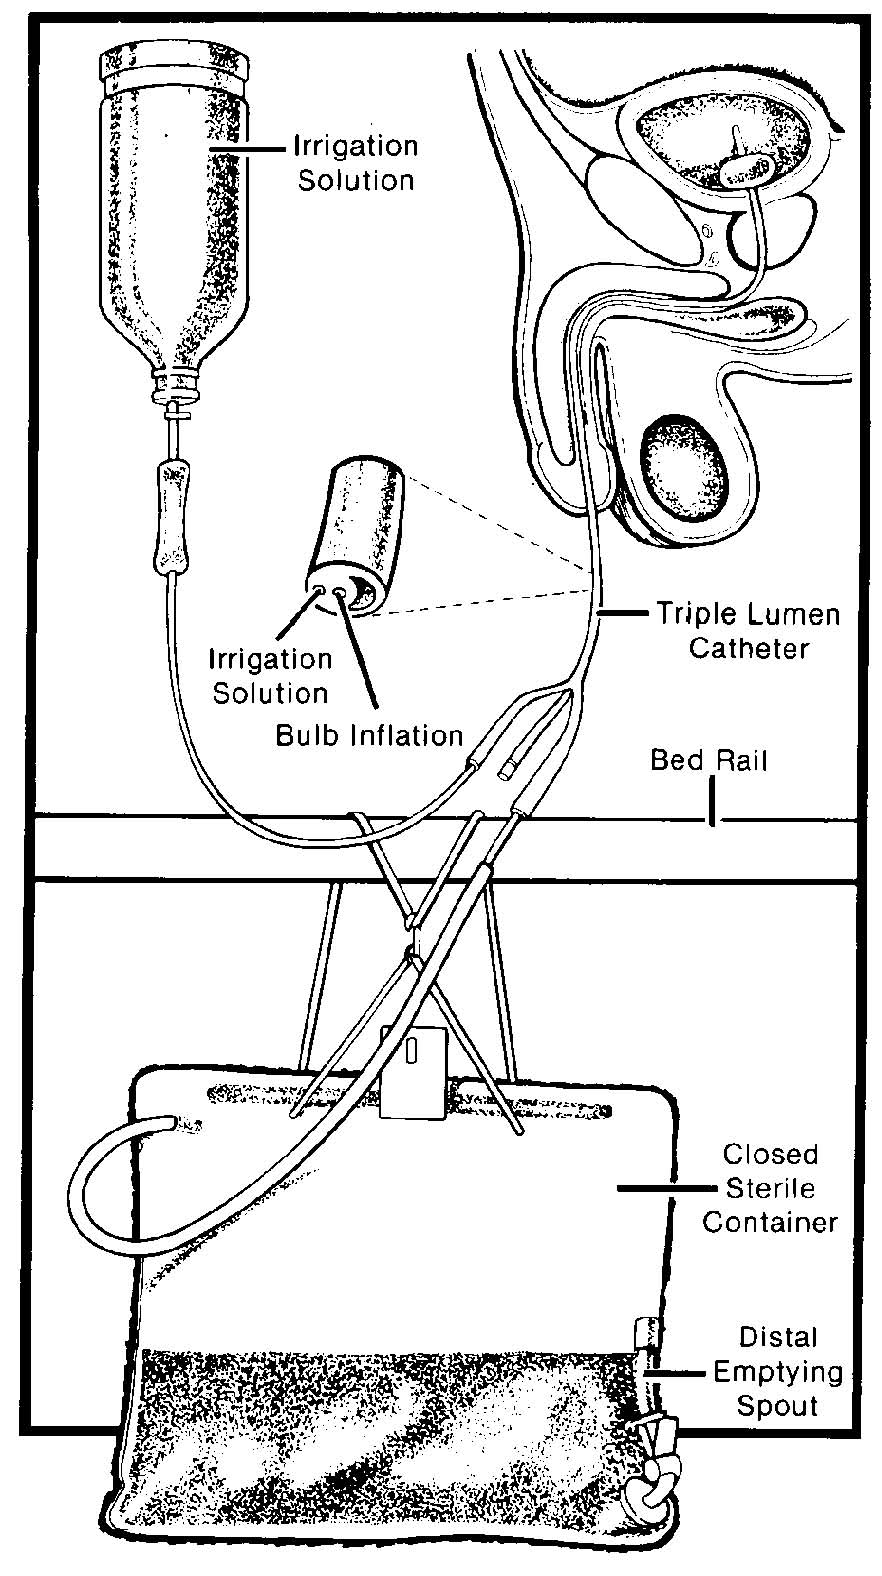
c. Place the sterile tubing protector on the end of the drainage tubing. An alternative is to cover the opening with sterile gauze moistened with antiseptic.
d. Fill the syringe with 30 to 60 cc of solution and insert the syringe tip well into the end of the catheter.
e. Gently compress the ball or end of the syringe to instill the irrigating solution. Do not apply force. Replace the catheter if it cannot be irrigated.
f. Allow the instilled solution to flow back into the basin by gravity.
g. Connect the catheter and drainage tube.
h. Note the total amount of solution used for irrigating and measure the amount of solution returned in the basin. In some cases there is less solution returned than solution instilled. Both amounts must be recorded. The amount that remains will eventually drain into the collection bag.
i. Discard the solution drained into the basin. Replace or protect the irrigating equipment.
j. Record that the irrigation was done, by whom, and the patient’s response to the procedure.
3-10. REMOVING AN INDWELLING CATHETER
Eventually, a catheter must be removed because the need for it no longer exist or it is crusting and must be changed. The nurse usually removes the catheter.
a. Assemble all supplies and equipment.
(1) 10 cc syringe.
(2) Washcloth and towel.
(3) Exam gloves.
(4) Soap and water.
(5) Chux®
b. Identify the patient and explain the procedure to him. Advise him that there will be a slight burning during removal of the catheter.
c. Provide privacy and assist the female patient into a dorsal recumbent position. The male should be in a supine position. Place Chux® under the patient’s buttocks and provide proper draping.
d. Wash your hands and put on exam gloves.
e. Empty the balloon by inserting the barrel of the syringe and withdrawing the amount of fluid used during inflation.
f. Pinch off and gently pull on the catheter near the point where it exits from the meatus.
g. Clean the perineum or penis with soap and water. Dry the area well.
h. Inspect the catheter to be sure no remnants remained in the bladder. If the catheter is not totally intact, report this promptly and save the catheter for further inspection.
i. Empty the drainage bag. Measure the amount of urine and record on the intake and output (I&O) sheet.
j. Remove the gloves and wash your hands.
k. Discard disposable supplies and return reusable supplies and equipment to the appropriate area.
l. Record that the catheter was removed, the time and date and by whom. Note the amount, color, and clarity of the urine in the drainage bag. Also document all patient teaching done and the patient’s level of understanding.
m. After removal of the catheter, assess the patient for 24 hours for patterns of urinary elimination. Note the time and amount of the first voided urine. Report any of the following:
(1) Inability to void within 8 to 10 hours.
(2) Frequency, burning, dribbling, or hesitation in starting the stream of urine.
(3) Cloudiness or any other unusual color or characteristic of the urine.
n. Provide a level of fluids similar to the intake when the catheter was in place.
o. Record that the catheter was removed, the date and time, and by whom.
3-11. CLOSING
Catheterization can be done without embarrassment and with little discomfort for both the male and female patient. Your observation of urinary output and characteristics of the urine aids in early detection of infection or any other complications. Always remember, you are accountable for responsible care and the safety of the patient.