This is the Archived Desktop Edition.
You should be transferred to the Newest Edition for Desktop and Mobile within 2 seconds.
![]()
Multimedia Edition
Section III. ADMINISTER AN INTRADERMAL INJECTION
a. An intradermal (ID) injection is the injection of a small amount of fluid into the dermal layer of the skin (see figure 2-10). It is frequently done as a diagnostic measure, such as for tuberculin testing (screening test for tuberculosis referred to as a tine test) and allergy testing (placing very small amounts of the suspected antigen or allergen in a solution under the skin). The intradermal injection is made in skin areas of the body that are soft and yielding.
b. Often the tuberculin syringe is the only syringe with fine enough calibrations to measure the minute dose that is used. A 26-gauge needle, which is one-fourth to one-half inch in length, is usually selected. The fluid is in a small welt or "wheal" (a small swelling of the skin due to the medication placed under the skin) just under the surface of the skin and between its layers.
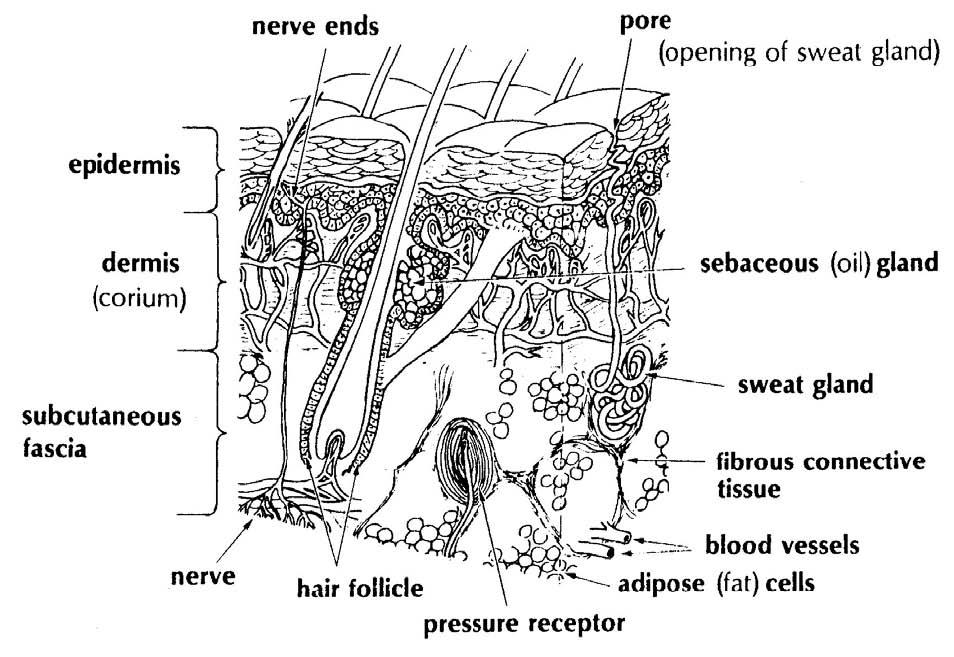
Figure 2-10. The layers of skin.
2-7. PROCEDURE FOR ADMINISTERING AN INTRADERMAL INJECTION
a. General. Follow procedures outlined in paragraph 2-3 a through h. Use only acetone or alcohol to clean injection site and allow the area to dry before injection is administered.
b. Select Injection Site and Prepare Patient.
(1) Selecting site. Usually palmer (inner) forearm or subscapular region of the back is selected. The site selected should be an easily obtainable area and relatively free from being rubbed by clothing.
(2) Position patient. To position the patient, proceed as follows:
(a) Place arm in a relaxed position, elbow flexed.
(b) Place palm up, exposing palmer or inner arm area.
c. Prepare Injection Site. Refer to paragraph 2-3a.
d. Remove Needle Guard. Pull the guard straight off.
e. Stabilize Injection Site.
(1) Using your nondominant thumb, apply downward pressure, directly below and outside the prepared injection site. (Do not draw the skin back or move the skin to the side because the skin will return to its normal position when pressure is released and will cause the needle bevel to either go deeper into the skin or to leave the skin, depending upon which direction the skin moves.)
(2) Hold the skin taut until the needle bevel has been inserted between the skin layers (see figure 2-10).
f. Insert Needle.
(1) Using your dominant hand, hold syringe, bevel up, with fingers and thumb resting on the sides of the barrel. If you insert the needle at a 20 degree angle, lower it at once to 15 degrees. Do not place thumb or fingers under syringe because this will cause the angle of insertion to exceed 15 degrees causing the needle to insert beyond the dermis.
(2) Insert needle, bevel up, just under the skin at an angle of 15 to 20 degrees until the bevel is covered (see figure 2-11). Continue stabilizing thumb pressure. You should feel some resistance. If the needle tip moves freely, you have inserted the needle too deeply. At this point, withdraw needle slightly and check again for resistance.
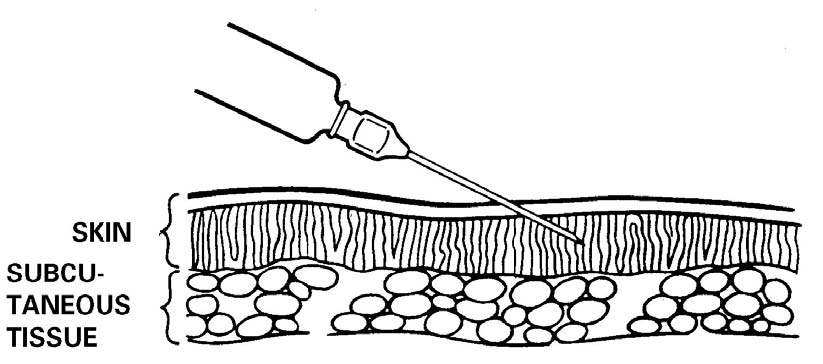
Figure 2-11. Position of needle.
g. Inject Medication. It is not necessary to aspirate the syringe since no large vessels are commonly found in the superficial layer of the skin. Inject the medication as follows:
(1) Continue holding syringe with same hand.
(2) Release skin tension with other hand.
(3) With free hand, push plunger slowly forward until the medication is injected and a wheal appears at the site of the injection. The appearance of a wheal indicates that the medication has entered the area between the intradermal tissues. If a wheal does not appear, withdraw the needle and repeat the procedure in another site.
h. Withdraw Needle. To withdraw the needle, quickly withdraw it at the same angle that it was inserted.
i. Cover Injection Site. Without applying pressure, quickly cover injection site with a dry sterile small gauze.
j. Perform Postinjection Patient Care. Refer to paragraph 2-3u.
k. Evaluate Reaction of Medication. Usually you, as the medical specialist, will not evaluate the reaction of a suspected allergic reaction or a tuberculin test, but will record the reaction. For a tuberculin test, the patient will wait 48 to 72 hours and then return to have an evaluation to determine if the patient has been exposed to tuberculosis. If the intradermal injection is done to determine if the patient is allergic to dust, pollen, or similar substances, a reaction will take place in a few minutes after the substance has been placed under the skin.
(1) Instruct the patient to wait or return to have the test read according to local SOP.
(2) Caution patient not to rub, scratch, or wash injection site. Rubbing, scratching, or washing may spread or dilute the medication, causing a false reading at a later time.
l. Dispose of Equipment. Dispose of equipment according to local SOP.
m. Record Administration of Intradermal Injection. Record the injection information on the patient's chart or record.
|
|
|
The Brookside Associates Medical Education Division is dedicated to the development and dissemination of medical information that may be useful to medical professionals and those in training to become medical professionals. This website is privately-held and not connected to any governmental agency. The views expressed here are those of the authors, and unless otherwise noted, do not necessarily reflect the views of the Brookside Associates, Ltd., any governmental or private organizations. All writings, discussions, and publications on this website are unclassified.
© 2007, 2014 Medical Education Division, Brookside Associates, Ltd. All rights reserved
![]()