This is the Archived Desktop Edition.
You should be transferred to the Newest Edition for Desktop and Mobile within 2 seconds.
![]()
Multimedia Edition
Section I. ADMINISTER AN INTRAMUSCULAR INJECTION
This lesson discusses the procedures for administering the three types of injections. The basic preparation (checking the doctor's order, washing hands, assembling needle and syringe, and drawing medication) is basically the same for all types of administering medication.
Remember that this subcourse by itself does not present sufficient training for you to be proficient in administering injections. You need "hands-on" training under the guidance of a qualified person before you begin administering injections.
An intramuscular (IM) injection is the preferred route of administering medication when fairly rapid-acting and long-lasting dosage of medication is required. Some medications that are irritating to the subcutaneous tissue may be given into the deep muscle tissue. Injection of medication into muscle tissue forms a deposit of medication that is absorbed gradually into the bloodstream. An intramuscular injection is the safest, easiest, and best tolerated of the injection routes. Remember the following guidelines:
a. The needle should be not less than one inch in length or more than one and one-half inches long (20 to 22 gauge). A needle one and one-fourth inches long (20 to 22 gauge) is commonly used.
b. A maximum volume of medication of five milliliters per injection can be administered at one site to an adult.
2-3. PROCEDURE FOR ADMINISTERING AN INTRAMUSCULAR INJECTION
NOTE: The steps are basically the same for all the types of injections.
a. Check Doctor's Orders and Obtain Medication. Of course, no injection is given without the doctor's orders. The orders are checked to ensure correct medication is obtained and administered. The correct dosage may already be prepared by the hospital pharmacy.
b. Gather Equipment. You will need a needle and syringe, antiseptic pads, adhesive bandages (such as Band-Aid), and an emergency cart. The emergency cart, which contains equipment and materials to treat a patient in case of anaphylactic shock and cardiac arrest, should be available in the immediate area. IAW AR 40-562, an anaphylaxis tray with specific contents must be maintained in every room where immunizations are administered. Cardiac arrest may develop as a result of anaphylactic shock, which can be caused by very small amounts of strange substances.
c. Wash Hands. Use the patient care handwash procedures.
d. Assemble Needle and Syringe. Use the procedures discussed in the first lesson of this subcourse. Remember to adhere to strict aseptic techniques.
e. Check Expiration Date of Medication. Do not use a medication whose expiration date has passed. Discard or return the medication to the pharmacy IAW local policy.
f. Draw Medication into Syringe. Do not combine immunizations or other medications into one syringe unless specifically ordered by the physician. Normally these types of medications will be prepared by the pharmacy.
g. Identify Patient. Refer to the patient's wrist-name tag for the patient's name or ask the patient, "What is your name?" and compare to the doctor's orders.
h. Prepare the Patient.
(1) Ask the patient about any known allergies before you administer any medication. You should ask about specific allergic reactions such as penicillin, eggs, or horse serum to refresh his memory. You should refer to his chart to see if any allergies are listed. If the patient is a young child or an older person, they may not be able to tell you. If there is a known allergy, consult the senior medical person in the area for guidance. Do not administer the injection if you are not sure there are no allergies. Allergic reactions can make the patient very sick or even cause death.
(2) Ask females about the possibility of current pregnancy. Some medications can cause severe birth defects if given to the mother during pregnancy. If there is a possibility of pregnancy, do not administer the injection. Refer the patient to the physician or senior medical person.
(3) Provide privacy for the patient if injecting in the buttocks or lateral thigh. Be sure to abide by a local SOP.
(4) Tell the patient about the injection procedure. Be sure to wake up a patient if he has been sleeping. If a patient is unconscious and you think he cannot understand what you are telling him, tell the patient anyway. A patient may be frightened and/or violent. If this is the case, you must seek assistance.
i. Select Injection Site and Position Patient. An intramuscular injection is usually given in the buttocks, thigh, or the upper arm area. If the medication is more than 1 cc, give the injection in the buttocks. The amount of medication determines the selection of the site.
(1) Buttocks. The buttocks are the preferred site for administration of the intramuscular injection. The muscles (gluteal) of this area are thick and are utilized frequently in daily activities, thus causing complete absorption of drugs.
(a) Using care in choosing the location for administering the injection will minimize the possibility of hitting a bone, large blood vessel, or the sciatic nerve.
(b) To identify the injection site, draw an imaginary horizontal line across the buttocks from hip bone to hip bone. Then divide each buttock in half with an imaginary vertical line (see figure 2-1). The four imaginary sections of the buttock are referred to as quadrants. The proper location for an injection is in the upper outer quadrant of either buttock.
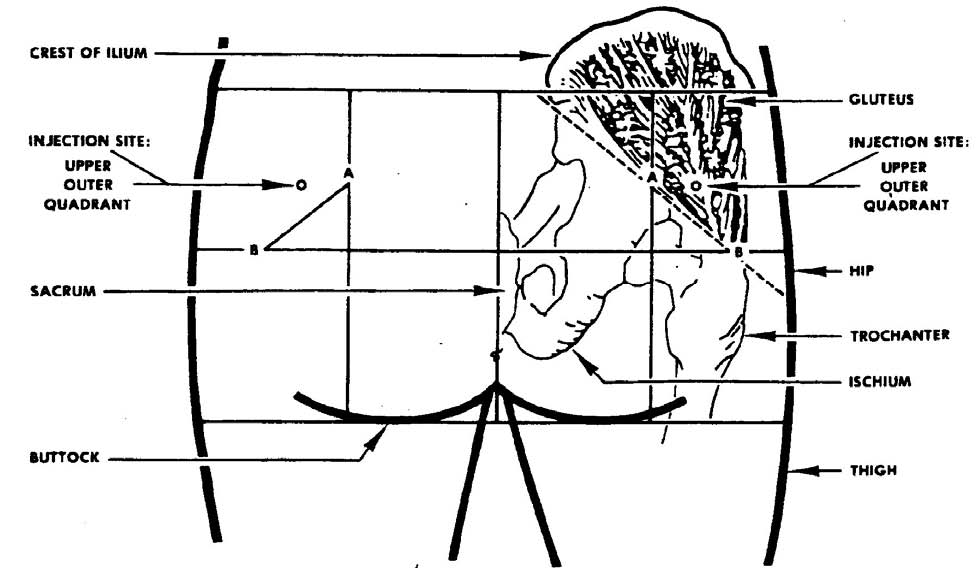
Figure 2-1. Intramuscular injection site in the buttocks (upper, outer quadrant).
(c) Remember, if an injection is given outside of the upper outer quadrant, irreparable injury may be done to the sciatic nerve or the needle may penetrate the gluteal artery and this can cause significant bleeding from the vessel.
(d) If 5 cc is to be given, the medication should be divided into 2 doses and injected into separate sites with a maximum of 2.5 cc per dose.
(e) The needle length should not exceed one and one-half inches. A one and one-fourth inch needle is commonly used.
(f) If the patient is receiving a number of intramuscular injections over a prolonged period, the site of injection should be rotated. A record in sites must be kept on the patient's chart for this purpose.
(g) Expose the buttocks to make sure you do not make an error in determining the location of the injection. The patient will lie face down with toes together and heels apart. This position relaxes the muscles of the buttocks (see figure 2-2).

Figure 2-2. Patient in prone position for intramuscular injection in the buttocks.
(h) If no bed, cot, or table is available for the patient to lie on, the patient may be instructed to support himself with a nearby object (such as a chair). Be sure you can visualize the entire buttocks to assure identification of the injection site. The patient will lean over and shift his weight to one leg. In this position, the buttock muscles will relax in the hip not bearing the body weight. You will be able to give an injection in the gluteus medius muscle with minimal discomfort to the patient.
(2) Lateral thigh (vastus lateralis muscle). The vastus lateralis muscle, part of the quadriceps group of four muscles of the upper leg, is located on the outer, lateral thigh. The injection site is about a hand's width above the knee to a hand's width below the groin (or hip joint) (see figure 2-3). Injections outside this area may hit a bone, a nerve, or blood vessel.
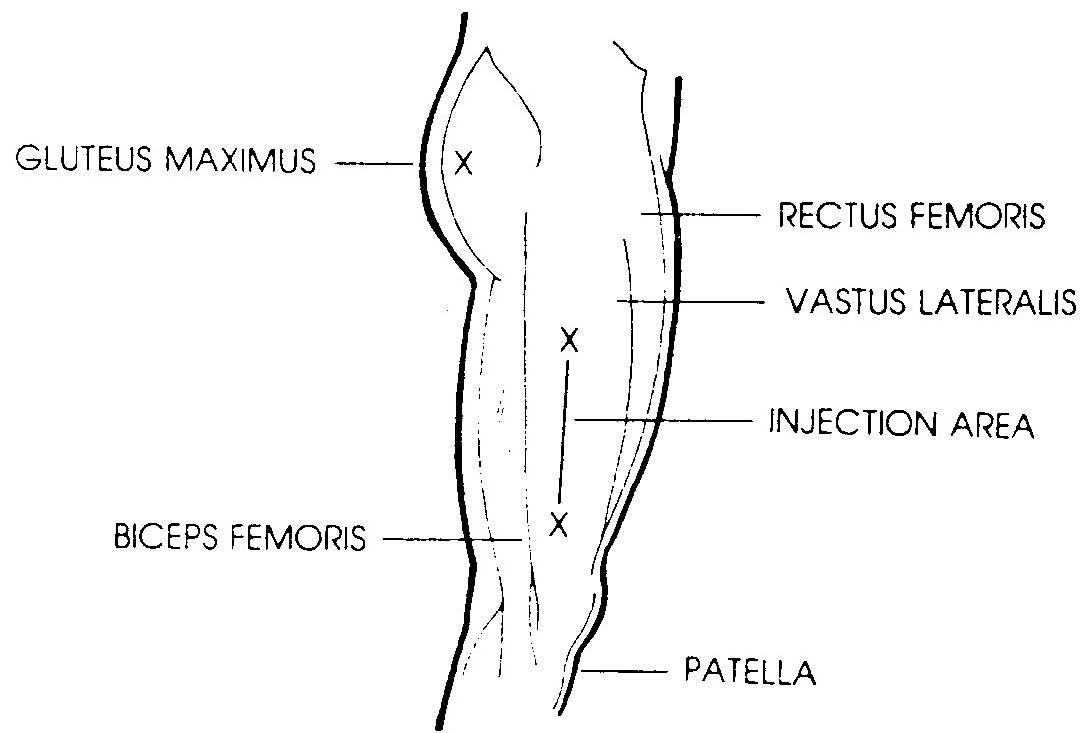
Figure 2-3. Location for thigh injection.
(a) The volume of medication given in this site can be up to two milliliters injection in an adult.
(b) The needle length must not be less than one inch and should not exceed one and one-half inches for adults. A one and one-fourth inch needle is commonly used.
(c) To administer an injection, make sure the patient's lateral thigh is completely exposed so you can visualize the injection site. The patient should be lying on his back (supine) or seated.
(d) Do not inject into the areas close to the knee or hip bone.
(e) There are no main blood vessels or nerve trunks in the lateral thigh injection site. There is a cutaneous nerve (lateral femoral) superficially located and sometimes damage to these nerves is reported.
(3) Upper arm (deltoid muscle). The injection site in this area is a rectangular area bounded on the top by the lower edge of the shoulder bone (the acramion process), on the bottom by the armpit (the axilla), and by the lateral one-third of the arm (see figure 2-4).
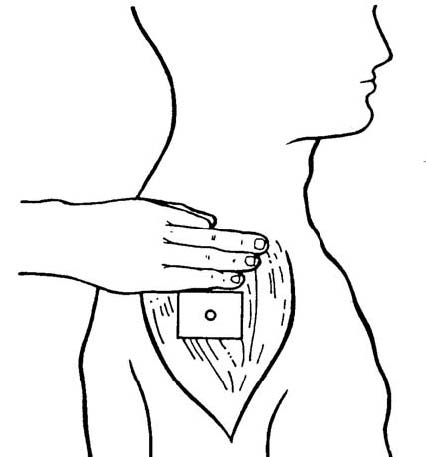
Figure 2-4. Location for upper arm injection.
(a) The safe area for injection is generally defined as about three fingers below the shoulder joint.
(b) The needle length of one inch is normally used because of the size of the deltoid muscle.
(c) The volume of medication given in this site can be up to a maximum of one milliliter per injection for an adult. A volume of 0.5 milliliter or less is more commonly used.
(d) The shoulder should be completely exposed so you can determine the exact location of the injection. The clothing should not be rolled up to attempt to administer an injection.
(e) Ensure that the patient is in a standing or sitting position, with the arm at side and muscles relaxed. Direct the patient to hang the arm loose.
j. Prepare Injection Site. Clean the skin at the injection site thoroughly with an antiseptic pad (sponge with alcohol or Betadine). Use a circular motion from the center of the injection site outward. Place the antiseptic pad between the last two fingers for use later when you complete the injection.
k. Remove Needle Guard or Cover. Pull the cover straight off, rather than using a twisting motion or a sideward motion because you may bend the needle.
(1) Avoid bending or touching the needle.
(2) Place the needle cover on a clean, flat surface.
l. Stabilize Injection Site. Firm the tissue at the injection site with the hand that is free by pinching the skin with the thumb and forefinger so that it is taut.
(1) The cushion of tissue formed by grasping the skin makes it easier to inject the needle in exactly the right place.
(2) The needle enters more easily into taut or firm skin than into loose skin.
(3) Help the patient relax his muscles by distracting his attention by asking a question or having the patient do something like blow a breath out or look at an object on the wall.
m. Insert Needle Into Patient at Site Selected for Injection. When inserting the needle, remember the following guidelines:
(1) Hold the barrel of syringe firmly between the thumb and index finger of the dominant hand (see figure 2-5).
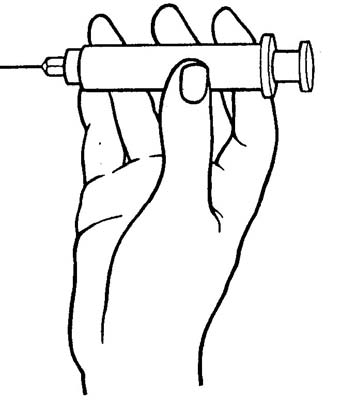
Figure 2-5. Hold barrel of syringe between thumb and index finger.
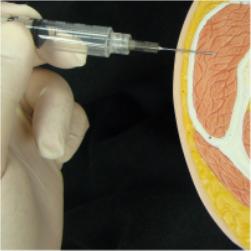
(2) Move the needle tip to about one-half inch from the injection site, with the bevel up, and position the needle at a 90-degree angle to the skin surface. (All intramuscular injections are inserted at a 90-degree angle into the muscular layer below the skin.)
(3) Plunge the needle firmly and quickly into the muscle to the depth of the needle with a steady straightforward motion. A quick insertion of the needle will minimize the pain for the patient.
n. Aspirate Syringe. Aspirate the syringe as follows (see figure 2-6).
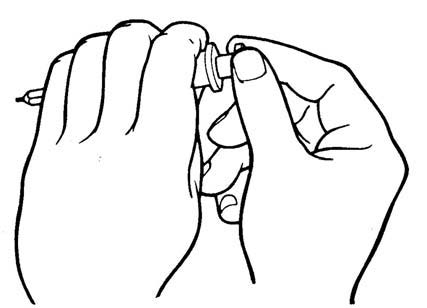
Figure 2-6. Aspirate the syringe.
(1) Release the hold on the skin.
(2) Move the free hand to the plunger of the syringe.
(3) Pull back the plunger until slight resistance is felt.
(4) Check for blood entering the syringe. If blood appears in the syringe, do not administer the medication. Proceed as follows:
(a) Withdraw the needle from the skin at a 90-degree angle.
(b) Dispose of the needle and syringe (see procedures for accomplishing this at the end of this lesson).
(c) Explain your actions to the patient.
(d) Obtain another (sterile) needle and syringe.
(e) Select another injection site.
(f) Start the injection procedure over, following the instructions already provided.
>CAUTION: Failure to aspirate for blood before injecting could result in administering medication into a blood vessel, which would endanger the life of the patient. This is because the entire amount is instantly available for the body to use.
o. Inject Medication. To inject the medication, do the following procedures:
(1) Stabilize the syringe with the nondominant hand.
(2) Place the thumb of the dominant hand on the plunger and the index and middle fingers under the hook of the syringe barrel.
(3) Push the plunger into the syringe barrel with a slow, continuous downward movement as far as the plunger will go.
(4) Make sure that all the medication is injected. Any medication that is left in the needle at the end of the injection may dribble into the subcutaneous tissue as it is withdrawn. Tissue injury may result.
p. Withdraw Needle. To withdraw the needle:
(1) Place the alcohol pad you are holding just above the injection site with the nondominant hand.
(2) Remove the needle straight out in same direction as the injection with a quick, outward motion.
q. Massage Injection Site. Rub the injection site with the alcohol pad with a firm, circular motion for about five seconds. Massaging helps to disperse the medicine so that it can be absorbed more quickly.
r. Cover Injection Site. Place an adhesive bandage over the injection site to protect clothes from possible bloodstains and protect the injection site from possible infection.
s. Perform Postinjection Patient Care. Perform as follows:
(1) Observe the patient for unusual reactions. Any medication can cause anaphylactic reactions.
(2) Give appropriate information regarding the medication and required waiting time to the patient in accordance with local guidelines.
(3) Care should be provided for the bed patient as follows:
(a) Position the patient for comfort.
(b) Ask the patient if there is anything else you can do.
(c) Tell the patient when you expect to return to check on any reaction and to notify you if he experiences any problems.
t. Dispose Expended Needle and Syringe. Place the needle and syringe in a non-permeable container in accordance with local policy. Proper disposal of equipment prevents cross contamination, drug abuse, and injury by needles.
u. Record Administration of Intramuscular Injection. Record the information in the patient's medical record (inpatient or outpatient) or field medical card IAW local policy.
(1) Prompt recording prevents other personnel from administering the same medication.
(2) After recording the information, follow local procedure for returning the patient's medical record, or field medical card, to the records holding area.
|
|
|
The Brookside Associates Medical Education Division is dedicated to the development and dissemination of medical information that may be useful to medical professionals and those in training to become medical professionals. This website is privately-held and not connected to any governmental agency. The views expressed here are those of the authors, and unless otherwise noted, do not necessarily reflect the views of the Brookside Associates, Ltd., any governmental or private organizations. All writings, discussions, and publications on this website are unclassified.
© 2007, 2014 Medical Education Division, Brookside Associates, Ltd. All rights reserved
![]()