
Treating Fractures in the Field
Lesson 2: Spinal
Injuries
Section II: Immobilizing a Suspected Spinal Injury
2-8
2-8. IMMOBILIZING A CASUALTY'S SPINE WITH CASUALTY SITTING UP
If the casualty was riding in a vehicle when it was involved in an accident, he may be in a sitting position. After making sure the casualty is breathing and all severe bleeding has been controlled, immobilize the casualty's spine by applying a cervical collar and a short spine board to the casualty before removing him from the vehicle. The following procedures assume the casualty is in a sitting position and you have at least one other person to assist you by applying a cervical collar and short spine board while you apply traction. Direct the assistant as needed.
a. Apply Manual Traction. Immobilize the casualty's head and neck by applying gentle manual traction.
(1) Position yourself behind the casualty and face the casualty.
(2) Place your hands on both sides of the casualty's head with your palms over the casualty's ears and your fingers supporting the casualty's mandible (jaw) as shown in figure 2-7.
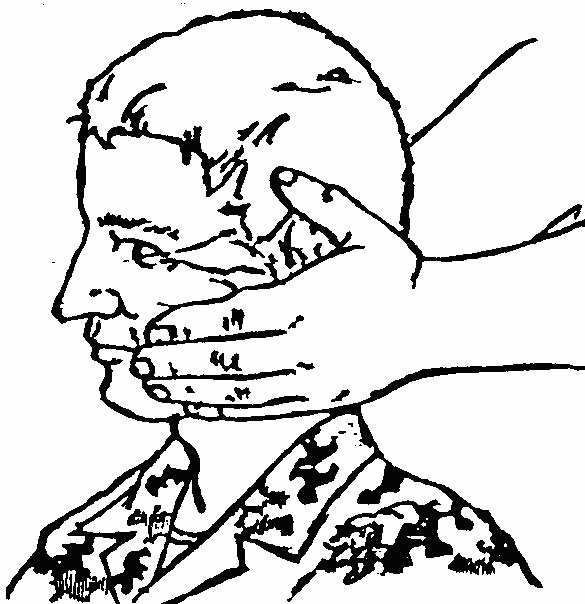
Figure 2-7. Applying manual traction to a casualty's head (casualty sitting up).
(3) Apply and maintain manual traction until the casualty has been secured to the spine board. The casualty should be in an "eyes forward" position.
b. Apply Cervical Collar. If a cervical collar is available, have the assistant apply the collar to the casualty's neck. If a cervical collar is not available, have the assistant improvise a collar from a SAM splint or from material such as a folded towel, T-shirt, or field jacket. Apply an improvised material collar following the procedures given in paragraph 2-5b.
c. Position Short Spine Board. Have the assistant position the short spine board in the manner described below. If a short spine board is not available, improvise using a plank and cravats or other nearby materials.
(1) Position the spine board next to the casualty with the head (narrow) end of the board up.
(2) Slip the spine board between the casualty's back and the seat of the vehicle by pushing the board as far into the seat behind the casualty as possible.
(3) Tilt the upper end of the board toward the head.
d. Secure Casualty's Head to Short Spine Board.
(1) Position the back of the casualty's head against the spine board. Make sure you move the head and neck as a unit. The casualty will be in an upright position.
(2) If a cervical collar has not been applied to the casualty, have the assistant place a roll of material in the hollow space between the neck and the board to help keep the neck in its normal position when the casualty is removed from the vehicle. The roll should be large enough to fill the gap, but not large enough to exert pressure on the neck.
(3) If available, have the assistant place a support (rolled towel, blanket, sandbag, or similar material) next to each side of the casualty's head before securing the casualty's head. The additional material will help to prevent motion. The supports and the head are secured as a single unit.
(4) Have the assistant secure the casualty's head to the board using a head strap or cravat (see figure 2-8). Once the casualty's head is firmly secured, you can release your hold on the casualty's head.
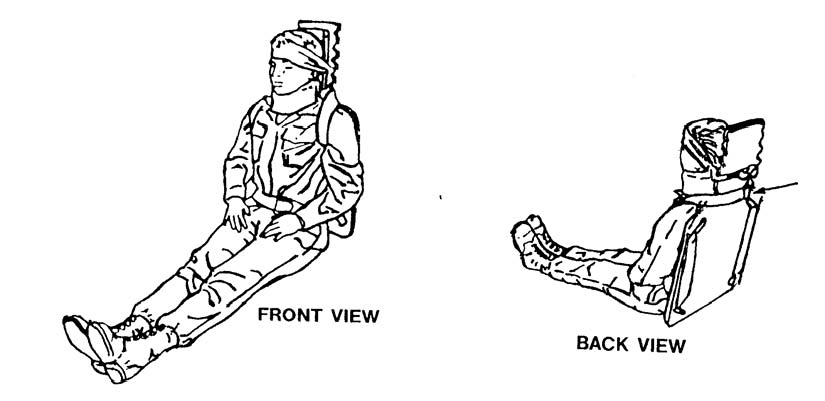
Figure 2-8. Short spine board and cervical collar applied to a sitting casualty.
e. Secure Casualty's Back to Short Spine Board. Secure the casualty's back to the spine board using two body straps or improvised straps (see figure 2-8).
(1) Place the buckle of the first body strap in the casualty's lap.
(2) Pass the other end of the strap through the lower hole in the board, up the back of the board, through the top hole, under the casualty's armpit, up over his shoulder (same side as armpit), and across the back of the board at the neck.
(3) Take the second body strap and buckle it to the end of the first body strap (the end at the back of the board near the casualty's neck). The buckle should rest on the back of the spine board and not press on the casualty's neck.
(4) Continue to secure the casualty by bringing the strap around the back of the board, over the casualty's unsecured shoulder, down and under his armpit, through the top hole on that side of the board, down the back of the board, through the lower hole, and across the casualty's lap.
(5) Secure the end of the second body strap to the buckle of the first body strap. Both shoulders are secured to the top of the board's body and the bottom of the board is secured to the casualty's waist (see figure 2-8).
f. Secure Casualty's Wrists. If the casualty is unconscious, place the casualty's wrists together in his lap and tie them together loosely with a cravat. Make sure the cravat does not interfere with blood circulation.
g. Position Long Spine Board. Once the casualty has been partially immobilized with the short spine board, position him on a long spine board. If a long spine board is not available, use a wide plank or similar object.
(1) Have the assistant obtain the long spine board and open the vehicle door on the opposite side of the casualty. If the casualty is located on the driver's side of the front seat, for example, the assistant will open the door on the passenger's side of the front seat.
(2) Have the assistant position the long spine board flat on the seat perpendicular to the casualty.
(3) Have the assistant slide the long spine board on the seat until the end of the board is against the casualty's buttocks.
(4) Tip the casualty slightly and have the assistant continue to move the board until the end of the long spine board is beneath the casualty's buttocks. This will make it easier to place the casualty on the long spine board.
h. Lay Casualty on Long Spine Board. Turn the casualty in the seat so his back is toward the opened door (back toward long spine board) and lay him on the long spine board.
(1) Check the casualty's feet. If they are tangled up in the pedals, move the feet until they are free.
(2) Turn the casualty by working in unison with the assistant.
(a) Grasp his upper body area (under his arms). Do not grasp the short spine board when moving the casualty.
(b) Have the assistant grasp the casualty's lower legs.
(c) Pivot the casualty's body as the assistant lifts the casualty's legs onto the seat. You and the assistant must work in unison to prevent additional injury to the casualty.
(3) Have the assistant help you lay the casualty on the long spine board in a slow and gentle manner. The casualty's trunk is now in a horizontal position.
(4) Have the assistant help you to lift the casualty's body and legs and slide the long spine board beneath the casualty's entire body. If the casualty is properly secured to a short spine board and there is not enough room to lift the casualty, slide the casualty onto the long spine board.
i. Remove Casualty From Vehicle. Once the casualty has been positioned on the long spine board, remove the casualty from the vehicle.
(1) Have the assistant join you at your door. You should be on one side of the long spine board (right or left) and the assistant should be on the other side.
(2) Lift the long spine board and remove the casualty from the vehicle.
j. Secure Casualty to Long Spine Board.
(1) Secure the short spine board to the long spine board. If possible, line up the strap holes of the short spine board with the holes of the long spine board and secure the two boards together. Do not remove the short spine board.
(2) Secure the casualty to the long spine board using available straps, cravats, or strips of cloth.
(3) Assess the casualty's pulse, motor, and sensory each time after the casualty is moved and after the casualty has been secured to the long spine board.
