1-11. WHEELCHAIRS
a. The folding wheelchair is the most commonly used mobilization device for a patient who can sit upright. If leg elevation is required, a special board or leg attachment can be secured to the chair and pillow or cushion support provided. The use of a wheelchair allows the patient to be out of bed, mobile, and moderately independent.
b. Patients must be instructed in the proper use and operation of a wheelchair. Place the patient in the chair with his feet on the footrest plates and instruct him in the following maneuvers:
(1) Show the patient how to lock and release the wheel brakes.
(2) Show the patient how to place his hands on the turning rims and roll the rims forward with even force to produce straight-ahead movement.
(3) Show the patient how to turn the wheelchair. Instruct the patient to use more force on the left turning rim in order to turn right, and more force on the right turning rim in order to turn left (see figure 1-6).
(4) Ask the patient to demonstrate wheelchair techniques, offering guidance as necessary.
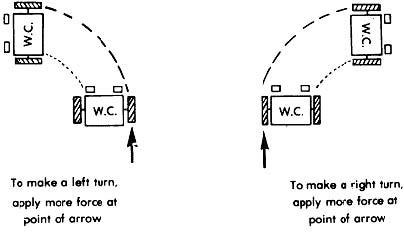
c. Several precautions must be observed when orthopedic patients are permitted to use a wheelchair.
(1) Tell the patient not to use the chair as a racing vehicle.
(2) Tell the patient to ask for assistance when going through doorways, entering elevators, or attempting to maneuver through congested areas.
(3) Tell the patient that braking devices must be set and the wheelchair braced against a wall or held while the patient gets in or out. This will prevent the chair from rolling or tipping when the patient shifts weight or changes position.
(4) Tell the patient to use the safety belt.
1-12. CRUTCHES
a. Crutches are used to promote ambulation and independence in patients with affected lower extremities. The use of crutches is a complicated procedure that is routinely taught by the physical therapy department. There are occasions, however, when the nursing staff will have this responsibility. The physician will prescribe the use of crutches and the gait (crutch-walking method) to be used. The prescribed gait depends upon the amount of weight bearing permitted on the affected leg(s). The crutches must be “fitted” to the patient and instructions given for the prescribed crutch-walking method.
b. Standard axillary crutches need two adjustments–the length of the crutch and the position of the handgrip. Prior to adjusting, prepare the crutches with padding on the axillary bar and a rubber tip on the end of each crutch.
(1) Have the patient lie supine, arms at sides, wearing a shoe on the unaffected foot.
(2) Using a tape measure, measure from the axilla to the heel of the shoe and add two inches. Adjust the crutch shaft to this measurement. Or . . .
(3) Place the crutch along the patient’s unaffected side with the axillary pad at the axilla and the crutch tip 6 to 8 inches to the side of the heel. Adjust the crutch to fit this length.
(4) Have the patient stand at the bedside with the crutches in place and grip the hand bars. You should be able to fit two fingers between the axilla and the axillary bar when the patient is standing in the tripod position (see figure 1-7).
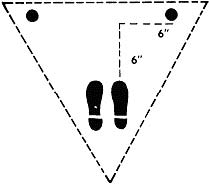
(5) Adjust the hand bar so that the patient’s elbow is flexed approximately 30° when the hand grips the hand bar.
(6) Check each crutch for proper fit and ask the patient if the crutch feels comfortable.
c. With properly fitted crutches, the patient is almost ready to learn ambulation with crutches. Prepare the patient for instruction by doing the following:
(1) Explain the procedure to the patient and determine if the patient has the upper body strength and ability to ambulate.
(2) Ensure that the patient is fully clothed and wearing non-skid slippers or shoes.
(3) Assist the patient to stand. Have the patient grasp both crutches in one hand at the handgrip, then push off from the bed with the free hand using the crutches for support.
(4) Instruct the patient to stand in correct body alignment with the tip of the crutches 6 inches in front and 6 inches to the side of the feet. (This is the tripod position.) The hands and arms, not the axillae, should bear the weight. The elbows should be flexed about 30°.
(5) Teach the prescribed gait.
1-13. CRUTCH WALKING GAITS
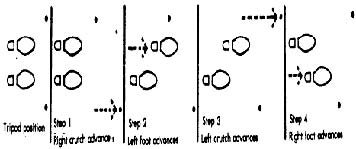
a. The 4-point gait (see figure 1-8) is used when the patient can bear some weight on both lower extremities. Place the patient in the tripod position and instruct him to do the following.
(1) Move the right crutch forward.
(2) Move the left foot forward.
(3) Move the left crutch forward.
(4) Move the right foot forward.
(5) Repeat this sequence of crutch-foot-crutch-foot for desired ambulation.
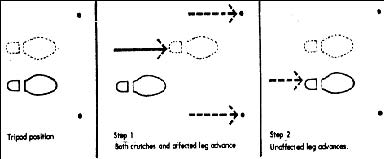
b. The 3-point gait (see figure 1-9) is used when the patient should not bear any weight on the affected leg. Place the patient in the tripod position and instruct him to do the following.
(1) Move the affected (non-weight bearing) leg and both crutches forward together.
(2) Move the unaffected (weight bearing) leg forward.
(3) Repeat this sequence for desired ambulation.
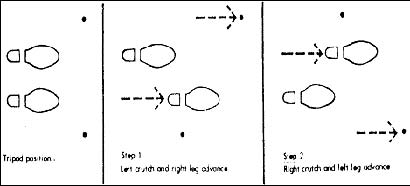
c. The 2-point gait (see figure 1-10) is used when the patient can bear some weight on both lower extremities. Place the patient in the tripod position and instruct him to do the following.
(1) Move the right leg and left crutch forward together.
(2) Move the left leg and the right crutch forward together.
(3) Repeat this sequence for desired ambulation.
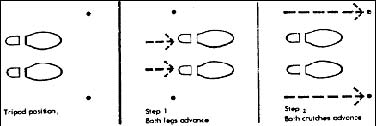
d. Swing-through gait (see figure 1-11) is used for patients with lower extremities that are paralyzed and/or in braces. Place the patient in the tripod position and instruct him to do the following:
(1) Move both crutches forward together about 6 inches.
(2) Move both legs forward together about 6 inches.
(3) Repeat the sequence in rhythm for desired ambulation.
1-14. WALKERS AND CANES
a. Walkers and canes are generally used as mobilization aids for patients who can bear weight on the affected leg, but require some support.
b. When utilizing a walker, the patient should use the muscles of the arms and upper body to help support his weight. After placing the walker in front of the patient, instruct the patient to ambulate with a walker using the following sequence of moves.
(1) Firmly grasp the hand grips.
(2) Move the walker and the affected leg forward about 6 inches.
(3) Move the unaffected leg forward, parallel to the affected leg.
(4) Repeat the sequence for each step.
c. The patient should hold a cane on the unaffected side with his elbow slightly flexed and the cane tip about 6 inches in front of and 6 inches to the side of his foot. (A cane is used for balance, rather than physical support. It is held on the unaffected side to prevent the patient from “leaning” on it for support.) Instruct the patient to ambulate using the following sequence.
(1) Move the affected leg forward, parallel to the cane.
(2) Move the unaffected leg forward so that the heel is just beyond the cane.
(3) Move the affected leg forward so that it is even with the unaffected leg.
(4) Move the cane forward 6 inches to the front and 6 inches to the side of the patient (starting position).
(5) Repeat the sequence for desired ambulation. If less support is needed, the cane and the affected leg can be moved together.
