![]()
Multimedia Edition
|
Lesson 3: Recovery Room Care of the Surgical Patient
The recovery room, which is generally located near the operating room, has accommodations for a group of surgical patients who are under the continuous surveillance of highly skilled personnel. These patients are taken to the recovery room after surgery. There, the nurses check on the patient's condition continuously. The majority of the recovery room nurse's time is spent at the bedside rendering direct patient care. The observation of a patient cannot be completed from any other location. When the patient has fully recovered from the anesthesia and there is no evidence of complications, he is prepared to return to the nursing unit. This lesson will include the knowledge and skills required by the practical nurse to care for a surgical patient in the recovery room.
a. Airway. A passageway through which air normally circulates. A device that is inserted through the patient's mouth to maintain the patency of an air passage such as the trachea.
b. Anoxia. A reduction in, or lack of, oxygen.
c. Coma. A state of being unconscious or unresponsive to stimuli.
d. Conscious. A state of being awake, responsive, and alert.
e. Disoriented. A state of being confused; lack of response or inappropriate response to stimuli.
f. Dyspnea. Difficult and labored breathing in which the patient has a persistent unsatisfied need for air and feels distressed.
g. Embolism. The obstruction of a blood vessel by a foreign substance due to an air bubble, fat globule, or purulent matter of blood clot. h. Embolus. An embolism floating in the blood stream.
i. Hypoventilation. A state in which there is a decreased or reduced volume of air taken into the lungs.
j. Hypoxemia. Low oxygen content in the blood.
k. Hypoxia. A decrease on the supply of oxygen to cells of the body.
l. Lethargic. A condition of drowsiness or indifference.
m. Pallor. The absence of the skin coloration or paleness.
n. Semiconscious. A state of being able to respond to physiological stimuli, but capable only of reduced response to mental stimuli.
o. Suction. The act of sucking up (or drawing up) by reducing air pressure and creating a partial vacuum.
p. Unconscious. A state of being unaware and unresponsive to all stimuli.
3-3. FACTS ABOUT THE RECOVERY ROOM
a. The recovery room is sometimes referred to as the postanesthetic room (PR) or anesthetic room (AR). It is a special nursing unit that accommodates a group of patients who have just undergone major or minor surgery.
b. The purpose of a recovery room is to provide direct and continuous patient observation during emergence from general or regional anesthesia.
c. The recovery room and surgical intensive care unit are used mainly for the same general purpose; that is, to accommodate a group of patients who have undergone surgery and need close observation and prompt care in the event of sudden complications. However, there is a difference between the two.
(1) Recovery room. The recovery room generally supports patients for a few hours until they have recovered from the anesthesia.
(2) Surgical intensive care unit. The surgical intensive care unit supports patients for a prolonged stay. This stay can be from 24 hours to months (in the worst cases). Additionally, this unit recovers patients from anesthesia after hours when the recovery room is closed.
d. The practical nurse responsibility for the care of a patient in the recovery room is to prevent complications, detect early complications, relieve patient's discomfort, support patients through their state of dependence to independence, and closely monitor the patient's condition.
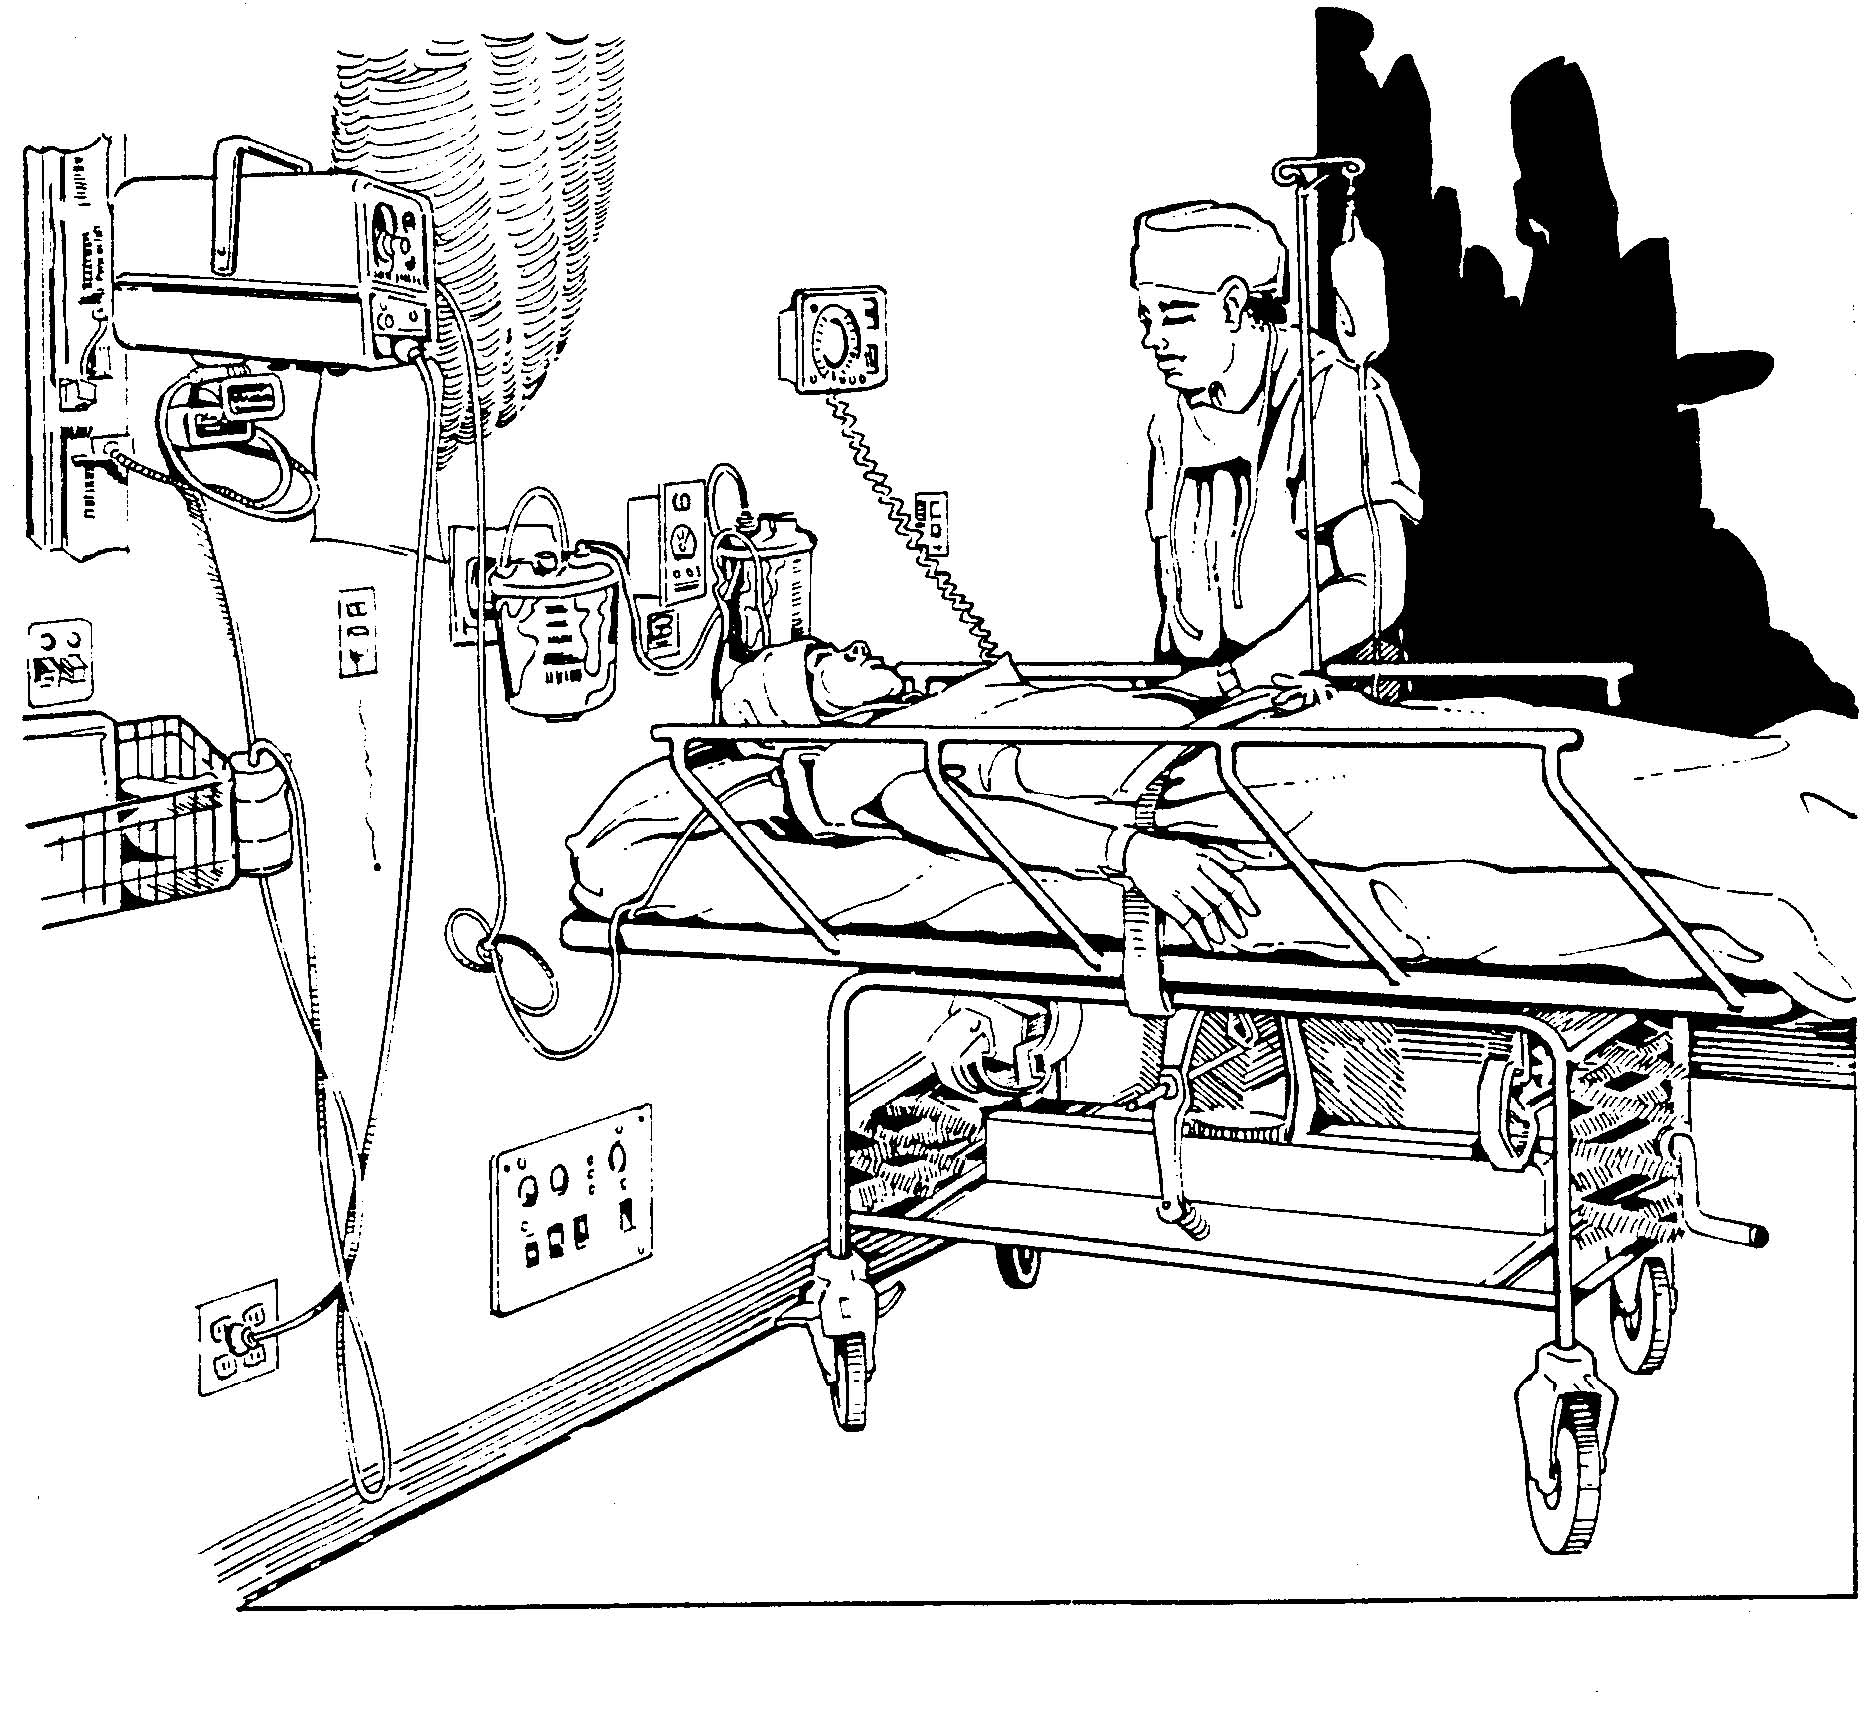
e. The recovery room (see Figure 3-1) should be quiet, clean, and free of unnecessary equipment. This room should have:
(1) Walls and ceiling painted in soft pleasing colors.
(2) Indirect lighting.
(3) Sound proof ceiling.
(4) Equipment that controls or eliminates noises.
(5) Isolated quarters for noisy patients.
3-4. COMPLICATIONS TO BE PREVENTED FOR THE SURGICAL PATIENT IN THE RECOVERY ROOM
The first hours after surgery require alert attention to prevent occurrence of complications that may happen while the patient is in the recovery room. Each nurse will be able to relate to the complications that are respiratory distress and hypovolemic shock.
a. Facts Concerning Respiratory Distress.
-
(1) Respiratory distress is caused by laryngospasms (a complication that may happen after the patient's endotracheal tube is removed by the anesthetist or anesthesiologist), by aspiration of vomitus, or by preoperative medications. Some preoperative medications can depress respirations, especially morphine.
-
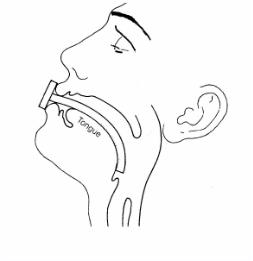
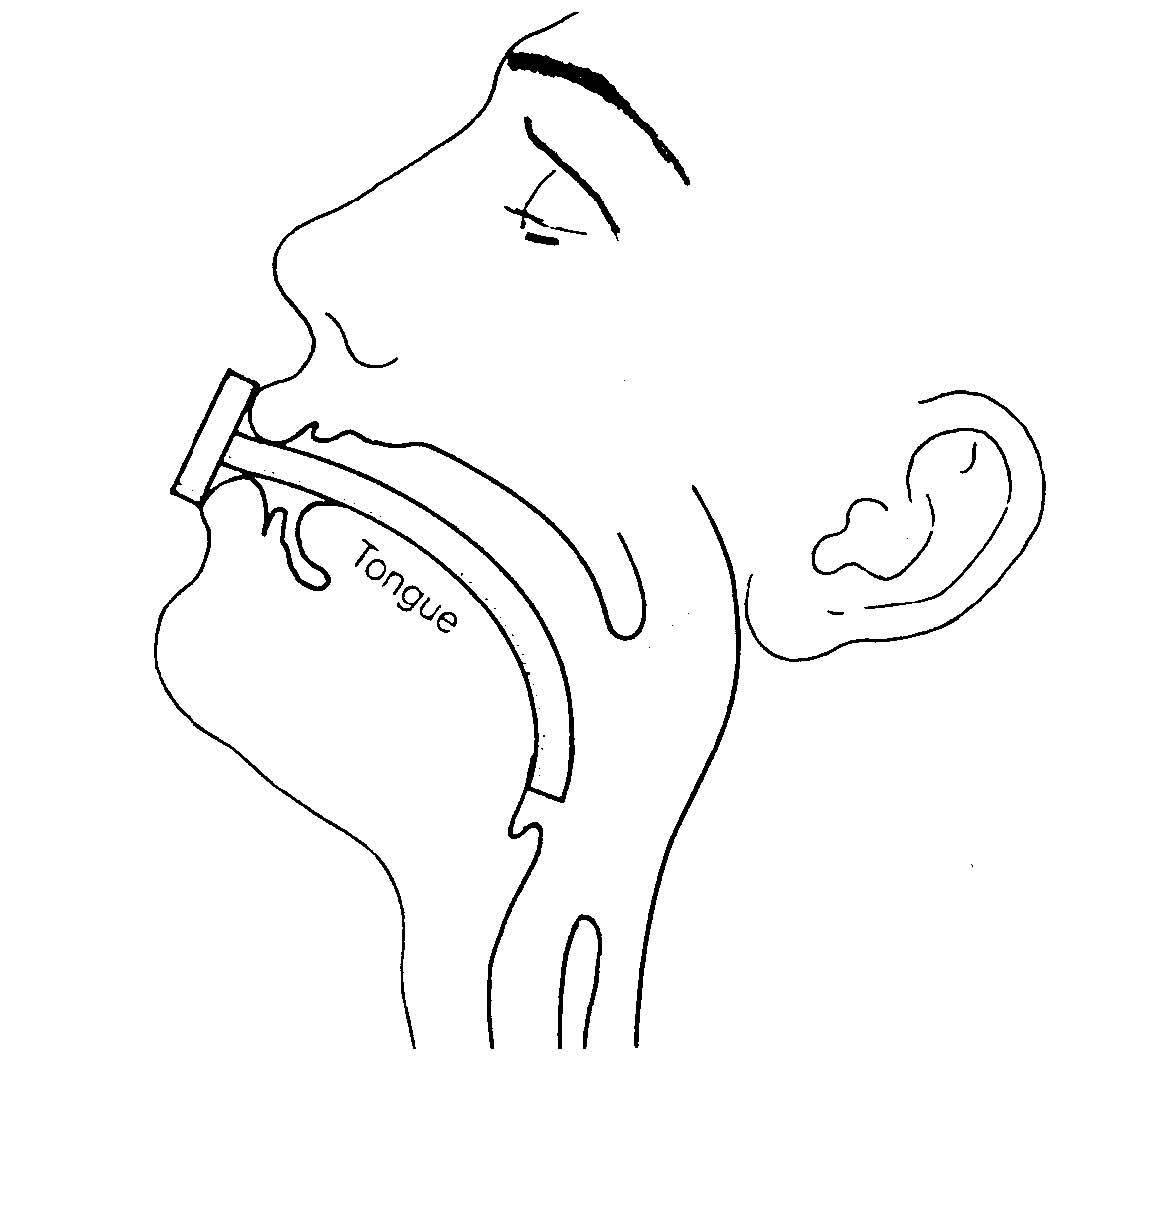
(2) If the patient's breathing is obstructed because his tongue has fallen back and has obstructed the nasopharynx, the lower jaw is pulled forward and an oropharyngeal airway is inserted (see Figure 3-2).
-
(3) The airway is left in place until the patient is conscious. The airway prevents the tongue of the unconscious patient from blocking the air passages.
b. Nursing Implications to Prevent Respiratory Distress.
(1) Monitory respiratory status as ordered.
(2) Report labored and shallow or rapid respirations to the Charge Nurse
(3) Maintain patent airway either with oropharyngeal airway in place or removed
(4) Suction the patient via nose and/or orally as ordered.
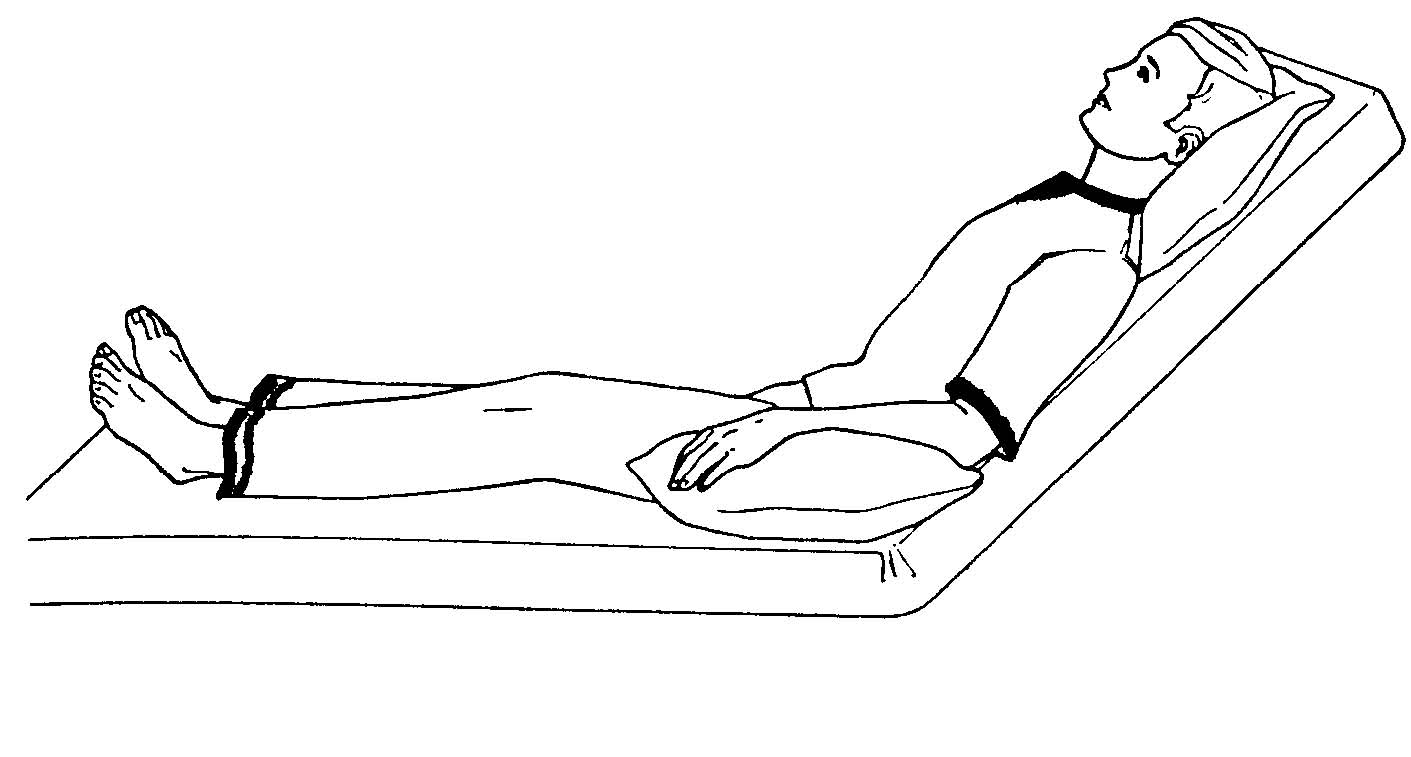
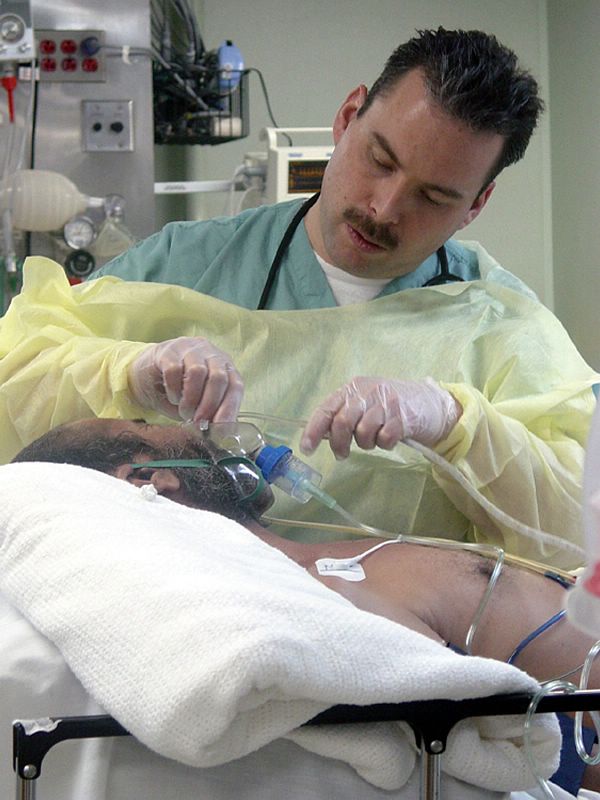
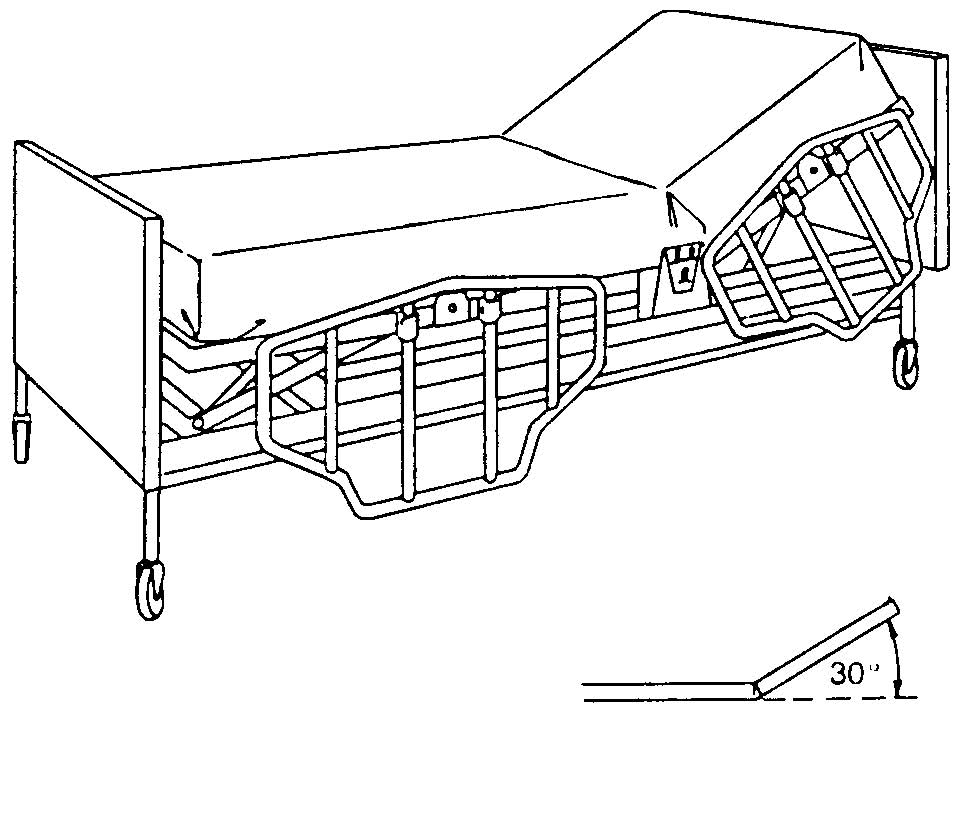
(5) Maintain the patient's position to facilitate lung expansion, usually the Fowler's position (see Figure 3-3).
(6) Administer oxygen as ordered.
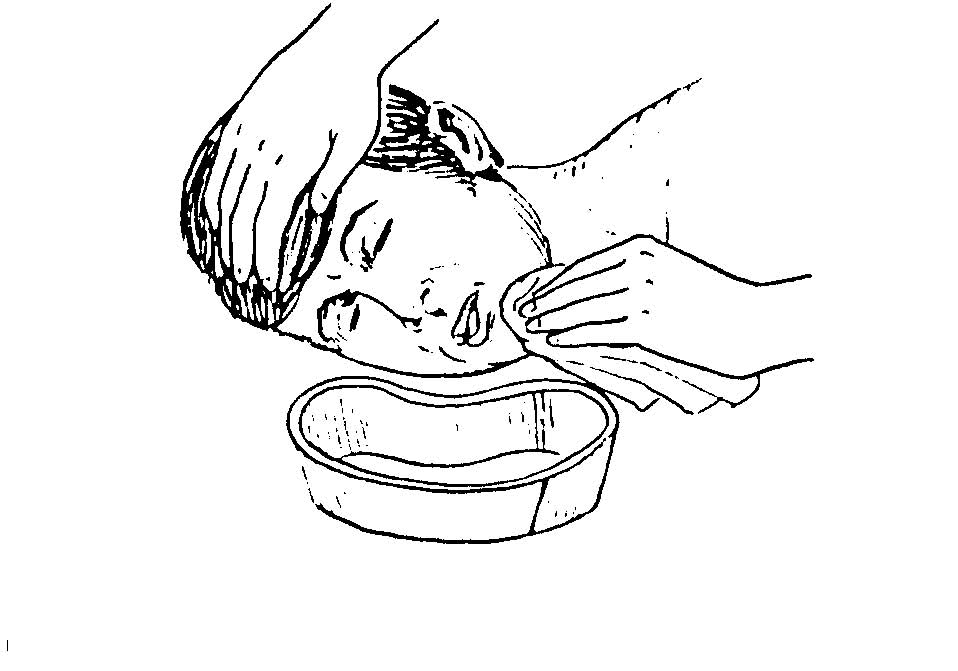
(7) Maintain patient's position to prevent aspiration of vomitus (see Figure 3-4).
(a) Position the patient's head on one side and place an emesis basin under the cheek.
(b) Use tissues to wipe vomitus from the nose or mouth in order to avoid possible aspiration of the vomitus into the lungs.
c. Facts About Hypovolemic Shock. Hemorrhage secondary to surgery, which may be internal or external, may cause hypovolemic shock. The loss of blood or fluid volume does not have to be rapid or in copious amounts to cause shock.
d. Nursing Implications for the Early Detection of Pending Hypovolemic Shock.
(1) Inspect the surgical dressing and report bleeding to the Charge Nurse.
(2) If the patient has a large dressing in place, always check under the patient because the blood may drain down the sides and pool under the patient. There may be no evidence of bleeding on the top of the dressing.
(3) Reinforce the original dressing after indicating outline of blood perimeter stain on original dressing.
(4) Report to the Charge Nurse the color and amount of blood. Bright red blood indicates fresh bleeding; brownish blood indicates bleeding that is not fresh.
(5) Record all of the above events in the Nursing Notes.
(6) Monitor vital signs as ordered and report:
(a) Fall in blood pressure.
(b) Rapid, weak pulse.
(c) Restlessness.
(d) Cool, moist skin.
(7) Administer narcotics only after checking doctor's orders and consulting with the Charge Nurse. Narcotics may precipitate shock in patients in whom shock is imminent.
(8) Administer fluids to replace volume as ordered by the physician. Fluids include whole blood products, plasma expanders, and IV fluids.
3-5. GENERAL NURSING IMPLICATIONS FOR THE CARE OF A PATIENT
Nursing interventions immediately after surgery are carried out by the recovery room nurses. These nurses have special skills to care for a patient recovering from anesthesia and surgery. Their main goals are to make sure the patient is comfortable and safe while in the recovery room. The nurses will:
a. Maintain proper functioning of drains, tubes, and intravenous fluids.
b. Prevent kinking or clogging that interferes with adequate drainage of catheters and drainage tubes.
c. Encourage and assist the patient to cough, to turn frequently, and to take deep breaths several times each hour (see Lesson 1, paras 1-5a(1), (2), (3)).
d. Monitor the patient's intake and output accurately, including all IVs, blood products, urine, emesis, NG tube drainage, etc. (refer to Lesson 4, para 4-13b).
e. Implement safety measures to protect dependent and lethargic patients. These safety measures are given below.
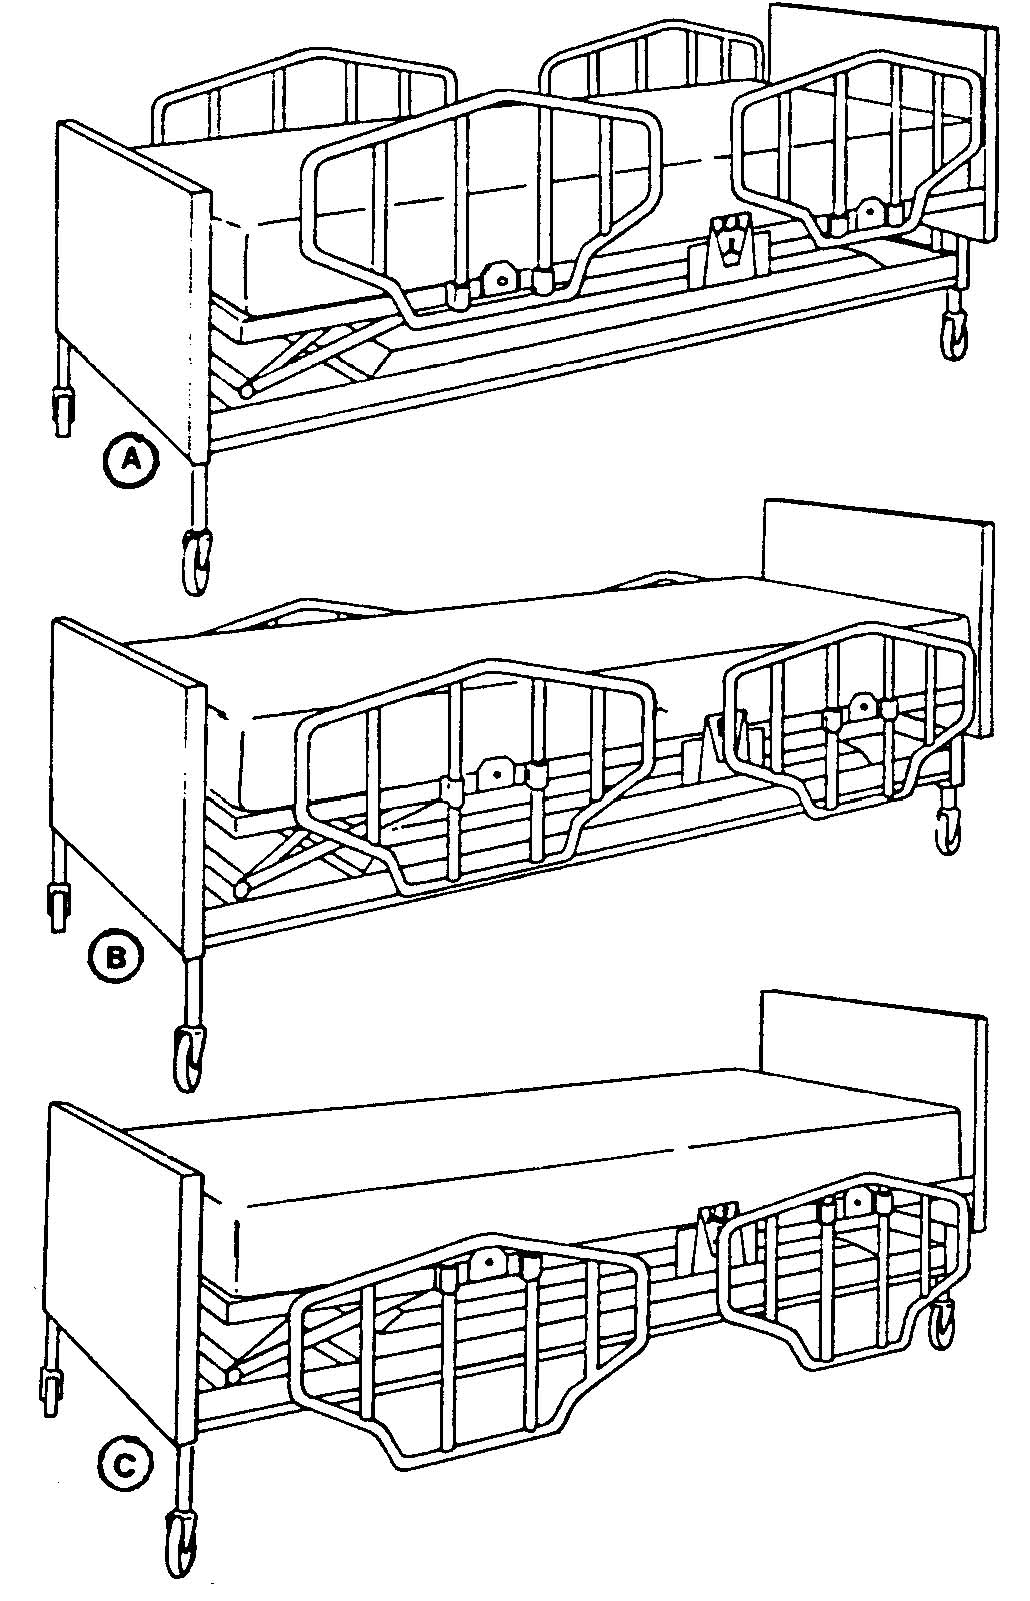
(1) Keep side rails in the high position at all times (see Figure 3-5). B. Intermediate position. C. Low position
-
(2) Keep the patient warm and comfortable.
-
(3) If call bells are in the wall unit, teach the patient how to use them (if he is alert). Keep them readily available for the patient.
-
(4) Position the patient so that he is not resting on his tubes and thus preventing future skin breakdown.
-
(5) No head pillow is used for the unconscious patient or for 8 hours following spinal anesthesia.
-
(6) The patient's head is turned to one side when the patient is in the supine position so that secretions can drain from the mouth, and the tongue cannot fall back into the throat to block the air passages.
f. Prevent nosocomial infections by washing your hands before and after working with each patient. Maintain aseptic technique for incisional wound care and turn the patient frequently to prevent respiratory infections.
g. Observe for and report any feeling/movement of the patient if he has had a spinal anesthetic.
-
(1) Spinal anesthesia wears off slowly.
-
(2) Observe for spontaneous movements as recovery time goes by.
-
(3) Movement usually returns before feelings and is first observed in the patient's toes and then moves up the legs.
-
(4) As anesthesia wears off, the patient will begin to have sensation often described as "pins and needles."
-
(5) Keep the patient in the supine position for 6 to 8 hours to prevent spinal headache.
(6) The patient may turn from side to side and prop up with pillows if the physician permits. This is done to relieve pressure from his back, but only for a few minutes at a time.
h. Observe and document the recovery room patient's level of consciousness.
-
(1) Specific criteria are usually used in the recovery room for categorizing the recovering patient as follows:
(a) Alert -- The patient will be able to give appropriate response to stimuli.
(b) Drowsy -- The patient is half asleep and sluggish.
(c) Stupor -- The patient is lethargic and unresponsive, unaware of surroundings.
(d) Comatose -- The patient is unconscious and unresponsive to stimuli.
-
(2) Engage the patient in a conversation, if possible, to observe his level of orientation.
i. Take into consideration each patient's baseline (normal) responses due to various physical factors.
-
(1) Hearing deficit.
(2) Inability to understand speech/speaks a foreign language.
(3) Previous physical weaknesses.
j. Provide emotional support to the patient and family.
-
(1) When the patient is alert, tell him about his whereabouts and that you are nearby and will help him as needed.
-
(2) Teach the patient using brief, simple sentences about the tasks you will be doing.
-
(5) Stay with the family members if they are permitted in the recovery room. Remember, they may be frightened of the environment and the way their loved one looks.
(3) Encourage conversation with the patient. This will decrease anxiety and increase his lung expansion.
(4) Reinforce information from the surgeon.

k. When the patient is cleared by the surgeon, call the receiving nursing unit and give the report. Include the following information.
-
(1) Patient's name.
-
(2) Type of surgery.
-
(3) Update of care in the recovery room.
-
(4) Mental alertness.
-
(5) Time of vital signs and results.
-
(6) Interaction with family in the recovery room.
-
(7) Presence, type, and functioning of drainage tubes, IV, etc.
-
(8) If patient has voided or not.
l. Record all of the above information on SF 510, Nursing Notes (see Figure 3-6). Transfer the patient per recovery room SOP.
Section III. SUCTIONING THE PATIENT IN THE RECOVERY ROOM
3-6. ADMINISTERING ORAL/NASAL SUCTIONING TO THE RECOVERY ROOM PATIENT
a. Oral/nasal suctioning is suctioning of the upper airway passages of the nose, mouth, and pharynx. This procedure is used to assist the patient in eliminating secretions before he has regained full consciousness and cannot spit out secretions. The catheter used should be soft and pliable. When you employ suctioning, you must make every effort to prevent the introduction of pathogens (disease causing microorganisms) into the lower airways. Normally, countless microorganisms are found in the upper respiratory tract and it is virtually impossible to maintain sterility when suctioning the nose or pharynx. Clean technique and thorough handwashing are essential for pharyngeal suctioning of the oral and nasal cavities, but aseptic technique is mandatory for deep suctioning in the tracheobronchial tree and for the intubated patient.
b. Administer an oral/nasal suctioning to the patient in the recovery room.
(1) Wash your hands and assemble all needed equipment as listed:
(a) Portable continuous suction machine or gauge to attach to the wall suction.
(b) Connecting tube.
(c) Sterile whistle-tip straight catheter (14 to 18 Fr) with a valve or Y-connector.
(d) Exam gloves.
(e) Disposable cup with tap water.
(f) Waste receptacle.
(2) Identify the patient. If the patient is conscious, explain the suctioning procedure to him and that it may stimulate the cough reflex.
(3) Provide for the patient's privacy.
(4) Observe the patient for evidence of airway obstruction due to secretions.
(5) Position the patient on one side in a semi-Fowler's position, if possible.
(a) This will facilitate airway patency and drainage of secretions.
(b) If unable to place the patient in a semi-Fowler's position, be sure the patient's head is turned to the side.
(6) Provide a clean working area. Oropharyngeal/nasopharyngeal suctioning is a clean procedure provided suctioning is limited to the oral, nasal, and/or pharyngeal areas.
(7) Wash your hands.
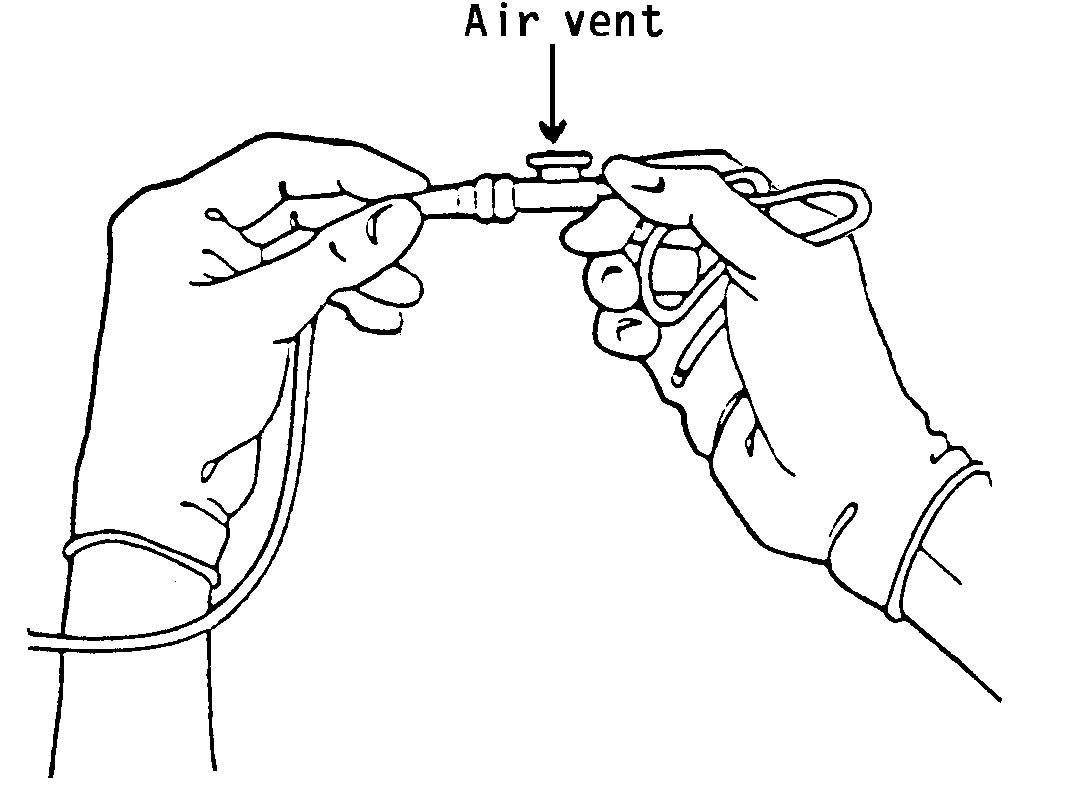
(8) Open the suction catheter package, attach the end to the connecting tubing from the suction machine, and place the catheter on a clean towel (see Figure 3-7).
(9) Put tap water in a clean paper cup.
(10) Turn on the suction unit, and set the desired pressure according to the equipment specification or the physician's order.
(11) Put on the exam gloves. Protective gloves should be worn during the procedure to prevent the transmission of infection.
(12) Moisten the suction catheter tip in the cup of water to reduce friction.
(13) Insert the catheter tip gently into the patient's nose or mouth.
(a) Do not apply suction during insertion.
(b) Do not force the catheter during insertion.
1 It can cause injury to the patient's mucous membranes.
2 If obstruction is encountered, call the Charge Nurse immediately for assistance.
(14) Advance the catheter to the posterior oral/nasal pharynx.
-
(a) Stimulate a cough reflex if the patient is unable to cough effectively.
-
(b) If patient has a mouth full of vomitus or secretions, clean this area first before stimulating cough in order to avoid aspiration and introduction of infection.
-
(15) Begin suctioning by placing the thumb of your nondominant hand over the catheter valve or Y-connector.
-
(a) Rotate the catheter while withdrawing to prevent irritation to the oral/nasal mucosa.
-
-
(18) Repeat the suctioning procedure as necessary until the patient's airway is clear.
-
(19) Remove your gloves and discard them and the catheter in the waste receptacle.
-
(20) Reobserve the patient for evidence of airway obstruction due to secretions.
-
(a) Suction collection bottles should be emptied and rinsed every 8 hours and cleaned with soap and water every 24 hours.
-
(b) Connecting tubing should be rinsed after each suctioning and changed in accordance with the local infection control policy.
(16) Suction for no more than 15 seconds. Suctioning for more than 15 seconds may cause hypoxia. Allow the patient to rest for 2 to 3 minutes between catheter insertions.
(17) Rinse the catheter in the cup of water after each insertion.
(21) Assist the patient to a comfortable position while maintaining a patent airway.
(22) Discard equipment or return it to the appropriate area.
(23) Wash your hands. Record the procedure and report significant observations to the Charge Nurse. You must include:
(a) Time and frequency of the procedure.
(b) Specific observations including color, amount, consistency, color of secretions, respirations, and breath sounds.
(c) Patient's reaction to the procedure and position in the bed, if appropriate.
(d) Any suction catheter or equipment changes.
(e) All of the patient teaching done and the patient's apparent level of understanding.
3-7. ADMINISTERING ENDOTRACHEAL SUCTIONING TO THE RECOVERY ROOM PATIENT
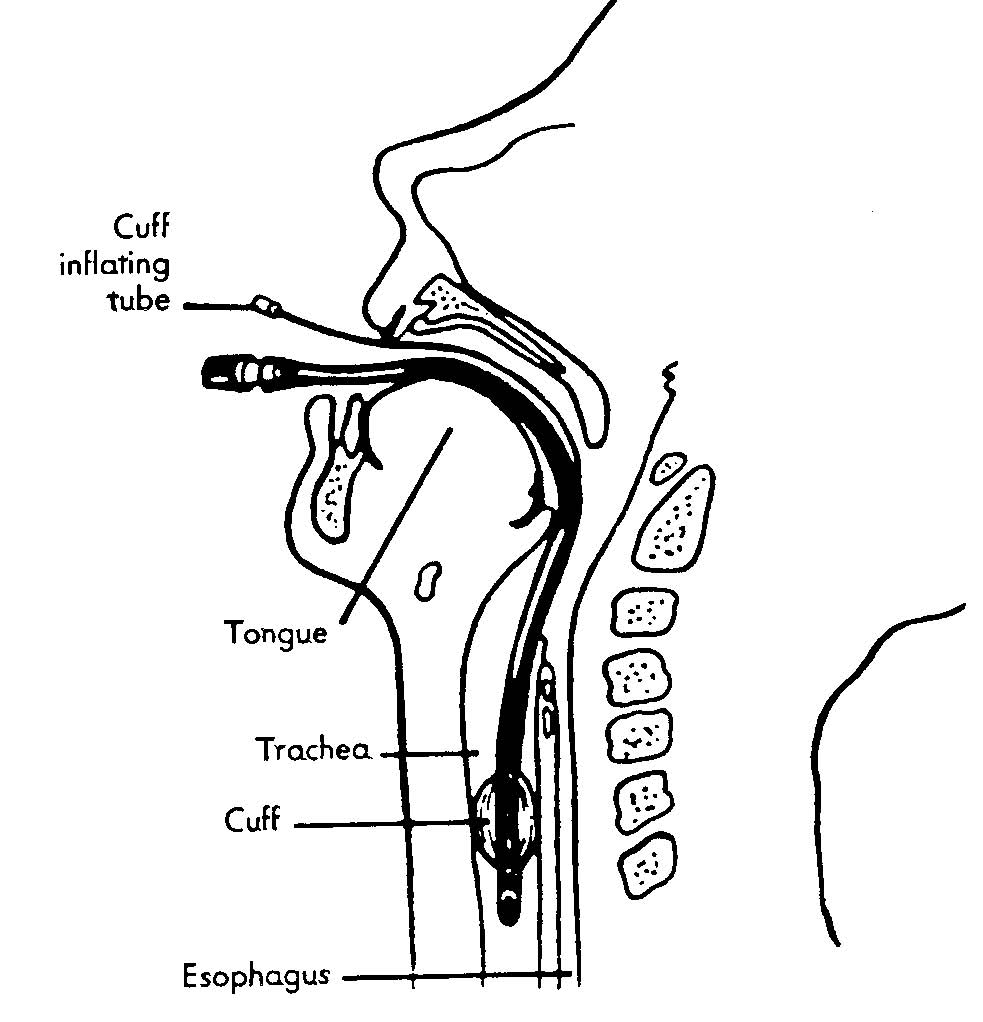
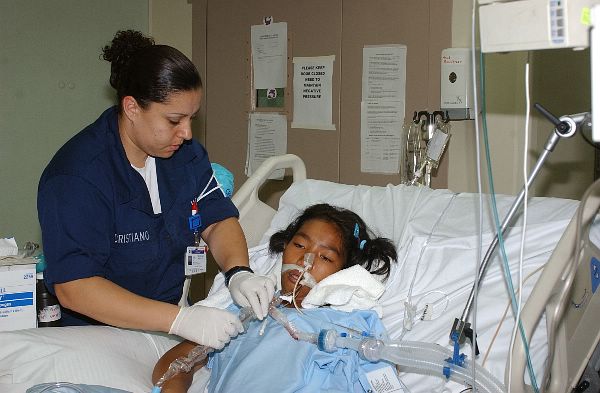
a. Endotracheal suctioning can be accomplished through an endotracheal tube that the physician inserts through the patient's mouth and into the trachea. It can remain in place for several days and, when its cuff is inflated to provide a tight connection, it can be attached to a respirator for controlled ventilation (see Figure 3-8). The inflated cuff also aids in preventing aspiration of blood, vomitus or foreign material into the bronchus.
b. Although endotracheal suctioning is a common procedure, it is one that interferes with arterial oxygenation. The decrease in oxygen in the alveoli is directly proportional to the amount of suction and the length of time the procedure takes. The amount of oxygen in the blood drops suddenly and produces serious hypoxia. It is essential to oxygenate the patient pre- and post-suctioning.
c. Endotracheal suctioning should be done only when necessary to maintain the airway, and then it must be brief. When suctioning is unavoidable, sterile technique (aseptic) must be used.
(1) Wash your hands and assemble all needed equipment.
-
(a) Portable continuous suction machine or gauge to attach to wall suction.
-
(8) Open the suction kit and sterile 2 x 2-inch sponges, using the wrapper to create a sterile field.
-
(9) Pour 30 to 50 cc of sterile normal saline into the sterile solution container using aseptic technique.
(b) Sterile suction solution container.
1 Sterile suction catheter (14 to 18 Fr).
2 Sterile solution container.
3 Sterile gloves.
(c) Sterile saline -- pour bottle.
(d) Oxygen flowmeter with a ventilator or manual resuscitator.
(e) Waste receptacle.
(2) Identify the patient and explain the suction procedure to the patient.
(3) Provide the patient with privacy.
(4) Observe the patient for evidence of airway obstruction due to secretions.
(5) Position the patient in a semi-Fowler's position (see Figure 3-9).
(6) Provide a clean work area.
(7) Wash your hands.
(10) Turn on the suction unit and set the desired pressure according to equipment specification or the physician's order.
(11) Put on the sterile gloves.
-
(12) Attach the sterile suction catheter to the connecting tubing by holding the catheter in your dominant hand (sterile hand) and the connecting tube in you nondominant hand (nonsterile hand).
-
(13) Moisten the suction catheter tip with the sterile normal saline solution.
-
(14) Instruct an assistant to hyperoxygenate the patient if ordered by physician.
-
(a) Patients should be hyperoxygenated prior to suctioning and between suction attempts by means of a ventilator or a manual resuscitator attached to an oxygen flowmeter set at 100% oxygen.
-
(b) This step limits the hypoxia caused by the suctioning.
-
(15) Insert the sterile suction catheter gently into the endotracheal tube until resistance is felt, then pull back slightly.
-
(a) Suction should not be applied during catheter insertion to prevent injury to the mucous membranes.
-
(b) The depth of suctioning may be determined by the physician's order or by the health care facility's policy.
-
-
(16) Place the thumb of your nondominant (nonsterile) hand over the suction control.
-
-
(b) Secretions trapped near inflated endotracheal cuffs should be removed at least every 8 hours by deflating the cuff and performing both oropharyngeal and tracheal suctioning using appropriate techniques.
-
(c) Reinflate the cuff to the minimum occluding volume or according to physician's order.
-
(19) Instruct an assistant to hyperoxygenate the patient between suction attempts.
-
(20) Instill 5 cc of sterile normal saline into the trachea if ordered by the physician and, if secretion is thick, wait 5 seconds and suction the patient again.
-
(a) Thick secretions may be controlled by instilling 5 cc of sterile normal saline into the endotracheal tube immediately prior to suctioning.
-
(b) Increasing airway humidity will also assist in liquefying secretions.
-
(17) Rotate the catheter between the thumb and index fingers of your sterile hand while applying intermittent suction and withdrawing the catheter.
(18) Rinse the suction catheter in sterile saline.
(21) Repeat the suction procedure until the airway is clear, rinsing the catheter and hyperoxygenating the patient.
(22) Perform oropharyngeal suctioning, if possible.
(23) Shut off the suction machine.
(24) Remove your gloves and place them in the waste receptacle.
(25) Determine the patient's airway patency and vital signs.
(26) Assist the patient to a comfortable position.
(27) Discard the suction kit equipment and return all equipment to the appropriate area.
(28) Wash your hands.
(29) Record procedure and report significant observations to the Charge Nurse.
-
(a) Time, frequency of the procedure, and name of the person performing the procedure.
(b) Hyperoxygenation procedure and the equipment used.
-
(c) Specific assessment parameters including color, amount, consistency, odor of the secretions, vital signs, and breath sounds.
(d) Instillation of normal saline during the procedure, if possible.
-
(e) The patient's reaction to the procedure and the position in bed, if appropriate.
-
(f) The type of respiratory care equipment attached to the endotracheal tube following the procedure, as appropriate.
-
(g) Any patient teaching done and the patient's level of understanding.
|
|
|
The Brookside Associates Medical Education Division is dedicated to the development and dissemination of medical information that may be useful to medical professionals and those in training to become medical professionals. This website is privately-held and not connected to any governmental agency. The views expressed here are those of the authors, and unless otherwise noted, do not necessarily reflect the views of the Brookside Associates, Ltd., any governmental or private organizations. All writings, discussions, and publications on this website are unclassified.
© 2007 Medical Education Division, Brookside Associates, Ltd. All rights reserved
![]()