
Treating Fractures in the Field
Lesson 3: Traction Splints
3-3
3-3. APPLY THE HARE TRACTION SPLINT
a. Locate Fracture Site. As you perform your survey of the casualty, cut or tear the pants leg to expose the injury and locate the site of the fracture. Dress any open wounds on the leg before applying the traction splint. Check the casualty's distal pulse.
b. Obtain Splint. Obtain the Hare traction splint set. The set contains the metal Hare splint with straps and ratchet, an ankle hitch, padding materials, and a litter bar. The Velcro straps provide support for the leg and secure the leg to the splint. The metal splint has a stirrup that lifts the splint off the ground.
c. Obtain Assistant. The Hare traction splint can be applied by two people. In the following instructions, the person helping you will be identified as the assistant. Instruct the assistant in his functions and provide help as needed.
d. Stabilize the Injured Leg. Check for a pulse distal to the injury. Then grip the casualty's ankle and foot as shown in figure 3-1. Apply sufficient traction to stabilize the leg to prevent movement at the site of the fracture.
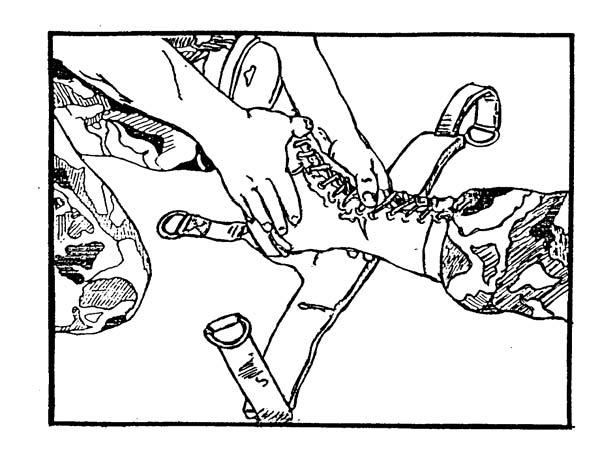
Figure 3-1. Positioning the ankle hitch of a Hare splint.
e. Adjust Splint. Have the assistant adjust the telescoping splint to the right length and lock the rod in place using the following steps.
(1) Loosen the locking devices on the two metal rods of the splint so the bottom of the splint is free to slide.
(2) Lay the splint parallel to the casualty's uninjured leg with the top of the splint even with the bottom of the casualty's buttocks (at the ischium).
(3) Pull on the lower part of the splint until the bottom of the splint is 8 to 12 inches beyond the bottom of the casualty's foot. Keep the top of the splint even with the ischium (the lower bone of the pelvis).
(4) Lock the splint in position.
(5) Test the splint to make sure the lower part of the splint is securely locked and will not slip.
(6) Position the splint next to the injured leg with the top of the splint even with the ischium on the casualty's injured side.
f. Open and Position Support Straps. The splint has five straps, the ischial (top) strap and four Velcro leg support straps. Have the assistant open all five straps and position the four Velcro support straps in the following positions:
(1) Position the first leg support strap (first strap below the ischial strap) so it will secure the thigh above the fracture site.
(2) Position the second leg support strap so it will secure the thigh below the fracture site.
(3) Position the third leg support strap so it will secure the lower leg below the knee.
(4) Position the fourth leg support strap so it will secure the lower leg above the ankle.
g. Prepare Ratchet. Have the assistant release the ratchet, pull the traction strap over the top of the ratchet, and place the "S" hook so the hook hangs off the splint.
h. Apply the Ankle Hitch to the Boot. Have the traction assistant apply the ankle hitch in the following manner:
(1) Slide the three-ringed ankle strap under the heel of the casualty's boot with the padded side of the strap against the foot. Place the bottom edge of the heel even with the lower edge of the sponge padding as shown in figure 3-1.
NOTE: You will need to change your grip on the casualty's ankle and foot to allow the
assistant to apply the traction strap while you maintain your support. After
the strap is applied, your hands should be over the "X."
(2) Crisscross the side straps high over the casualty's instep so the straps form an "X."
(3) Bring the ends of the crisscrossed straps down to meet the center strap. Hold all three straps in place.
(4) Twist the center strap until it is even with the two side straps, all three straps can be firmly grasped, and the three "D" rings at the end of the straps are together (see figure 3-2).
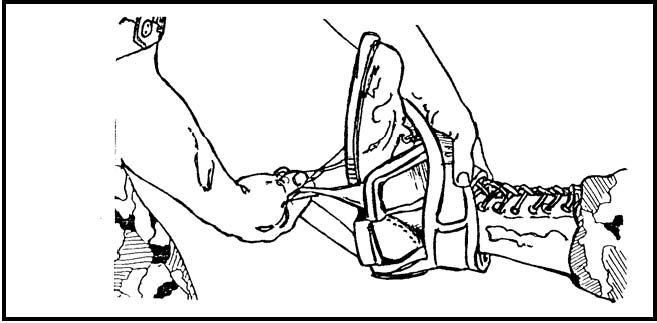
Figure 3-2. Ankle hitch applied to the casualty.
i. Apply Manual Traction. Have the assistant position himself at the casualty's injured thigh and gently support the thigh above and below the fracture site. Apply increased gentle, longitudinal manual traction to the casualty's limb. In unison with the assistant, lift the casualty's injured leg so the splint can be slipped beneath the leg (see figure 3-3).
NOTE: Traction and lift can be applied by leaning back. Apply only enough traction
to align the limb to fit into the splint. Do not try to align the fracture fragments
anatomically. Once you have applied increased traction, maintain the traction
until the splint is in place and providing the traction.
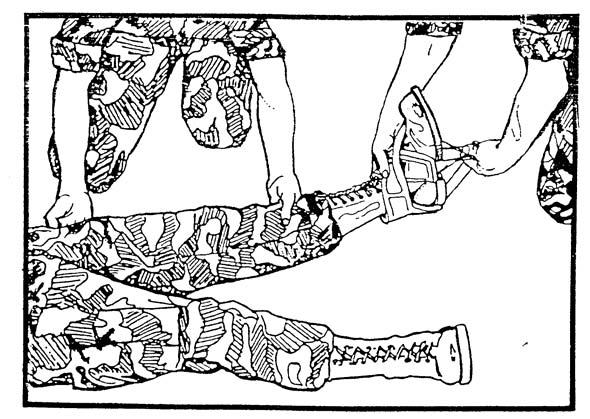
Figure 3-3. Applying manual traction and lifting the leg.
j. Position the Splint. While maintaining traction, have the assistant use one hand to support the fracture site and slide the splint into position under the casualty's hip and limb with his other hand (see figure 3-4). The ischial ring of the splint should be seated where the thigh joins the buttocks (on the ischial tuberosity).
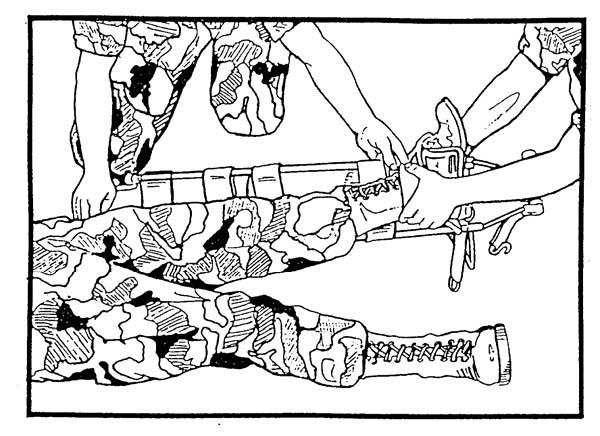
Figure 3-4. Positioning the Hare splint under the casualty's limb.
k. Lower Leg Into Splint. Upon your command, lower the casualty's leg into the cradle of the splint in unison with the assistant. Maintain traction as you and the assistant lower the limb. After the limb is in position, have the assistant remove the hand supporting the fracture site and prepare to secure the limb to the splint.
l. Apply the Ischial Strap. Have the assistant perform the following steps.
(1) Make sure the ischial ring is seated on the ischial tuberosity.
(2) Place padding around the groin area and where the ischial strap will cross the thigh.
(3) Bring the ischial strap over the top of the casualty's thigh; then secure and tighten the ischial strap (strap has a buckle). Do not tighten the strap tight enough to impair circulation.
(4) Check the casualty's distal pulse. If the strap is interfering with circulation, loosen the strap and check the pulse again.
m. Apply Traction Using the Splint. Have the assistant perform the following steps.
(1) Have the assistant move to the ankle hitch and hold the traction straps again so that the three "D" rings are together.
(2) Slip the three "D" rings over the free end of the "S" hook.
(3) Tighten the traction strap to provide enough traction to maintain the limb's alignment (see figure 3-5).
CAUTION: Some models do not have a ratchet mechanism to tighten the strap.
When a ratchet mechanism is used, do not apply undue traction to the
limb. Overstretching the limb can cause further injury to the limb.
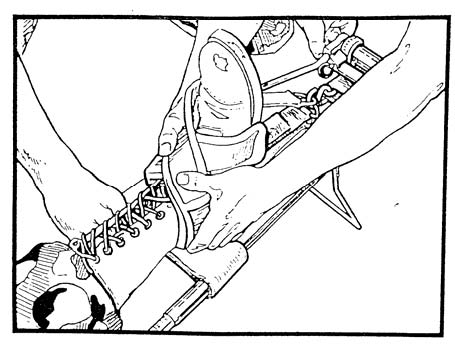
Figure 3-5. Applying mechanical traction with the Hare splint.
(4) Once the traction has been applied by the traction strap, you can lean forward and relax your manual traction. Continue to support the leg at the ankle until the remainder of the splint straps have been applied.
n. Secure Velcro Support Straps. The medical leader secures the four Velcro support straps so the limb is securely held in the splint.
(1) Tighten the straps on the thigh above the fracture, on the thigh below the fracture, below the knee, and above the ankle.
(2) Check the distal pulse after tightening each strap.
(3) If the strap interferes with the blood circulation, loosen the strap and secure it again.
o. Place Casualty on Litter. Once the traction splint has been applied, the casualty is moved to the litter using the procedures given in paragraph 3-4.
CAUTION: Once the traction strap has been applied, do not release the traction.
Traction should only be released by a medical officer. If the strap
becomes loose, have the traction assistant administer manual traction;
then tighten and secure the strap again.
p. Support the Lower Limb. Position yourself next to the casualty's injured leg at the tibial area. Place both hands under the casualty's thigh, one above the fracture site and one below the fracture site. Manually support and stabilize the injured limb to prevent any movement at the fracture site. Continue providing support and stabilization as the traction assistant applies the ankle hitch and splint.
