
Cardiopulmonary Resuscitation
LESSON 4: PERFORM CARDIOPULMONARY RESUSCITATION ON AN ADULT
4-1
4-1. ADMINISTER CARDIOPULMONARY RESUSCITATION TO AN ADULT USING THE ONE-RESCUER METHOD
There are two basic methods of administering cardiopulmonary resuscitation (CPR) to an adult casualty--the one-rescuer method and the two-rescuer method. The one-rescuer method is used when you have no one available to help you perform CPR. The two-rescuer method is used when you have an assistant available. The one-rescuer method is presented in this paragraph and the two-rescuer method is presented in paragraph 4-2. In this paragraph, it is assumed that you have already moved the casualty to safety if required (paragraph 3-1), checked for spinal injury (paragraph 3-4), opened the airway and administered two ventilations (paragraphs 3-6 through 3-9), found the airway unblocked or have removed any blockage (Lesson 5), and have found the casualty's carotid pulse to be absent (paragraph 3-11).
a. Position the Casualty on a Firm Surface. Chest compressions must be performed with the casualty lying on a firm surface. If you have not already placed the casualty on a firm surface, do so now. The casualty's body should be in the same position as used in initiating rescue breathing (paragraph 3-5).
b. Position Yourself. Kneel at the side of the casualty's chest.
c. Call for Help Again. If help has not arrived, call for help again. If an assistant is available, have him seek help (telephone, radio, and so forth). Remember, for the adult chain of survival (figure 4-1), you should phone first before initiating CPR.

Figure 4-1. The chain of survival.
d. Locate the Compression Area. Locate the site on the casualty's chest where the force of the chest compression is to be applied. The method described below is normally used, but other methods can be used if they locate the same compression site.
(1) Take the index and middle finger of your hand that is nearest the casualty's feet and locate the lower edge of the casualty's rib cage (figure 4-2A).
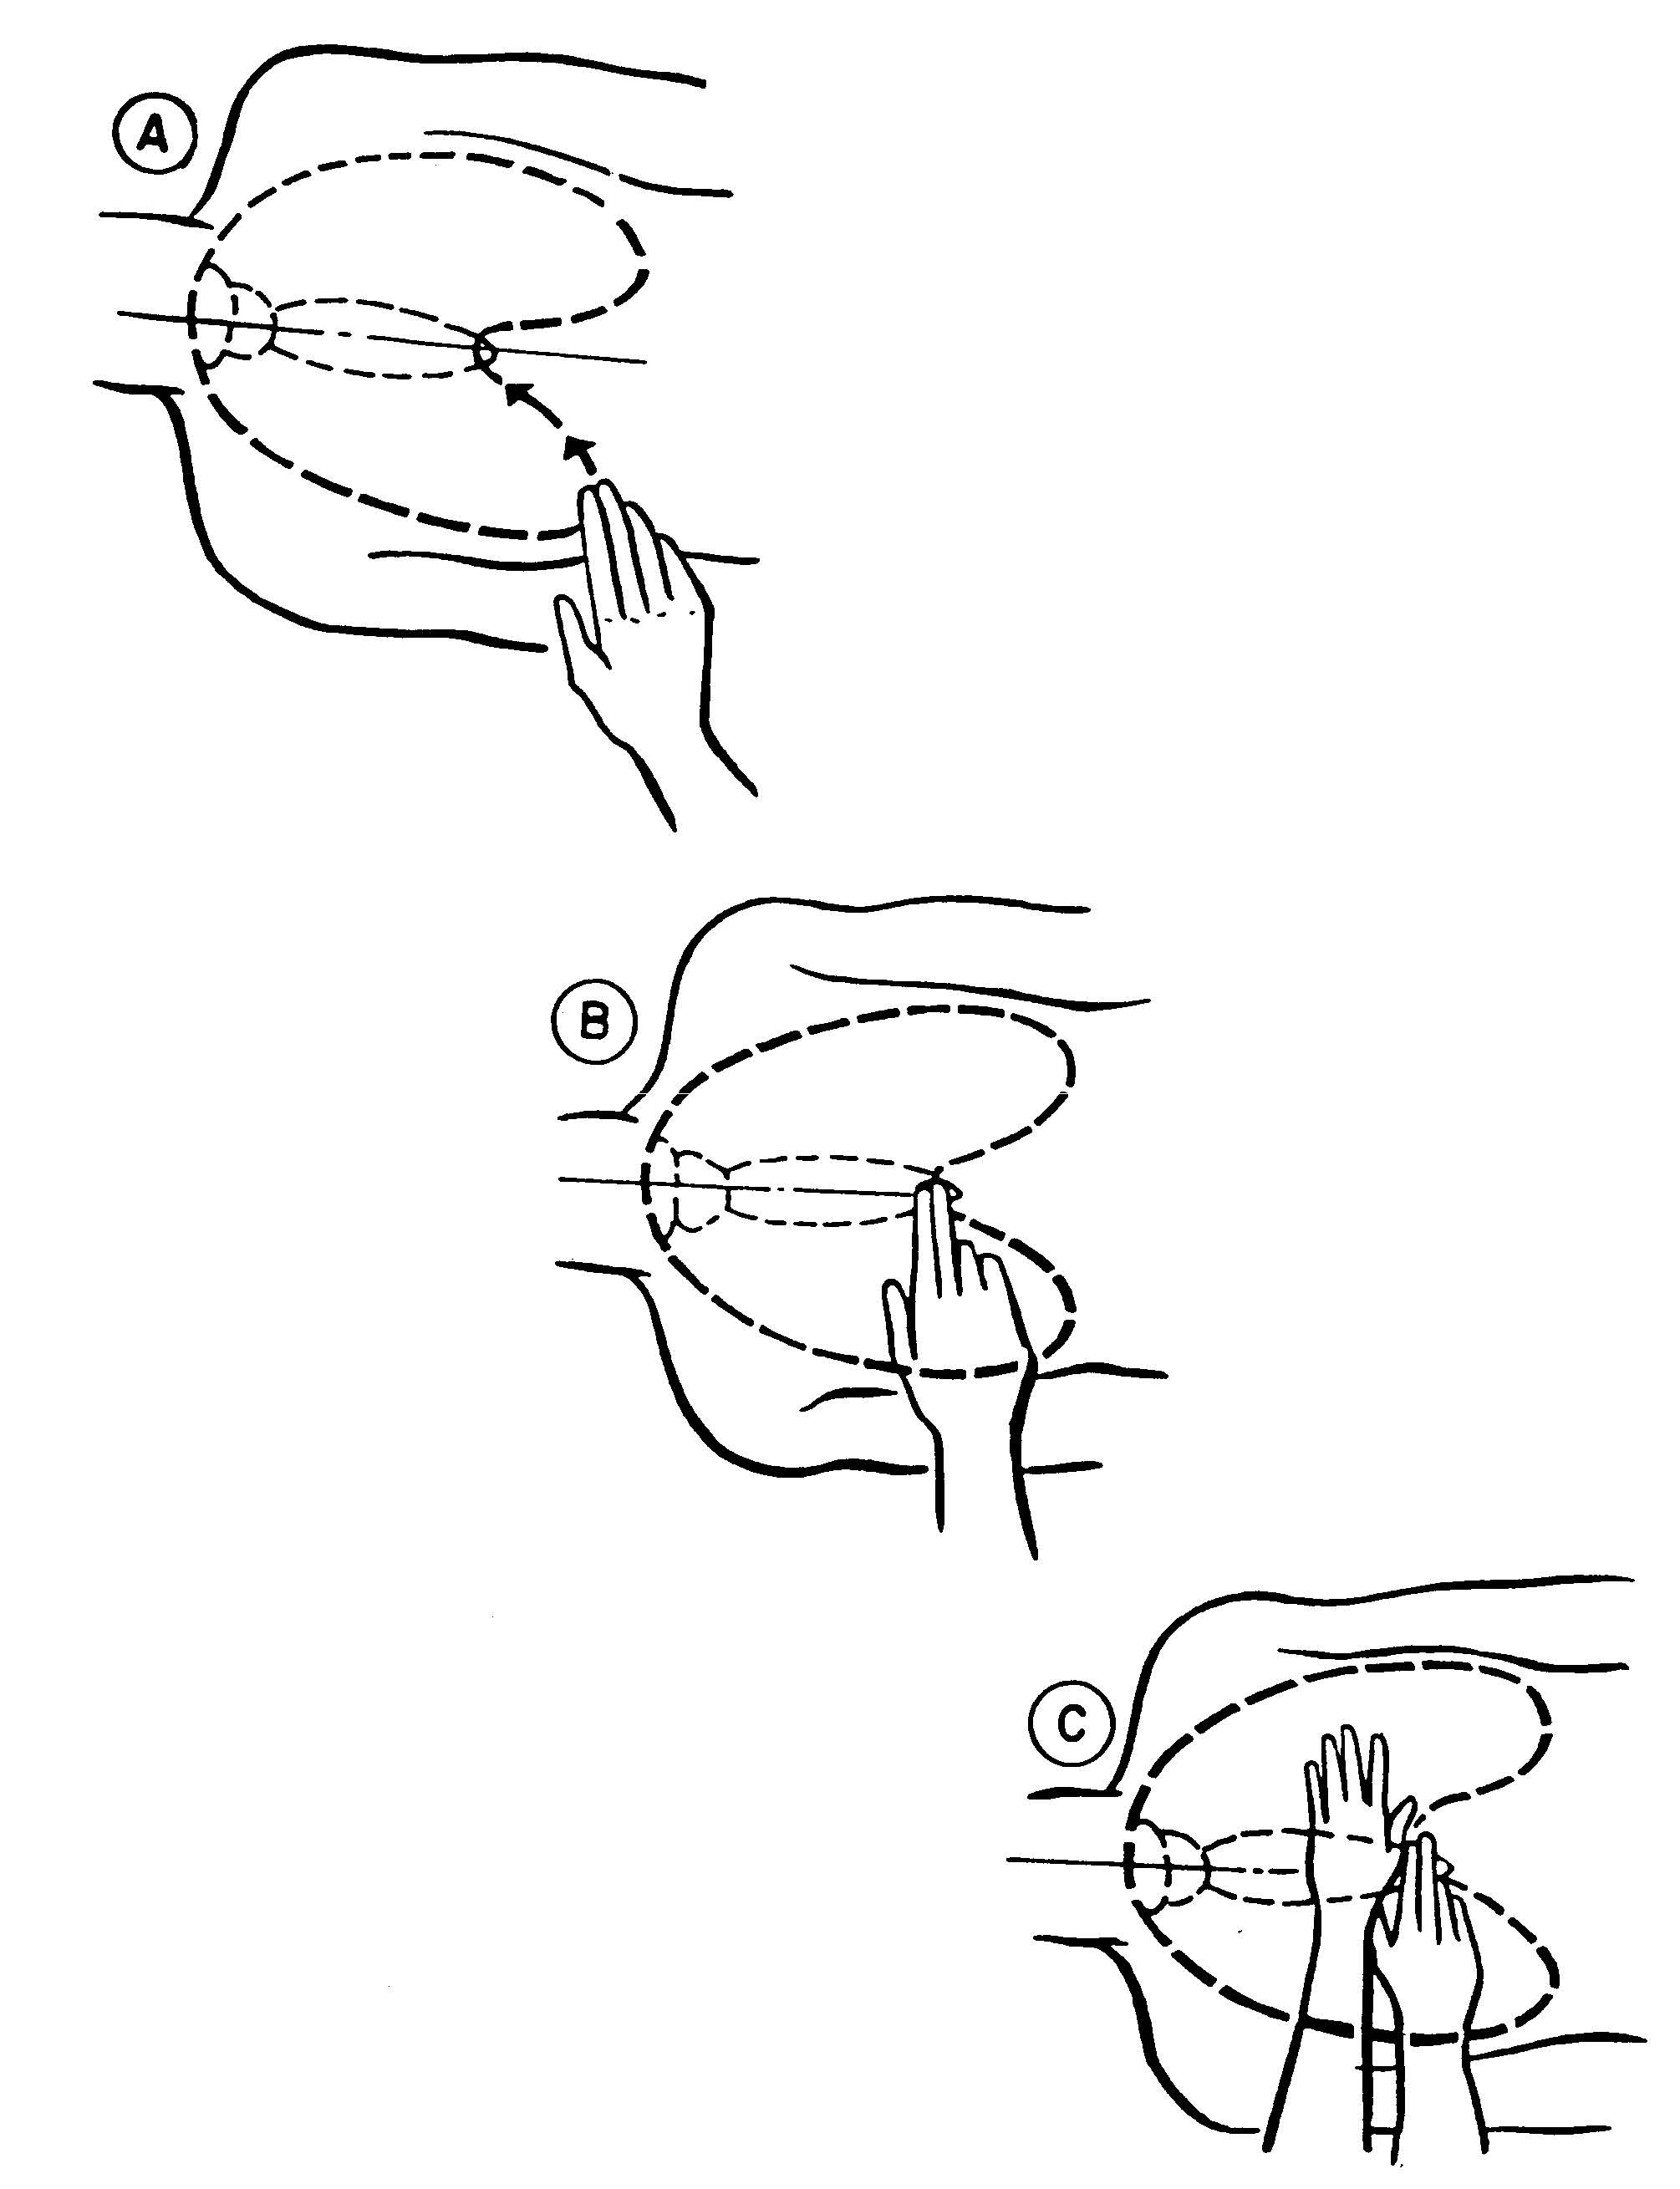
Figure 4-2. Locating the compression site for chest compressions.
(2) Push your fingers along the lower edge of the rib cage toward the center of his chest until you come to a notch. The notch is the location where the ribs meet the sternum, and where the xiphoid process begins.
(3) Place the tip of your middle finger in the notch and against the bottom of the sternum.
(4) Place your index finger next to the middle finger and over the sternum (figure 4-2B). The index finger is now above the xiphoid process.
NOTE: The xiphoid process is a bone shaped somewhat like an arrowhead. It is
located at the bottom of the sternum. Force is never applied directly to the
xiphoid process.
(5) Place the heel of your other hand so that the thumb side is next to your index finger (figure 4-2C). The heel is now over the lower half of the sternum and covers the compression site. Having the long axis of the heel of your hand placed along the long axis of the sternum keeps the main line of the force of compression on the sternum only rather than on the sternum and the ribs together. This decreases the chance of fracturing a rib during chest compressions. This hand position also ensures that the heel of the hand is not over the xiphoid process. A fractured rib or a xiphoid process that has broken free of the sternum can result in damage to the heart, lungs, and/or major blood vessels. It is common, even with proper CPR, to fracture a rib or ribs in the process of good resuscitation. The 2005 AHA guidelines state that it is extremely important to ensure proper force and depth of compressions and that this outweighs the risk associated with fracturing ribs.
e. Position Hands for Compression. Lift your hand that is closest to the casualty's feet (the one you ran along the bottom of the casualty's rib cage) and place the heel of that hand on top of the hand that is on the compression site. The long axis of both heels should be parallel with the long axis of the sternum with the fingers of both hands pointing away from you. Either extend the fingers of both hands so that the fingers are straight or interlace your fingers. (Figure 4-3 shows the fingers interlaced.) Keep your fingers and palms off the casualty's chest.
f. Position Your Body to Deliver Compressions. To be efficient and effective (the best heart compression for the least amount of energy expended), the thrust must be straight down. If the thrust is not straight down, the casualty's body will tend to roll. Such a rolling motion will decrease the force of the compression, lead to early fatigue on your part, and could cause fractured ribs or a fractured xiphoid process.
(1) Lock elbows. Straighten your arms and lock your elbows. If your elbows are not locked, your arms will bend somewhat when you deliver the compression and your compression will not be as effective.
(2) Position shoulders over hands. Move your shoulders so that they are directly over your hands and directly above the casualty's sternum. You will probably be at a point of imbalance when you assume this position. That is, you will feel that you would fall forward if you were not being supported by your hands on the casualty's chest. This imbalance actually helps in performing external chest compressions since your weight is added to the force of the compressions.
g. Perform 30 Chest Compressions. A compression consists of a thrust which compresses the heart and a release which allows the heart to refill with blood. These compressions are delivered at a rate of approximately 100 per minute. Figure
4-3 shows a rescuer delivering chest compressions. It is recommended to push hard and fast to make sure adequate depth and rate of compressions are maintained.
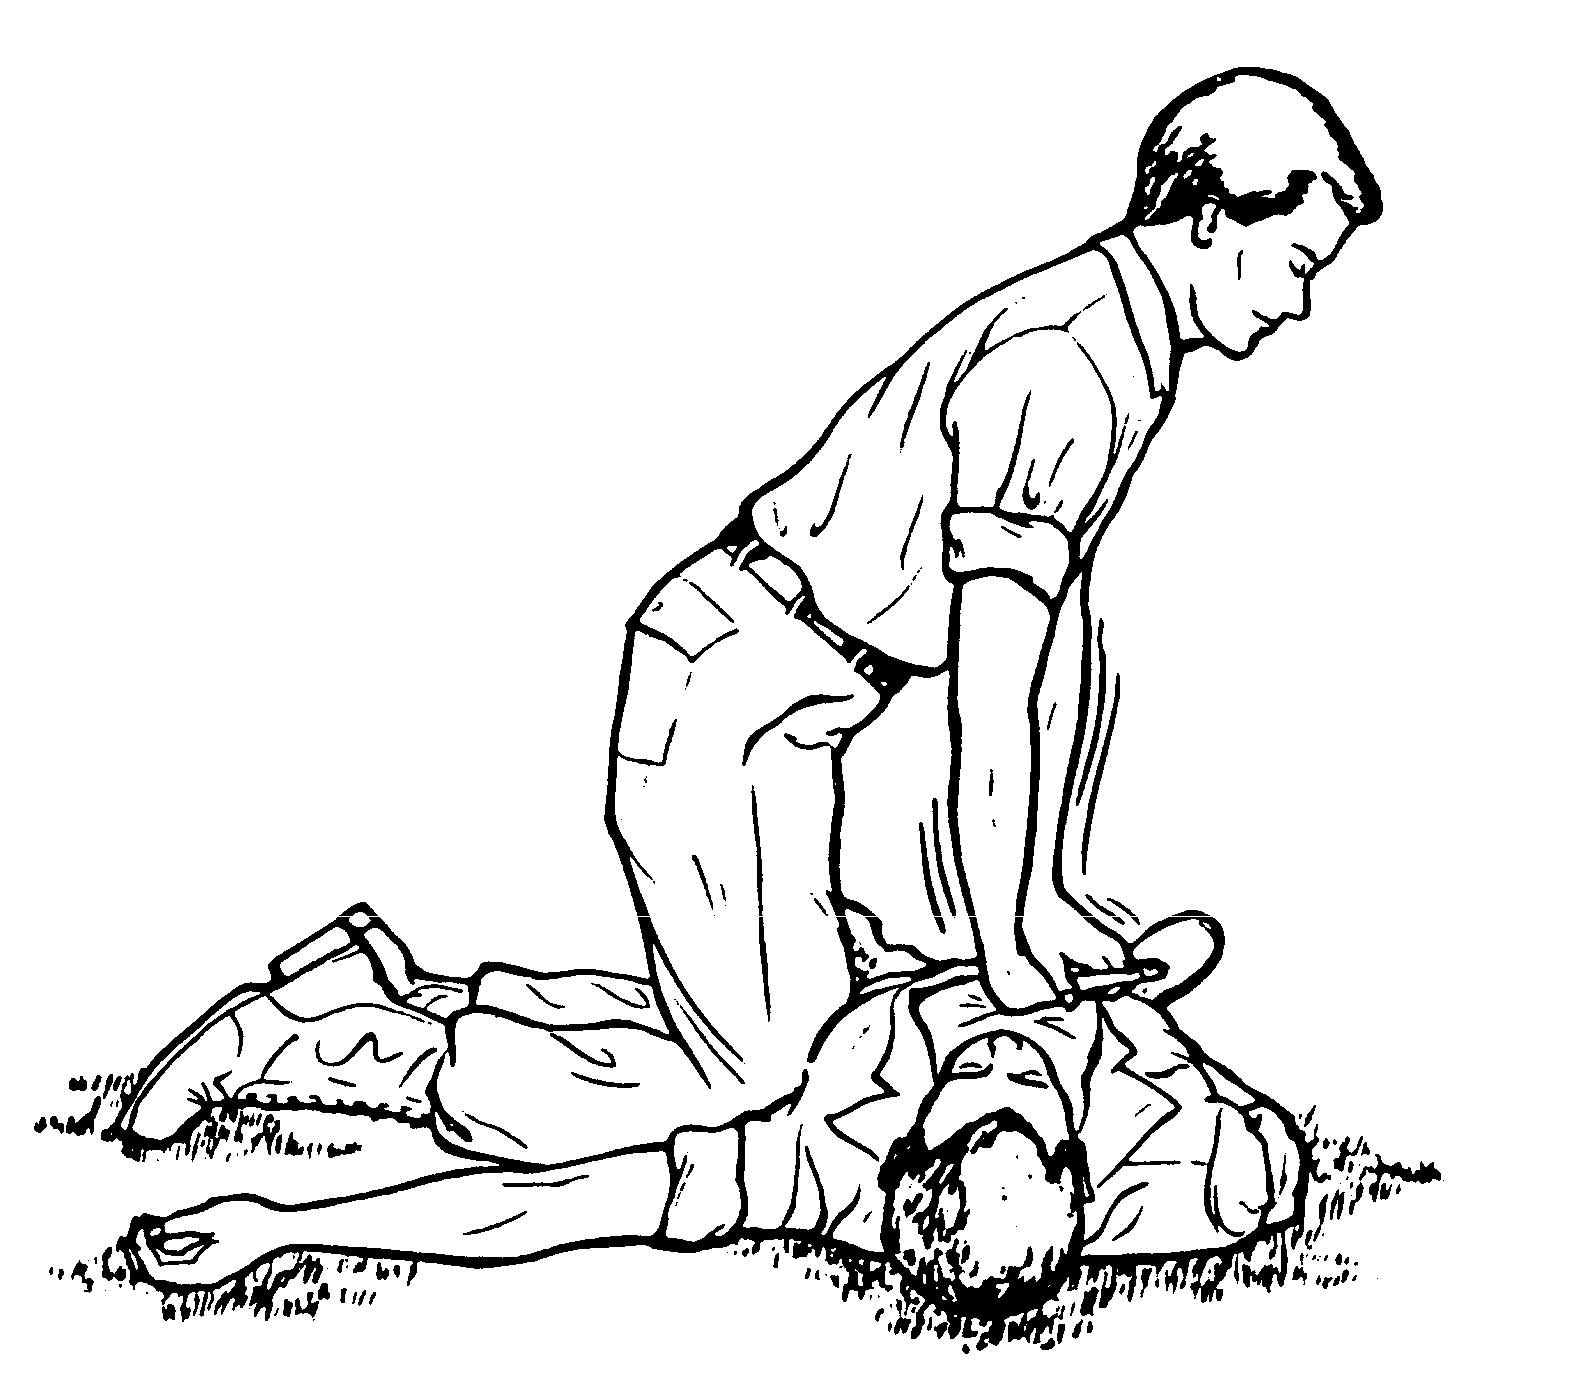
Figure 4-3. Rescuer administering chest compressions.
(1) Thrust. When performing the thrust, keep your elbows locked and push straight down. Do not push with all of your strength, but do use enough force to push the casualty's sternum down 1 1/2 to 2 inches (4 to 5 centimeters). Instead of pushing down using your muscles only, let the weight of your body move forward and use that force to help depress the sternum.
(2) Release. Releasing the pressure allows the heart to refill with blood. Release the pressure completely so that the sternum resumes its normal position, but do not remove the heel of your hand from the compression site.
NOTE: If you do lose the compression site, quickly repeat the procedures given in
paragraphs d and e.)
(3) Rhythm. You should establish a definite rhythm when performing external chest compressions. The release part of the cycle should be equal in time to the thrust part of the cycle. Both parts should be distinct--do not "bounce." Use a system to keep the compressions regular, smooth, and uninterrupted. One system for keeping track of the number of compressions administered is given below.
(a) Count out loud, "One and two and three and four and five and six and seven and eight and nine and ten and eleven and twelve and thirteen and fourteen and fifteen and...."
(b) Push down on the sternum when you say a number.
(c) Release the pressure when you say "and."
h. Administer Two Breaths. Immediately after giving the thirtieth chest compression, move your hands to the casualty's head, open his airway (paragraph 3-6), and administer two breaths (paragraph 3-9). Each breath should take about 1 second to administer. Observe the casualty's chest out of the corner of your eye to make sure that the chest rises when you blow into the casualty's mouth (or nose or stoma). The procedure should be completed within 3 to 5 seconds.
i. Prepare to Administer Chest Compressions. After the second breath, relocate the compression site (landmark) over the lower half of the casualty's sternum. Use the procedure given in paragraph d. Do not guess where the site is located. Position your hands, lock your elbows, and move your shoulders over your hands.
j. Perform Four More Cycles of Cardiopulmonary Resuscitation. Administer four more CPR cycles. A one-rescuer CPR cycle is sometimes referred to as a 30:2 cycle. Each cycle consists of administering 30 chest compressions (paragraph g) followed by administering two breaths (paragraph h). You have now administered five complete CPR cycles (150 compressions and 10 breaths). About 2 minutes have elapsed since you began the first cycle.
k. Check for Pulse and Breathing. After you have administered the two full breaths of the fifth CPR cycle, check the carotid pulse (paragraph 3-11) again to see if his heart has resumed beating on its own. At the same time, check for signs that spontaneous breathing has resumed (paragraph 3-7). The check should take about 5 seconds. CPR should not be stopped for more than 10 seconds.
l. Evaluate Your Findings.
(1) If the casualty has resumed adequate breathing on his own, stop administering CPR and begin checking for other injuries. Remember to keep his airway open and check his breathing
every few minutes if he does not regain consciousness. Resume administering rescue breathing or CPR if the breathing stops.
(2) If the casualty has a pulse, but has not resumed breathing on his own, proceed to administer rescue breathing (paragraph 3-12). Check the casualty's pulse after every 12 breaths. If you find the casualty's pulse to be absent, resume administering CPR.
(3) If the casualty does not have a pulse, give the casualty two full breaths and resume administering CPR. (Note: If there is no possibility of help arriving unless you make a telephone or radio call and a telephone or radio is readily available, quickly telephone or radio for help.) Continue to check for the return of pulse and breathing after every five cycles (5 cycles = approximately 2 minutes) of compression/ventilation.
m. Evacuate the Casualty. If possible, evacuate the casualty to a medical treatment facility. Continue administering CPR or rescue breathing en route if needed. If the casualty is breathing on his own, continue to observe him and be prepared to resume administering CPR since his condition could deteriorate rapidly without warning. Even if the casualty appears to recover, he needs to be examined by a physician as soon as possible.
n. Terminate Efforts, If Required. Keep administering CPR until one of the following occurs.
(1) The casualty's heart resumes beating adequately on its own. (If this happens, continue rescue breathing.)
(2) The casualty's heart resumes beating on its own and he also resumes breathing adequately on his own. (If this happens, look for injuries.)
(3) You are joined by another qualified person. (If this happens, change to two-rescuer CPR as described in paragraph 4-3.)
(4) You are relieved by a physician or other medical personnel. (If this happens, perform other duties as required.)
(5) You are ordered to stop by a physician or other qualified person authorized to pronounce the casualty as being dead. (In a military treatment facility, only a physician has this authority.)
(6) You are too exhausted to continue.
CAUTION: In general, when in the tactical environment, serious consideration should be given before administering CPR to the combat casualty. Cardiopulmonary resuscitation actions require your entire concentration and will prohibit you from attending to casualties that you may be able to save.
