LESSON ASSIGNMENT Paragraphs 6-1 through 6-10.
LESSON OBJECTIVES After completing this lesson, you should be able to:
6-1. Identify the functions of roller bandages.
6-2. Identify the procedures for applying an anchor wrap.
6-3. Identify the procedures for applying a circular wrap.
6-4. Identify the procedures for applying a spiral wrap.
6-5. Identify the procedures for applying a spiral reverse wrap.
6-6. Identify the procedures for applying a figure eight wrap.
6-7. Identify the procedures for applying a recurrent wrap.
6-8. Identify the procedures for monitoring a casualty with an elastic bandage applied to a limb.
SUGGESTION After completing the assignment, complete the exercises at the end of this lesson. These exercises will help you to achieve the lesson objectives.
6-1. ROLLER BANDAGES
A roller bandage is a strip of gauze or cotton material prepared in a roll. Roller bandages can be used to immobilize injured body parts (sprains and torn muscles), provide pressure to control internal or external bleeding, absorb drainage, and secure dressings. Three types of bandages are the Kerlex bandage, the gauze bandage, and the elastic bandage (see figure 6-1).
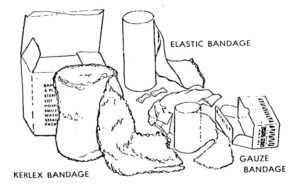
a. Kerlex Bandage. The Kerlex bandage is absorbent, loosely woven, and conforms easily to uneven surfaces such as the hand, wrist, elbow, shoulder, groin, knee, ankle, and foot. The Kling bandage is similar to the Kerlex bandage. These bandages are used primarily for bleeding injuries.
b. Gauze Roller Bandage. The gauze roller bandage is absorbent, loosely woven, cotton fabric. It does not conform well to uneven surfaces and is not to be used on areas prone to chafing such as shoulders, elbows, groin, and other jointed areas. It is used primarily on bleeding injuries on the upper arm, forearm, thigh, and lower leg.
c. Elastic Roller Bandage. The elastic roller bandage is composed of cloth and elastic that allows it to stretch and retract. It conforms to uneven surfaces and applies even pressure to the area covered. It is used to apply pressure and/or restrict movement. The elastic bandage is normally used when a sprain needs to be immobilized. Make sure the bandage is not tight enough to restrict blood flow unless it is used as a pressure dressing.
6-2. GENERAL RULES FOR APPLYING ROLLER BANDAGES
Some general rules for applying roller bandages are given below.
a. Expose the limb to be bandaged. The limb should be as dry and clean as possible.
b. Position the body part to be bandaged in a normal resting position (position of function).
c. Check the circulation at a point below where the bandage will be applied.
d. Choose the appropriate sized roller bandage. Roller bandages range from 1/2 inch to 6 inches in width. The wider widths are used for the larger body parts. The 2-inch roller bandage is primarily used for the hand. The 3-inch roller bandage is used for the forearm, lower leg, and foot. The 4-inch and 6-inch roller bandages are used for the thigh and chest.
e. Pad bony areas and/or between skin surfaces (such as between fingers) that will be covered by the roller bandage.
f. Apply the roller bandage. A roller bandage applied to a limb is normally applied beginning with the most distal point to be wrapped. The roller bandage is normally secured with an anchor wrap at the beginning and with a circular wrap at the end.
g. Tape, clip, or tie the end of the bandage in a position that is easy to reach.
h. Check the circulation below the wrapping. If the wrapping is interfering with the casualty’s circulation, loosen the roller bandage and apply it again.
i. Elevate the injured limb to help control swelling.
6-3. APPLY AN ANCHOR WRAP
The following steps are used to apply an anchor wrap to a limb. The anchor wrap is usually used to anchor (secure) the roller bandage when beginning other wrappings.
a. Lay the end of the bandage on the bottom of the limb to be wrapped and at an angle so one corner (apex) of the bandage will not be covered when the bandage is brought around the limb (see figure 6-2 A).
b. Wrap the bandage completely around the limb twice and past the raised corner (see figure 6-2 B).
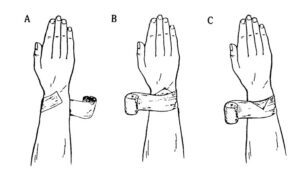
c. Fold the corner over the second turn of the bandage (see figure 6-2C).
d. Continue wrapping the bandage around the limb a third time, bringing the bandage over and covering the turned-down corner. The bandage is now anchored.
6-4. APPLY A CIRCULAR WRAP
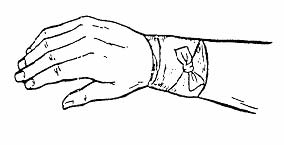
The circular wrap is usually used to end a bandage pattern, but can also be used to help immobilize a joint (see figure 6-3). Secure the bandage with two or more circular-turns, then tape, clip, or tie the end of the bandage.
6-5. APPLY A SPIRAL WRAP
The spiral wrap is usually used to cover the forearm, upper arm, calf, or thigh. It is not used to cover elbows, knees, fingers, or toes.
a. Apply an anchor wrap.
b. Wrap the limb in a spiral manner (see figure 6-4). On each turn, overlap about one-third of the previous turn. Keep the bandage tight enough to apply pressure to the limb, but not tight enough to impair blood circulation.
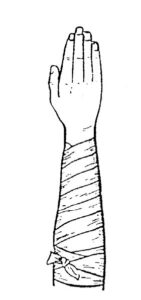
c. Continue wrapping until the entire portion of the limb has been wrapped.
d. Secure the bandage with a circular wrap.
e. Tape, clip, or tie the end of the bandage.
6-6. APPLY A SPIRAL REVERSE WRAP
Although the spiral wrap (see figure 6-5) is normally used to apply pressure to a limb, the spiral reverse wrap can also be used. It is especially useful when applying pressure to the calf (lower leg) since it follows the contours of the limb more closely than does the spiral wrap.
a. Secure the bandage at the ankle with an anchor wrap (see figure 6-5 A).
b. Apply about four spiral turns (see figure 6-5 B).
c. Place the thumb of your free hand on the upper edge of the uppermost turn and apply firm pressure to hold the bandage in place.
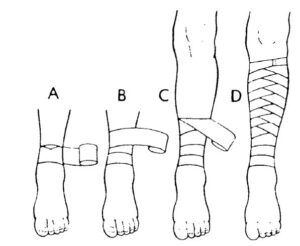
d. Unwind about six inches of bandage from the roll.
e. Give the roll a half-twist so the bandage is directed downward (see figure 6-5 C). The upper edge of the turn should be parallel to the lower edge of the previous turn and overlap it by two-thirds of its width. The wrap continues in the same direction (figure shows counterclockwise).
f. Carry the roll around the limb and back. The bandage should be at about the same location as the half-twist, but higher.
g. Repeat steps c, d, e, and f to apply another layer of bandage using the spiral reverse method.
h. Continue applying the bandage using the spiral reverse technique. The turns should be in line and uniform as shown in figure 6-5 D.
i. When you reach the top of the area to be bandaged, secure the bandage with a circular wrap.
j. Tape, clip, or tie the end of the bandage (see figure 6-5 D).
6-7. APPLY A FIGURE-EIGHT WRAP
A figure-eight wrap is used to limit joint movement of the hand, elbow, knee, ankle, or foot. Figure 6-6 shows a figure-eight wrap applied to a hand.
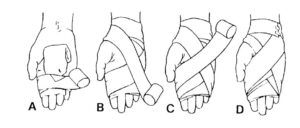
a. Apply padding (usually gauze applied between the fingers or toes, around bony areas, and/or in hollow areas).
b. Apply an anchor wrap below the joint (see figure 6-6 A).
c. Bring the roller bandage up diagonally and across the joint (wrist).
d. Wrap the roller bandage around the limb above the joint (circular wrap).
e. Bring the roller bandage down across the joint diagonally so that it crosses the upward portion of the figure-eight wrap (see figure 6-6 B).
f. Take the roll behind the body part (fingers) and up diagonally across the joint again. Overlap two-thirds of the previous upward wrap (see figure 6-6 C).
g. Take the roll behind the body part (wrist area) and down again diagonally, overlapping the previous downward wrap.
h. Continue alternate upward and downward diagonal wraps until the joint is sufficiently supported.
i. Apply a circular wrap above the joint.
j. Tape, clip, or tie the end of the bandage (see figure 6-6 D).
6-8. APPLY A RECURRENT WRAP
A recurrent wrap is used for a stump (amputated limb), finger, or hand. The procedures given below are for securing a dressing applied to a complete amputation.

a. Apply an anchor wrap above the stump. Apply the wrap so the apex will be pointing toward the stump when it is folded down over the bandage (see figure 6-7 A).
b. Bring the bandage down diagonally across the front of the limb (see figure 6-7A) and around the stump, encasing the edge of the dressing. Hold the bandage in back so it will not slip.
c. Bring the bandage to the front.
d. Move diagonally up across the front of the limb, forming an “X” pattern with the downward diagonal (see figure 6-7 B).
e. Encircle the “X” pattern at the anchor point with one complete turn.
f. Form the first recurrent (running back to the source). Put your thumb on the top of the bandage to keep it in place, make a fold, bring the bandage down, over the far side of the dressing, and up the back (see figure 6-7 C). Hold the dressing in place on the back of the limb with your index finger.
g. Form the second recurrent. Make a fold at the back and bring the bandage down, over the opposite side of the dressing, and up the front (see figure 6-7 D).
h. Form the third recurrent. Make a fold at the front, then bring the bandage down over the center of the dressing and up the back.
i. Lock the recurrents in place with a complete turn 3 to 4 inches from the bottom of the stump (below the anchor wrap).
j. Move diagonally across the stump from the locking turn encasing the edges of the recurrents; then move back diagonally forming another “X” pattern.
k. Overlap the “X” pattern with half the width of the bandage (circular turn).
l. Tape, clip, or tie the end of the bandage (see figure 6-6 E).
6-9. APPLY A SPICA WRAP
The spica wrap is a variation of the figure-eight wrap; it is used for large areas such as the shoulder and hip.
a. Anchor the bandage below the joint (around the upper arm or thigh).
b. Wrap the bandage across the joint and around the trunk of the body (chest or abdomen).
c. Return to and cross the previous wrap.
d. Wrap the bandage behind the limb, overlapping one-third of the anchor wrap.
e. Continue to wrap (steps b, c, and d) until the joint is sufficiently supported.
f. Tape, clip, or tie the end of the bandage.
6-10. MONITOR A CASUALTY WITH A WRAPPED LIMB
After you have wrapped a casualty’s limb with an elastic bandage, monitor the limb.
a. Check for Impaired Circulation. Even if the circulation was not impaired when you finished the wrap, pressure caused by swelling (edema and/or internal bleeding) may result in impaired circulation. If impaired circulation is discovered, loosen and apply the wrap again.
(1) Check the pulse.
(2) Perform the blanch test.
(3) Ask the casualty about numbness, tingling, or cold sensationsin the limb.
(4) Observe the skin below the bandage wrap for discoloration.
b. Check for Skin Irritation. Check for rubbing or wrinkles in the bandages. Correct the source of the irritation. If the bandage is removed, check the wrapped area for redness and sores.
