
2-1. ANATOMY
a. Spinal Column. The spinal column (also called the backbone, spine, or vertebrae column) consists of a series of bones called vertebrae (see figure 2-1) and fibrocartilage layers (intervertebral disks) that separate adjacent vertebrae. The vertebrae are held together by ligaments. The top seven vertebrae (cervical vertebrae) are the bones of the neck. The next twelve vertebrae (thoracic vertebrae) form the upper part of the back and have the ribs attached. The next five vertebrae (lumbar vertebrae) form the lower part of the back. The next five vertebrae (sacral vertebrae) are located between the hip bones. They are fused together and form the sacrum, a structure that looks like a broad triangle. The final four vertebrae (coccygeal vertebrae) are fused rudimentary vertebrae located at the end of the sacrum. These rudimentary vertebrae form the coccyx.
b. Spinal Canal. The spinal canal is created by holes in the posterior parts of the vertebrae. The spinal canal contains the spinal cord.

c. Intervertebral Disks. The vertebrae that are not fused together are separated by intervertebral disks. These disks act as a cushion between the vertebrae.
d. Spinal Cord. The spinal cord is composed of nerves that carry impulses between the brain and the rest of the body. The spinal cord is protected by the spinal column. The spinal cord begins at the base of the brain and extends through the cervical vertebrae and thoracic vertebrae. The cord itself usually stops between the second and third lumbar vertebrae. If the spinal cord is severed (cut completely), the muscles controlled by the portion of the spinal cord below the cut will not function. Muscle control may be lost even if the spinal cord is not severed. Pressure on the spinal cord from a fractured vertebra or pressure due to swelling of the spinal cord can also produce paralysis.
e. Cerebrospinal Fluid. The cerebrospinal fluid (CSF) is produced in the brain and acts as a protective cushion by surrounding the brain and spinal cord. Leaking cerebrospinal fluid (usually from the ears, nose, or site of a head injury) indicates a serious head or spinal injury.
2-2. SURVEYING THE SCENE
When you arrive upon the scene, the first thing you should do is to perform a general survey. This information will help you to determine if a spinal injury is probable. A spinal injury should automatically be suspected if the casualty fell from a height, was involved in a vehicle accident or cave-in, or had a heavy object fall across his body.
a. Always assume that a spinal injury is present until your survey of the casualty indicates otherwise.
b. If other soldiers are present, ask them how the casualty was injured.
c. Do not move a casualty with a suspected spinal injury unless it is necessary to move him to a place of safety (his life is in immediate danger due to a burning vehicle, and so forth) or it is necessary to position him for rescue breathing (the casualty has inadequate breathing). Moving a casualty with a fractured spine can result in permanent paralysis or death.
(1) If the casualty must be moved to safety, keep the head and back in alignment while moving him.
(2) If the casualty must be in position for rescue breathing (mouth-to-mouth or mouth-to-nose resuscitation), open the casualty’s airway using the jaw-thrust method. The jaw-thrust reduces movement and prevents hyperextension of the neck. Procedures for performing the jaw-thrust and other methods for restoring breathing are contained in Subcourse MD0532, Cardiopulmonary Resuscitation.
2-3. SIGNS AND SYMPTOMS OF A SPINAL INJURY
When you begin your primary survey, check for signs and symptoms of a spinal injury. If you suspect the casualty has a spinal injury, treat him as though you know he has a spinal injury. Some signs and symptoms of a spinal injury are given below.
a. Spinal Deformity. If the casualty is lying with his back, neck, or head in an abnormal position, suspect a severe spinal injury.
b. Severe Head Injury. If the casualty has a severe head injury (depressed area in the skull or brain matter visible), assume the casualty also has a spinal injury.
c. Pain in the Spinal Region. If the casualty is conscious, ask him about the presence of pain or tingling in his neck or back. The pain may be localized or defused. The presence of any pain in the spinal region is sufficient reason to suspect a spinal injury.
CAUTION: If your survey of the casualty does not indicate a spinal injury but the casualty has spinal pain when he attempts to move, assume a spinal injury is present.
d. Lacerations and Contusions. Look for lacerations (cuts) and contusions (bruises) over the spine.
e. Tenderness in the Spinal Region. If the casualty is conscious and does not report spinal pain, gently palpate the spine for tenderness (pain). If the casualty says an area of his spine is tender, assume that a spinal injury is present. As you check, also feel for deformity and look for lacerations and contusions. If the casualty is lying on his back, use the following procedures to check for spinal injury.
(1) Carefully insert your hand under the casualty’s neck and feel along the cervical spine as far as can be done without disturbing the casualty’s spine.
(2) Carefully insert your hand into the cavity formed by the small of the back and feel along the thoracic spine and down to the lumbar spine as far as possible without disturbing the casualty’s spine.
f. Numbness or Paralysis. If the casualty is conscious, ask him if his extremities (especially his legs) feel numb, weak, or paralyzed. Numbness or paralysis of all four extremities usually indicates an injury to the cervical spine. Numbness or paralysis of only those areas below the waist usually indicates an injury to the lower part of the spine. Check for pulse, motor, and sensory (PMS) function during your assessment of the casualty.
(1) Have the casualty move his fingers slightly to assess for motor ability.
(2) Touch the casualty’s hands and feet with your fingers and ask if the he feels your touch. Assess both sides at the same time to assess for differences in sensation.
g. Unconsciousness. Always treat an unconscious casualty as though he has a spinal injury.
2-4. SPINE BOARDS
After making sure the casualty is breathing and all severe bleeding has been controlled, you must immobilize the casualty’s spine. This is normally accomplished using a long spine board or a short spine board (see figure 2-2). If spine boards are not available, use a door, wide plank, or other flat, rigid materials to immobilize the casualty’s spine. A standard litter can be used, but a more rigid surface is preferred. Cravats or similar materials are used to secure the casualty to the spine board. The spine board allows the casualty to be evacuated with a minimum of spinal movement.
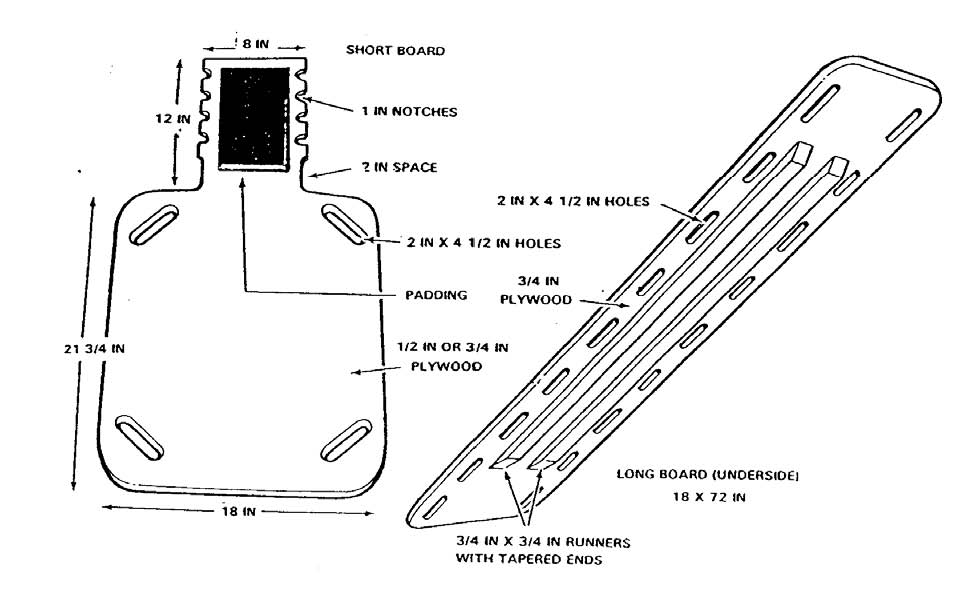
a. Long Spine Board. The long spine board is a combination litter, body splint, and rescue (extrication) device commonly used with casualties suspected of having spinal or pelvic injuries. A long spine board is usually made from 3/4-inch exterior plywood that has been sanded and varnished. The board usually measures about 18 inches in width and about 72 inches in length. Hand holes (which are also used for straps) are cut out along each side. Two parallel runners are attached lengthwise underneath the board. The runners permit easy sliding of the spine board and lift the board off the ground slightly to permit easy grasping of the hand holes. The ends of the board are rounded, beveled, and tapered to make it easier to slide the board beneath the casualty. Accessories normally include four 6-foot straps used to secure the casualty to the board, padding materials, and several cravats. The long spine board can also be placed beneath a casualty if cardiopulmonary resuscitation (CPR) is needed while the casualty is being transported on a litter. The board provides a firm surface for performing cardiac compressions.
b. Short Spine Board. The short spine board is used to immobilize the casualty’s upper body. It is normally used when the casualty is extricated while in a sitting position or when a long spine board cannot be used. The short spine board is a splint and a rescue device but, unlike the long spine board, it is not a lifting device. The short spine board is normally made of 1/2-inch exterior plywood. The board is generally 18 inches wide and about 32 to 34 inches long. It is also sanded and varnished. Although it is a one-piece board, it has two sections–the body and the headpiece. The headpiece is notched along its edges and normally measures 8 inches by 12 inches. The body has strap holes cut out at each corner and measures around 18 inches by 20 inches. Accessories normally include two 6-foot straps, one cervical collar, and cravats.
c. Cravats. A cravat is a piece of folded material. Cravats are usually made from muslin bandages, but can be made from other pliable material such as a shirt or sheet. The steps for making cravats are summarized below.
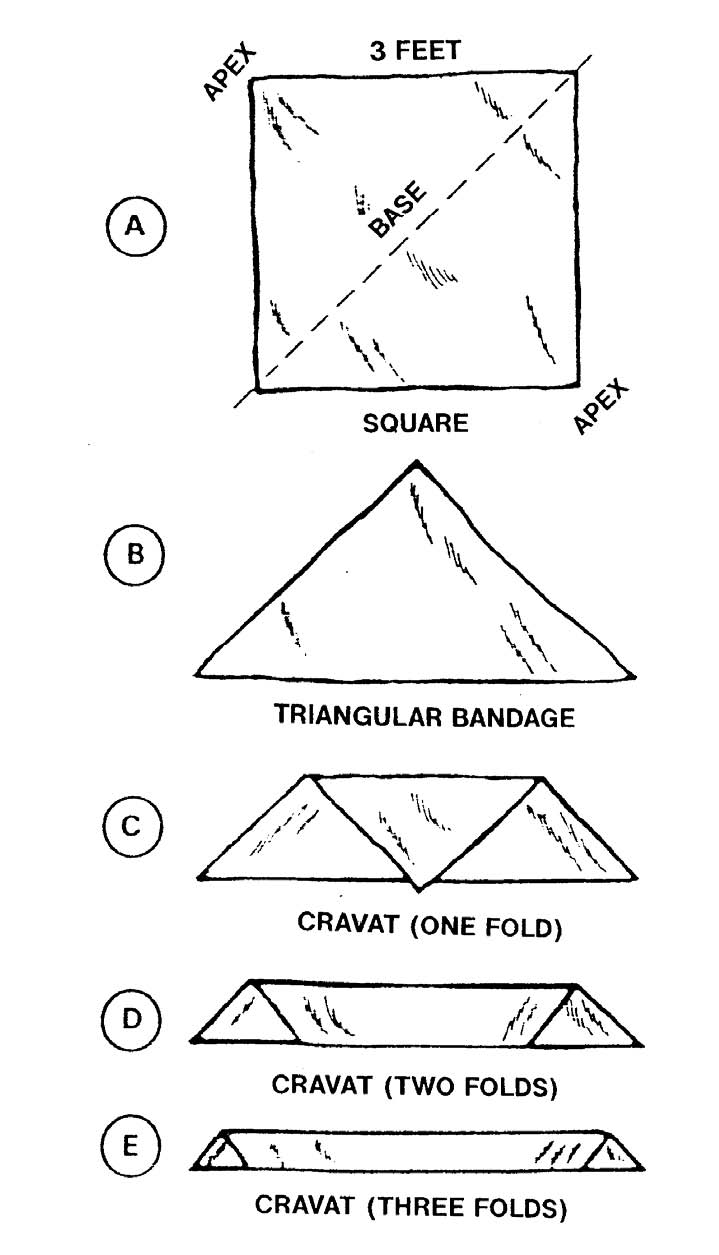
(1) Cut or tear a square about three feet on each side from pliable material if a muslin bandage is not available (see figure 2-3 A).
(2) Fold the square diagonally so it is triangular in shape (see figure 2-3 A).
(3) Cut or tear along the fold to form two triangles. Each triangle, commonly called a triangular bandage, is used to make a cravat. The longest side (the diagonal along which you cut the material) is called the base. The corner opposite the base is the apex (see figure 2-3 B).
(4) Fold the apex of the triangle down until the tip of the triangle touches the base (see figure 2-3 C).
(5) Continue to fold until the cravat is the correct size, usually about two more folds (see figures 2-3 D and E).