LESSON ASSIGNMENT Paragraphs 4-1 through 4-8.
LESSON OBJECTIVES After completing this lesson, you should be able to: be able to:
4-1. Identify the signs and symptoms of a fractured or dislocated hip.
4-2. Identify the procedures for immobilizing a fractured or dislocated hip.
4-3. Identify the procedures for immobilizing a fractured leg using an improvised splint.
4-4. Identify the procedures for immobilizing a fractured or dislocated knee using an improvised splint.
4-5. Identify the procedures for immobilizing a fractured or dislocated ankle using wire ladder splints.
4-6. Identify the procedures for immobilizing a fractured or dislocated ankle using a SAM splint.
SUGGESTION After completing the assignment, complete the exercises at the end of this lesson. These exercises will help you to achieve the lesson objectives.
4-1. IDENTIFY SIGNS AND SYMPTOMS OF A FRACTURED OR DISLOCATED HIP
The head of the femur (figure 4-1) and the hip form a “ball and socket” type joint. When the head of the femur is pulled away from the hip, a dislocation exists. When the neck or upper end of the femur is fractured, it is commonly called a “fractured hip” even though none of the pelvic bones is actually fractured. A dislocated hip and a fractured hip (upper femur) are very similar. Some of the signs and symptoms associated with these injuries are given below.
a. Pain. Both injuries are accompanied by considerable pain. The casualty will resist moving because of the pain.
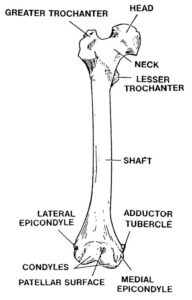
b. Severe Deformity. A hip injury results in severe deformity of the affected leg and hip. There are two general categories of hip dislocations–anterior and posterior.
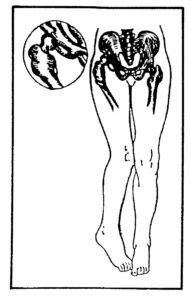
(1) Posterior dislocations comprise 70 to 80 percent of all hip dislocations. A large force is required to strike the flexed knee with the hip flexed, adducted, and internally rotated in order to cause a posterior dislocation. This injury occurs more commonly during contact sports such as American football and rugby when a running player is tackled and falls out of control onto a flexed knee. (See figure 4-2) The leading cause of posterior dislocations is automobile accidents.
(2) Anterior dislocations occur when a hip is flexed with the leg abducted and externally rotated. These injuries are more common in sports such as basketball and gymnastics where players are running at high speeds, jumping, and landing awkwardly with the knees flexed. These could be common causes of injury on the battlefield as well. This force drives the femoral head out of the acetabulum, tearing ligaments, and often fracturing the femoral head and/or acetabulum. (see figure 4-3).
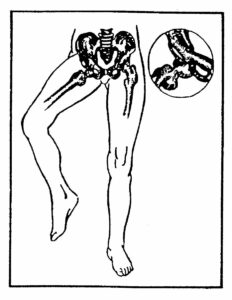
(3) When the top of the femur is fractured, the affected leg is rotated toward the midline of the body. The affected leg is usually shorter than the uninjured leg. There may be an open wound associated with the injury.
c. Impaired Sensation. The affected extremity may have tingling or other abnormal sensations (paresthesia) or the casualty may have a loss of sensation in the limb.
d. Impaired Circulation. Impaired circulation may result in coolness and/or cyanosis (bluish tint) of the affected limb. In some cases, the pulse distal to the injury may be lost due to pressure against the artery.
e. Blood Loss. Hip injuries usually result in significant blood loss, especially if a fracture is present. If there is no open wound, the internal bleeding will result in swelling. Significant internal bleeding may occur before the swelling is evident. The blood loss can result in hypovolemic shock.
4-2. IMMOBILIZE A FRACTURED OR DISLOCATED HIP (SPINE BOARD)
A casualty with signs and symptoms of a fractured or dislocated hip should be immobilized using a long spine board. If a long spine board is not available, use a door, wide plank, or other firm surface to immobilize the injured extremity and pelvis. Use the log roll technique given in paragraph 2-6 to place the casualty on the spine board. Some special considerations for performing the log roll and immobilizing the casualty when he has a hip injury are given on the following page.
a. If the casualty is lying on his abdomen, turn him onto his back using the procedures given in paragraph 2-11. Position the assistants next to the casualty’s uninjured side and have them secure holds on the injured side. In this way, the casualty will be rolled on his uninjured side, not his injured side.
b. When preparing to place the long spine board beneath the casualty, have the assistants kneel next to the casualty’s uninjured side and have the spine board positioned on the casualty’s injured side. Roll the casualty on his uninjured side, not on his injured side, and slip the board beneath the casualty. Position the casualty on the board.
c. Apply additional padding to the casualty to immobilize the hip and leg in a comfortable position. Secure padding materials in place.
(1) If the hip is dislocated, apply pillows, blankets, or other material to support the leg in its abnormal position.
(2) If the hip is fractured, place bulky support materials between the casualty’s legs and strap the legs together. Position the casualty’s knees in an up (flexed) position and place bulky support material beneath the knees. If there is no other major fracture of the lower extremities, support material may be placed beneath the buttocks to reduce abdominal pain.
d. Continue to check the pulse in the affected limb and observe for signs and symptoms of hypovolemic shock. Signs and symptoms of hypovolemic shock and procedures for treating hypovolemic shock are given in Subcourse MD0554, Treating Injuries in the Field.
4-3. IMMOBILIZE A FRACTURED FEMUR (IMPROVISED SPLINT)
A fractured femur should be immobilized using a traction splint whenever possible. If a traction splint is not available, immobilize the casualty using an improvised splint (see figure 4-4).
CAUTION: Traction splints CANNOT be applied to fractures that fall at or above the level of the ischial strap.
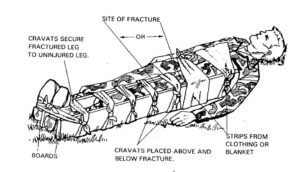
a. Obtain Materials. You will need two rigid objects, padding, and securing materials.
(1) Rigid objects. Tree branches, poles, boards, sticks, unloaded rifle, or similar objects can be used. The rigid objects should be straight, long enough to extend beyond the joint above the fracture site and beyond the joint below the fracture site. Preferably, one should be long enough to extend from the groin to the foot and the other should extend from above the hip to the foot (see figure 4-4).
(2) Padding. Padding is needed to keep the rigid objects from rubbing against the skin on the injured limb. Blankets, jackets, ponchos, extra clothing, shelter halves, leafy plants, or the casualty’s own clothing (trouser leg) can be used as padding. The padding helps to prevent excessive pressure that could interfere with blood circulation.
(3) Securing materials. The rigid objects and padding can be secured with cravats made from muslin bandages or other folded material. Rigid objects can also be secured with strips of clothing, belts, pistol belts, bandoleers, or similar materials. Narrow materials such as wire and cord should not be used since they could interfere with blood circulation.
b. Position the Securing Materials. Push the securing materials (cravats, etc.) under natural body curvatures (ankle, knee, and back). Then gently move the securing materials up or down the limb until they are in proper position.
(1) Place securing materials under the ankle, at the top of the boot, below the knee, above the knee, at the hip, and at where the top of the long splint will rest. Place a second cravat so that it is under both ankles.
(2) There should be at least two cravats above the fracture site and at least two cravats below the fracture site (above the upper joint, between the upper joint and the fracture, between the fracture and the lower joint, and below the lower joint).
(3) Do not place securing material directly under the suspected fracture site. The pressure caused by the securing material when it is tightened could result in additional injury to the limb.
c. Position the Rigid Objects. Place the shorter rigid object on the inside of the injured leg and the longer one on the outside. Position them so the joint above the fracture and the joint below the fracture can be immobilized. Make sure the end of the inner rigid object is not pressing against the groin. Pressure on sensitive areas can interfere with blood circulation.
d. Apply Padding. Place padding between the rigid objects and the limb. Apply extra padding to bony body areas such as the knee and ankle and at sensitive areas such as the groin.
e. Secure the Rigid Objects and Check Circulation. Wrap the securing materials around the rigid objects so they immobilize the limb. Tie the tails of each securing cravat in a non-slip knot on the outer rigid object and away from the casualty. The securing material should be tight enough to hold the rigid objects securely in place, but not tight enough to interfere with blood circulation. (You should be able to slip one finger between the knot and the rigid object.) Check the casualty’s pulse after each cravat is tied. If the cravat interferes with the casualty’s circulation, loosen the cravat and apply it again.
(1) Begin with the cravat positioned above the fracture site.
(2) Next, apply the cravat just below the fracture site.
(3) Continue applying cravats, checking the casualty’s circulation after each cravat is tightened.
(4) When securing the cravat going under the injured ankle only, bring the cravat up the outside of the splints, cross the tails over the boot, bring the tails down below the sole of the boot, cross the tails, bring the tails back to the top of the boot, and tie the tails in a non-slip knot at the instep.
(5) Use the cravat going under both ankles to secure the injured leg to the uninjured leg. Bring the cravat up the outside splint and the outside of the uninjured ankle, cross the cravat over the tops of the casualty’s boots, bring the tails down below the boots, and tie them together in a non-slip knot at the soles.
4-4. IMMOBILIZE A FRACTURED LEG (IMPROVISED SPLINT)
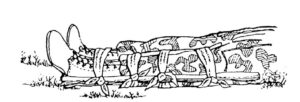
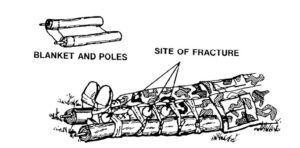
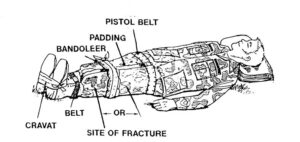
A fractured tibia or fibula in the lower leg can be immobilized with an improvised splint. The improvised splint used to immobilize a fractured thigh (see paragraph 4-3) can also be used to immobilize a fractured leg. The following procedures are used to apply shorter boards to immobilize a fractured leg (see figure 4-5). The same basic procedures can also be used with other improvised splints. Figure 4-6 shows a tree limb splint used to immobilize a fractured leg or ankle. Figure 4-7 shows a blanket and poles splint used to immobilize a fractured knee (knee straight), leg, or ankle. Figure 4-8 shows the casualty’s uninjured leg being used as the rigid object (anatomical splint) to immobilize the injured leg. A splint used for a fracture can also be used for a dislocation.
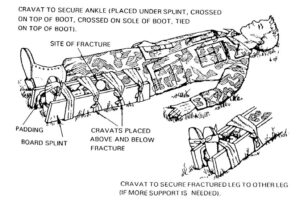
a. Obtain Materials. You will need two rigid objects, padding, and securing materials. The rigid objects should extend from the casualty’s foot to approximately half way up his thigh.
b. Position the Securing Materials. Position two cravats above the fracture site and two below the fracture site. Push the securing materials under natural body curvatures and move them up or down until they are in proper position. Do not place a cravat directly under the fracture site.
(1) Position one cravat above the knee.
(2) Position the second cravat between the knee and the fracture site.
(3) Position the third cravat between the fracture site and the ankle.
(4) Position the fourth cravat beneath the ankle.
c. Position the Rigid Objects. Place one rigid object on the inside of the injured leg and the other on the outside. Position them so the joint above the fracture and the joint below the fracture can be immobilized.
d. Apply Padding. Place padding between the rigid objects and the limb. Apply extra padding to the knee and ankle areas.
e. Secure the Rigid Objects and Check Circulation. Wrap the securing materials around the rigid objects so they immobilize the limb. Tie the tails of each securing cravat in a non-slip knot on the outer rigid object and away from the casualty. The securing material should be tight enough to hold the rigid objects securely in place, but not tight enough to interfere with blood circulation. (You should be able to slip one finger beneath the knot.) Check the casualty’s pulse after each cravat is tied. If the cravat interferes with the casualty’s circulation, loosen the cravat and apply it again.
(1) When securing the cravat under the ankle, cup the heel in the cravat, bring the cravat up the outside of the splints, cross the tails over the boot, bring the tails down below the sole of the boot, cross the tails, bring the tails back to the top of the boot, and tie the tails in a non-slip knot at the instep.
(2) If additional support is desired, pass another cravat beneath both ankles and secure the injured leg to the uninjured leg. Bring the cravat up the outside splint and the outside of the uninjured ankle, cross the cravat over the tops of the casualty’s boots, bring the tails down below the boots, and tie them together in a non-slip knot at the soles.
4-5. IMMOBILIZE A FRACTURED OR DISLOCATED KNEE (IMPROVISED SPLINT)
A fractured or dislocated knee is usually in a flexed (bent) position, and it is splinted in that position. The injury may include dislocation of the kneecap (patella). Instructions for immobilizing a knee in the flexed position (see figure 4-9) are given below.
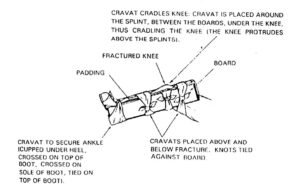
a. Obtain Materials. You will need two rigid objects, padding, and securing materials. The rigid objects should extend from the casualty’s ankle to approximately half way up his thigh.
b. Position the Securing Materials. Position one cravat above the knee, one cravat below the knee, and one cravat beneath the ankle.
c. Apply Padding. Place padding on the inside of the rigid objects.
d. Position the Rigid Objects. Place one padded rigid object on the inside of the injured leg and the other on the outside. Do not attempt to straighten the knee. If the casualty is able, you can have him hold the rigid objects in place while you secure them.
e. Secure the Rigid Objects and Check Circulation. Wrap the cravats (or other securing materials) around the rigid objects so they immobilize the limb. Three cravats should be applied: above the knee, below the knee, and at the ankle. Tie the tails of each cravat in a non-slip knot on the outer rigid object. The cravats should be tight enough to hold the rigid objects securely in place, but not tight enough to interfere with blood circulation. (You should be able to slip one finger beneath the knot.) Check the casualty’s pulse after each cravat is tied. If the cravat interferes with the casualty’s circulation, loosen the cravat and apply it again.
(1) Secure the cravat above the knee.
(2) Secure the cravat below the knee.
(3) Secure the cravat under the ankle. Cup the heel in the cravat, bring the cravat up the outside of the splints, cross the tails over the boot, bring the tails down below the sole of the boot, cross the tails, bring the tails back to the top of the boot, and tie the tails in a non-slip knot at the instep.
f. Cradle Knee. Apply a fourth cravat to cradle the knee. The knee will protrude above the rigid objects.
(1) Insert one end of the cravat between the outer rigid object and the knee.
(2) Bring the end under the knee and between the knee and the inner rigid object.
(3) Bring both ends straight up for measurement.
(4) Adjust the cravat so the outer tail is about 6 inches longer than the inner tail.
(5) Bring each tail over the top of its rigid object, down, under the knee, and up the other rigid object.
(6) Bring the inside tail across to the outside of the outer rigid object.
(7) Tie the tails together in a non-slip knot on the outer rigid object.
4-6. IMMOBILIZE A FRACTURED OR DISLOCATED ANKLE (TWO WIRE LADDER SPLINTS)
A wire ladder splint (see figure 4-10) is made from steel. It is about 31 inches long and about 3.5 inches wide. It contains 48 crosspieces and weighs about a half pound. The wire ladder splint can be bent to conform to the shape of the injured limb. The following paragraphs give instructions for applying two wire ladder splints to a fractured or dislocated ankle. The splints can also be used for a fractured foot.

a. Position Casualty. The casualty may be either sitting up or lying down.
b. Expose Injury. Cut the boot laces on the injured foot. Then cut the boot tongue on the outside edge from top to bottom all the way down.
c. Check Pulse. Check the casualty’s pulse along the top of the foot. If a pulse is absent, the casualty should be evacuated as soon as the splint is applied.
d. Form Rigid Splint.
(1) Bend the prongs (sharp ends) of the two splints away from the flat side of the wire ladder splint.
(2) Bend one splint into an “L” shape so that the flat surface is on the inside and the bottom of the “L” fits the length of the casualty’s boot. Bend the longer (top) end of the “L” back onto itself so it is even with the top of the casualty’s boot. Use the casualty’s uninjured foot for measurement.
(3) Bend the other splint into a “U” shape with a flattened bottom so the bottom of the soldier’s boot fits the bottom of the splint and the ends of the “U” will go up the sides of his boots. Use the uninjured foot for measurement.
(4) Joint the L-shaped splint and the U-shaped splints together by fitting the U-shaped splint around the L-shaped splint to form a cradle and protective case for the injured ankle.
e. Apply Rigid Splint.
(1) Gently lift the casualty’s foot, ankle, and lower leg.
(2) Slide the cradle under the casualty’s boot until the sole of the boot touches the bottom of the L-shaped splint.
(3) Lower the casualty’s foot until the boot fits into the cradle.
(4) Apply padding to the sides, if needed. The boot should be sufficient padding.
f. Secure the Rigid Splint With Cravats. Figure 4-11 shows a two-piece wire ladder splint applied to a left ankle.
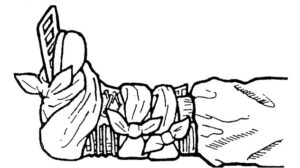
(1) Apply a cravat immediately above the ankle. Begin on the outside of the leg, bring the tails to the inside, cross them, bring them to the outside again and tie the tails in a non-slip knot on the outer part of the U-shaped wire ladder splint.
(2) Check the casualty’s pulse. If a pulse could be felt before but is no longer present, loosen and retie the cravat. If the pulse still cannot be felt and you can slip two fingers beneath the knot, evacuate the casualty as soon as possible after the splint is applied.
(3) Apply the second cravat below the ankle. Cup the heel of the boot in the center of the cravat and bring the tails up across the top of the boot. Cross the tails on the top of the boot toe, take them down under the sole of the boot, and tie the tails in a non-slip knot on the outer aspect of the rigid splint.
(4) Check the casualty’s pulse. If a pulse could be felt before but is no longer present, loosen and retie the cravat.
(5) Apply the third cravat at the top of the splint in the same manner as the first cravat. Tie the cravat in a non-slip knot on the outer aspect of the rigid splint.
(6) Check the casualty’s pulse. If a pulse could be felt before but is no longer present, loosen and retie the cravat.
4-7. IMMOBILIZE A FRACTURED ANKLE (THREE WIRE LADDER SPLINTS)
Another method of immobilizing an injured ankle using three wire ladder splints is given below. It is especially useful when the casualty’s boot has been removed to treat other injuries.
a. Check Pulse. Check the casualty’s pulse along the top of the foot. If a pulse is absent, the casualty should be evacuated as soon as the splint is applied.
b. Form Rigid Splint.
(1) Bend the prongs (sharp ends) of the three splints away from the flat side of the wire ladder splint.
(2) Bend one splint into an “L” shape so that the flat surface is on the inside and the bottom of the “L” fits the length of the casualty’s foot. The bent prongs should be at the toes.
(3) Join the pronged ends of the other two wire ladder splints. Then bend the long splint into a “U” shape with a flattened bottom so the bottom of the soldier’s foot fits the bottom of the splint and the ends of the “U” will go up the sides of his leg.
(4) Joint the L-shaped splint and the U-shaped splints together by fitting the U-shaped splint around the L-shaped splint to form a cradle and protective case for the injured ankle.
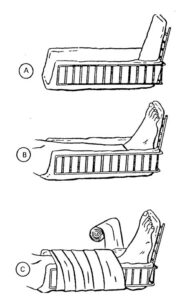
c. Pad Rigid Splint. Place padding along the three sides of the cradle and the bottom where the foot will rest (see figure 4-12A).
d. Apply Splint.
(1) Gently lift the casualty’s foot, ankle, and lower leg.
(2) Slide the cradle under the casualty’s foot and leg until the sole of the foot touches the bottom of the L-shaped splint.
(3) Lower the casualty’s foot until the foot and leg fits into the cradle (see figure 4-12B).
e. Secure the Rigid Splint.
(1) The rigid splint can be secured with four cravats similar to the method used in paragraph 4-6f (cravats at the foot, above the ankle, midway between the ankle and the top of the rigid splint, and at the top of the rigid splint). Check the casualty’s pulse after each cravat is applied. If a pulse could be felt before but is no longer present, loosen and retie the cravat.
(2) The rigid splint can also be secured with a roller bandage as shown in figure 4-12C. Check the casualty’s pulse as the rigid splint is being secured. If a pulse could be felt before but is no longer present, remove the bandage and apply it again.
4-8. IMMOBILIZE A FRACTURED OR DISLOCATED ANKLE USING A SAM SPLINT
The universal splint, called the SAM splint, can be used as the rigid object in splinting a fractured or dislocated ankle. The SAM splint is a piece of flat aluminum about 36 inches long and about 4.5 inches wide completely covered by foam that serves as padding for the splint. The SAM splint is lightweight (less than 7 ounces). The splint is rolled up for easy storing (see figure 4-13A) and can be reused.
a. Unroll the SAM splint and flatten it.
b. Fold the SAM splint in half so it is a tall “V” shape.
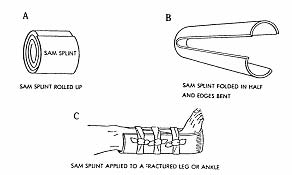
c. Bend the edges of the splint in until the splint generally conforms to the curve and shape of the foot and leg being splinted. Each half of the splint will have a “U” shape (see figure 4-13B). Bending the edges also increases the rigidity of the SAM splint.
d. Flatten the vertex of the splint so the bottom of the casualty’s foot will fit comfortably.
e. Check the casualty’s pulse below the fracture/dislocation site.
f. Apply the splint around the casualty’s foot and leg. Adjust the shape of the SAM splint to conform to the limb, if needed.
g. Secure the splint using at least three cravats (see figure 4-13C).
(1) Tie the tails of the cravats in a non-slip knot on the outside of the splint. Tuck the ends of the tails into the cravat to prevent accidental entanglement when the casualty is moved.
(2) Check the casualty’s pulse after each cravat is applied. If the pulse can no longer be detected, loosen the cravat and apply it again.
