|
OBGYN Skills Lab
|
|||||||||
|
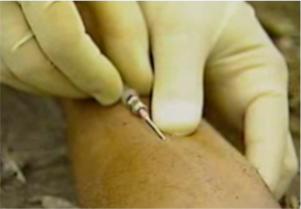
Starting an IV in a Field Setting Video Inspect the IV bag for defects and expiration date. Check the tubing on the IV set for discoloration, holes and cracks. Next, assemble the administration set without contaminating any part of it. Elevate the IV bag above the level of the casualty's heart by suspending it from a tree branch. Squeeze the drip chamber half full of solution. Next, remove the air from the tubing. This is necessary in order to prevent air embolism. To watch the video, click here. Select an infusion site, preferably the most distal and accessible vein of an uninjured hand or arm. Apply a constricting band about 6 to 8 inches above the proposed injection site. When choosing a site, try to avoid infected or injured areas, as well as areas directly over joints. Be sure to take the appropriate infection control precautions. Palpate the proposed vein, then cleanse the area around the injection site with a Betadine sponge, using a circular motion from inside to out. Then wipe the area with alcohol. Remove the protective cover from the catheter needle unit without contaminating the needle, and inspect the needle tip. The the thumb of your non-dominant hand, pull the skin below the vein taut with firm, downward pressure. The needle should be bevel up. Position the needle at about a 20 to 30 degree angle and pierce the skin slightly to the side or on top of the vein. Decrease the angle of the needle until it is nearly parallel to the skin surface, then advance the needle until a small "pop" or give is felt and the flash chamber fills with blood. Advance the needle approximately an eighth of an inch more to insure placement.
Stabilize the flash chamber with your dominant hand. Grasp the hub with your non-dominant hand and threat the catheter into the vein, all the way to the hub. Continue to hold the catheter hub and press lightly on the catheter tip. The with your dominant hand, remove the needle from the catheter and lay it aside. With your dominant hand, remove the protective cover from the needle adaptor IV tubing and connect the adaptor quickly and tightly to the catheter hub. With your non-dominant hand, release the constricting band. Unclamp the IV tubing and adjust the flow rate to TKO. Examine the IV site for signs of infiltration. These signs include pain, swelling, redness, coolness, and fluid leaking from the site. If this occurs, stop the infusion. Tape and secure the hub to the skin with your non-dominant hand, leaving the hub and tubing connection visible. Loop the excess tubing on the extremity and secure it with tape. Apply a sterile dressing over the puncture site and tape it in place. Readjust the flow of the IV solution. |
||||||||
|
This information is provided by The Brookside Associates, a private organization, not affiliated with any governmental agency. The opinions presented here are those of the author and do not necessarily represent the opinions of the Brookside Associates. For educational simplicity, only one method is usually shown, but many alternative methods may give satisfactory or superior results. This information is provided solely for educational purposes. The practice of medicine and surgery is regulated by statute and restricted to licensed professionals and those in training under supervision. Performing these procedures outside of that setting is a bad idea, is not recommended, and may be illegal. The presence of any advertising on these pages does not constitute an endorsement of that product or service by the Brookside Associates. C. 2010 All Rights Reserved
|
|||||||||
 This is the Archived Desktop Edition.