Sterile Procedures
LESSON 4: Procedures Used in Wound Care
4-10
4-10. PROCEDURE FOR IRRIGATING A WOUND
This section gives the procedures for performing a routine wound irrigation using sterile techniques. Irrigation of a wound prior to an operative treatment is discussed in section III.
a. Verify Wound Irrigation Order. Check the Doctor's Orders, Therapeutic Documentation Care Plan, or check with the supervisor to ensure that a wound irrigation is to be performed. Your instructions will specify the type and amount of solution to be used to irrigate the wound.
b. Wash Hands. Perform a patient care handwash.
c. Assemble Equipment and Supplies.
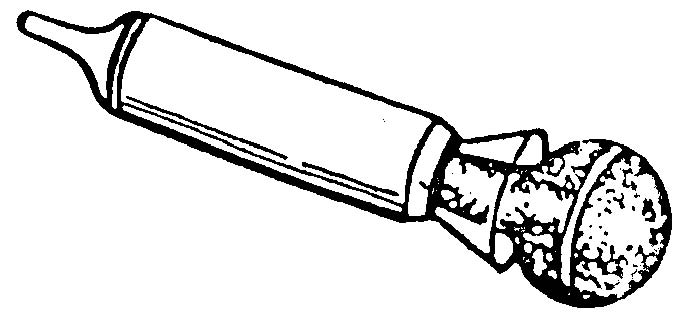
(1) Asepto (bulb-ended) syringe (300 to 500 ml) (figure 4-10). If asepto syringe is not available, use the largest regular syringe stocked.
Figure 4-10. Asepto syringe.
(2) Prescribed irrigating solution (normal saline is usually the preferred irrigation solution).
(3) Emesis basin.
(4) Sterile gloves.
(5) Mask, if needed.
(6) Sterile dressings.
(7) Sterile 4 x 8-inch gauze sponges.
(8) Sterile solution basin.
(9) Protective pad (bedcover).
d. Identify the Patient. Ask the patient his name and check the patient's identification bracelet, bedcard, or other identification. This is done to ensure that you perform the procedure on the correct patient.
e. Explain the Procedure to the Patient. Simply tell the patient what you are going to do and why.
f. Provide Privacy. Place a screen or curtain around the patient, or close the door if the patient is in a room.
g. Position the Patient. Place the patient in a position that provides for maximum exposure of the wound without causing unnecessary exposure of the patient's body. Make sure that there is adequate lighting of the wound area.
h. Position the Protective Pad. Assist the patient, as necessary, to raise his body. Place protective pad directly under the wound. The pad will protect the bedding. After the pad is in place, assist the patient to return to the desired position.
i. Mask, If Needed. A mask may be needed to protect the wound from contamination by microorganisms from your respiratory system. Once you have begun the irrigation, do not touch or adjust your mask since this action could transfer microorganisms from you to the wound or from the wound to you. To don the mask, place the mask on your face and pull the elastic over your head.
j. Remove Soiled Dressings, If Any. See paragraphs 4-5f through k.
k. Wash Hands. Perform a patient care handwash.
l. Prepare Irrigation Equipment.
(1) Check to make sure that you are using the correct solution before you start. If you are using a standard sterile water solution or normal saline solution, check for the date and time on the bottle. Once opened, the water/saline is considered sterile for 24 hours. If the solution has been open for more than 24 hours, discard the solution and obtain another bottle. If you open a new bottle, write the date and time that it was opened on the label.
(2) Open the sterile solution basin on the bedside stand using sterile technique. The opened wrapper will be used as your sterile field.
(3) Pour the prescribed irrigation solution into the basin without contaminating the sterile field.
(4) Open container with the asepto syringe and place it on the sterile field using sterile technique.
(5) Open the 4 x 8-inch sponges, and place them on the sterile field using sterile technique.
(6) Put on the sterile gloves.
(7) Position the sterile solution basin on the sterile drape against the area of the body to be irrigated.
m. Irrigate the Wound.
(1) Position the emesis basin beneath the wound so that the solution used to irrigate the wound will drain into the basin.
(2) Using a 4 x 8 gauze sponge, pat the wound dry. Start at the center of the wound and move outward toward the edges. Then dispose of the pad.
(3) Fill the syringe with irrigating solution.
(a) Grasp the asepto syringe, depress the bulb, and insert the tip of the syringe into the irrigating solution. Release the bulb and allow the syringe to fill.
(b) If you are using a regular syringe, insert the end of the syringe into the irrigating solution and pull back on the plunger to aspirate the solution into the syringe.
(4) Hold the tip of the syringe as close to the wound as possible without touching it.
(5) Depress the bulb (plunger) of the syringe, and direct the flow of solution to all parts of the wound.
(a) Pay particular attention to areas with debris, sweat, and/or drainage.
(b) Take extra care when irrigating a wound in which an abscess has formed. An abscess is simply a localized collection of pus. If the pressure within an abscess goes unrelieved, it may cause a sinus tract (an opening between the abscess and body surfaces).
(6) Repeat the procedure until the debris, sweat, and/or drainage has been flushed out of the wound.
(7) Remove the emesis (catch) basin from under the wound.
(8) Pat the wound dry with sterile gauze sponges.
n. Apply Sterile Dressing to Wound. Follow the procedures given in paragraph 4-7.
o. Perform Concluding Procedures.
(1) Remove the protective pad from under the wound.
(2) Remove the mask and gloves.
(3) Place the patient in a position of comfort that he likes.
(4) Dispose of contaminated items, especially soiled dressings, in accordance with local policy.
(5) Clean and store nondisposable items.
(6) Wash your hands.
(7) Report accomplishment of the procedure and observations to your supervisor and record any necessary information.


