Sterile Procedures
LESSON 3: Surgical Asepsis and Sterile Technique
3-6
3-6. OPENING AND POURING STERILE LIQUIDS
Sterile liquids are necessary for many procedures requiring sterile technique. Use the following procedures to open bottles containing a sterile liquid and to pour the liquids into a sterile container.
a. Lift or unscrew the cap. Do not touch bottle rim and inside cap, as these items are considered sterile. As you remove the cap, listen for a vacuum release sound. If there is no vacuum release sound, assume that the liquid is not sterile and get another bottle of the liquid to use instead.
b. Hold the cap in your hand or rest the cap upside down on table (not on sterile field since the outside of the cap is contaminated) so that the inside of the cap does not become contaminated. If the cap becomes contaminated, it cannot be used to reseal the bottle of sterile liquid and the left over portion of the sterile liquid must be discarded.
c. Glove your nondominant hand.
(1) Make sure glove package has not been contaminated (torn, and so forth) and that gloves are the proper size.
(2) Perform a patient care handwash, if you have not already done so.
(3) Place the package on a clean, dry surface.
(4) Peel back the outer wrapper.
(5) Remove the inner package and place it so that the end marked "cuff" is toward you.
(6) Grasp lower corner and open the package to a flat position.
(7) Grasp lower corners of the package and pull to the side in order to expose the cuffs.
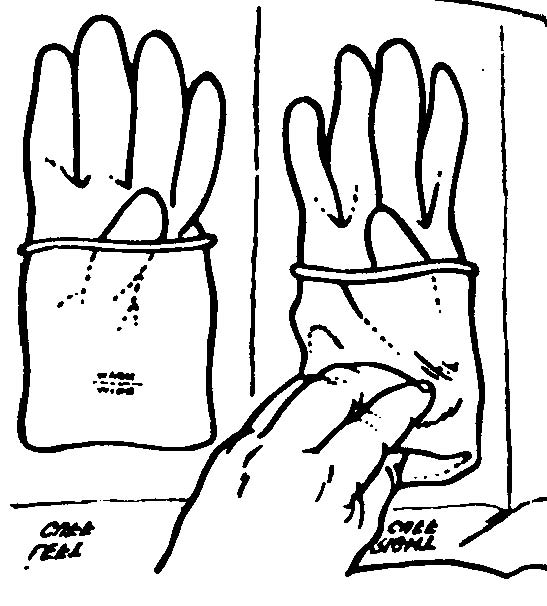
(8) Grasp the cuff of the glove on the same side as your nondominate hand with your dominate hand. (figure 3-8).
Figure 3-8. Grasp cuff.
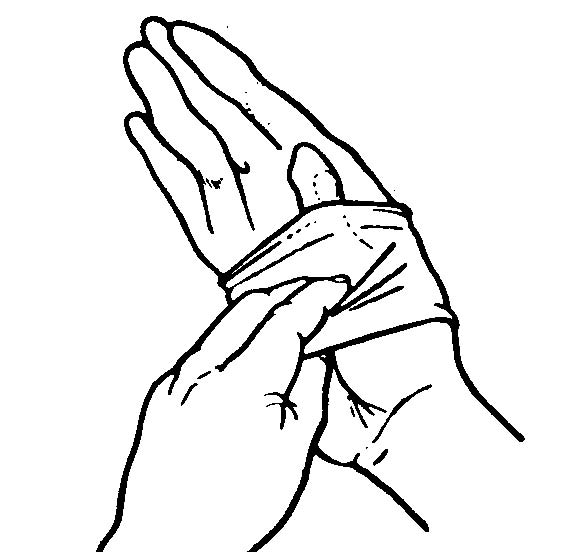
(9) Remove the glove from the wrapper, step back, and insert your nondominate hand into the glove (figure 3-9).
Figure 3-9. Hand in glove.
d. Hold bottle in your ungloved hand with label against your palm. This protects the label from dripping solution. Also a clean label can be read easily.
e. If the bottle was opened previously, pour a small amount of liquid into a waste container, usually an emesis basin. Prepouring will cleanse the lid of the bottle. The container should not be inside the sterile field.
f. Pick up the container into which the liquid is to be poured with your gloved hand and step back from the sterile field. This is done to keep any liquid from dropping onto the sterile field. If a sterile field becomes wet, consider it to be contaminated.
g. Hold the bottle about 6 inches above the container into which the liquid is being poured and pour the liquid slowly in a steady stream into the sterile container. Pouring slowly in a steady stream avoids splashing.
(1) Do not touch the bottle lip against the container. If the lip of the bottle touches the container, the container will not be sterile.
(2) Do not allow the bottle to pass over the sterile field. If the bottle passes over any part of the sterile field, then that part of the field is considered contaminated, because a microscopic organism could have fallen from the bottle or your hand onto the field.
h. Replace the container onto the sterile field.
i. Replace the cap securely on the bottle. If the cap or rim of the bottle becomes contaminated, discard the bottle.
j. Remove the sterile glove by grasping the portion of the glove over the heel of the hand and pulling the glove off. Discard the glove in an appropriate container.
k. Write the date and time and your initials on the bottle label.
l. Return the bottle to the storage area. (NOTE: Local SOP may require that you discard the bottle rather than reusing it.) Vacuum-packed sterile liquids can normally be used for 24 hours if the bottle is resealed. If your ungloved hand or other contaminated object touches the neck of the bottle, inside the bottle cap, the bottle rim, or the lip of the cap, the rim or cap is considered contaminated and you must discard the bottle.


