
Treating Fractures in the Field
Lesson 4: Fractures of the Lower
Extremities
4-7
4-7. IMMOBILIZE A FRACTURED ANKLE (THREE WIRE LADDER SPLINTS)
Another method of immobilizing an injured ankle using three wire ladder splints is given below. It is especially useful when the casualty's boot has been removed to treat other injuries.
a. Check Pulse. Check the casualty's pulse along the top of the foot. If a pulse is absent, the casualty should be evacuated as soon as the splint is applied.
b. Form Rigid Splint.
(1) Bend the prongs (sharp ends) of the three splints away from the flat side of the wire ladder splint.
(2) Bend one splint into an "L" shape so that the flat surface is on the inside and the bottom of the "L" fits the length of the casualty's foot. The bent prongs should be at the toes.
(3) Join the pronged ends of the other two wire ladder splints. Then bend the long splint into a "U" shape with a flattened bottom so the bottom of the soldier's foot fits the bottom of the splint and the ends of the "U" will go up the sides of his leg.
(4) Joint the L-shaped splint and the U-shaped splints together by fitting the U-shaped splint around the L-shaped splint to form a cradle and protective case for the injured ankle.
c. Pad Rigid Splint. Place padding along the three sides of the cradle and the bottom where the foot will rest (see figure 4-12A).
d. Apply Splint.
(1) Gently lift the casualty's foot, ankle, and lower leg.
(2) Slide the cradle under the casualty's foot and leg until the sole of the foot touches the bottom of the L-shaped splint.
(3) Lower the casualty's foot until the foot and leg fits into the cradle (see figure 4-12B).
e. Secure the Rigid Splint.
(1) The rigid splint can be secured with four cravats similar to the method used in paragraph 4-6f (cravats at the foot, above the ankle, midway between the ankle and the top of the rigid splint, and at the top of the rigid splint). Check the casualty's pulse after each cravat is applied. If a pulse could be felt before but is no longer present, loosen and retie the cravat.
(2) The rigid splint can also be secured with a roller bandage as shown in figure 4-12C. Check the casualty's pulse as the rigid splint is being secured. If a pulse could be felt before but is no longer present, remove the bandage and apply it again.
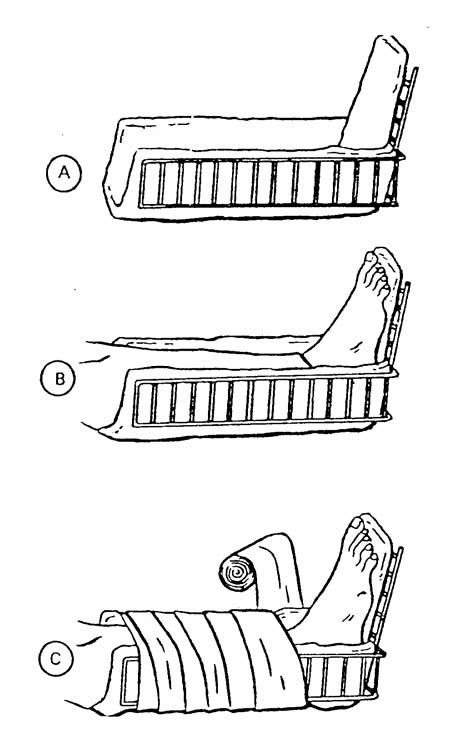
Figure 4-12. Wire ladder splint (three pieces) applied to a fractured ankle.
