
Treating Fractures in the Field
Lesson 4: Fractures of the Lower
Extremities
4-3
4-3. IMMOBILIZE A FRACTURED FEMUR (IMPROVISED SPLINT)
A fractured femur should be immobilized using a traction splint whenever possible. If a traction splint is not available, immobilize the casualty using an improvised splint (see figure 4-4).
CAUTION: Traction splints CANNOT be applied to fractures that fall at or above the
level of the ischial strap.
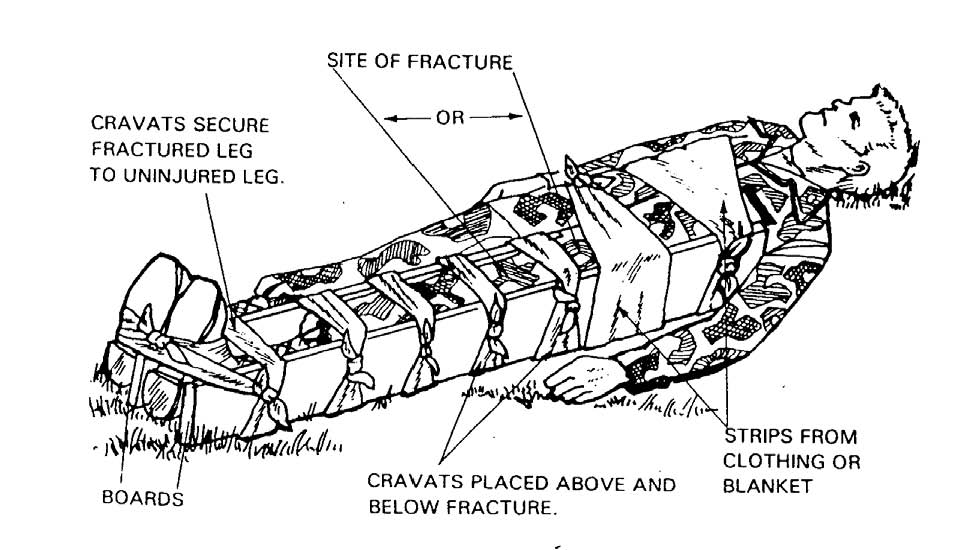
Figure 4-4. Improvised splint applied to a fractured femur.
a. Obtain Materials. You will need two rigid objects, padding, and securing materials.
(1) Rigid objects. Tree branches, poles, boards, sticks, unloaded rifle, or similar objects can be used. The rigid objects should be straight, long enough to extend beyond the joint above the fracture site and beyond the joint below the fracture site. Preferably, one should be long enough to extend from the groin to the foot and the other should extend from above the hip to the foot (see figure 4-4).
(2) Padding. Padding is needed to keep the rigid objects from rubbing against the skin on the injured limb. Blankets, jackets, ponchos, extra clothing, shelter halves, leafy plants, or the casualty's own clothing (trouser leg) can be used as padding. The padding helps to prevent excessive pressure that could interfere with blood circulation.
(3) Securing materials. The rigid objects and padding can be secured with cravats made from muslin bandages or other folded material. Rigid objects can also be secured with strips of clothing, belts, pistol belts, bandoleers, or similar materials. Narrow materials such as wire and cord should not be used since they could interfere with blood circulation.
b. Position the Securing Materials. Push the securing materials (cravats, etc.) under natural body curvatures (ankle, knee, and back). Then gently move the securing materials up or down the limb until they are in proper position.
(1) Place securing materials under the ankle, at the top of the boot, below the knee, above the knee, at the hip, and at where the top of the long splint will rest. Place a second cravat so that it is under both ankles.
(2) There should be at least two cravats above the fracture site and at least two cravats below the fracture site (above the upper joint, between the upper joint and the fracture, between the fracture and the lower joint, and below the lower joint).
(3) Do not place securing material directly under the suspected fracture site. The pressure caused by the securing material when it is tightened could result in additional injury to the limb.
c. Position the Rigid Objects. Place the shorter rigid object on the inside of the injured leg and the longer one on the outside. Position them so the joint above the fracture and the joint below the fracture can be
immobilized. Make sure the end of the inner rigid object is not pressing against the groin. Pressure on sensitive areas can interfere with blood circulation.
d. Apply Padding. Place padding between the rigid objects and the limb. Apply extra padding to bony body areas such as the knee and ankle and at sensitive areas such as the groin.
e. Secure the Rigid Objects and Check Circulation. Wrap the securing materials around the rigid objects so they immobilize the limb. Tie the tails of each securing cravat in a non-slip knot on the outer rigid object and away from the casualty. The securing material should be tight enough to hold the rigid objects securely in place, but not tight enough to interfere with blood circulation. (You should be able to slip one finger between the knot and the rigid object.) Check the casualty's pulse after each cravat is tied. If the cravat interferes with the casualty's circulation, loosen the cravat and apply it again.
(1) Begin with the cravat positioned above the fracture site.
(2) Next, apply the cravat just below the fracture site.
(3) Continue applying cravats, checking the casualty's circulation after each cravat is tightened.
(4) When securing the cravat going under the injured ankle only, bring the cravat up the outside of the splints, cross the tails over the boot, bring the tails down below the sole of the boot, cross the tails, bring the tails back to the top of the boot, and tie the tails in a non-slip knot at the instep.
(5) Use the cravat going under both ankles to secure the injured leg to the uninjured leg. Bring the cravat up the outside splint and the outside of the uninjured ankle, cross the cravat over the tops of the casualty's boots, bring the tails down below the boots, and tie them together in a non-slip knot at the soles.
