
Cardiopulmonary Resuscitation
LESSON 3: INITIATE RESCUE BREATHING ON AN ADULT
3-9
3-9. ADMINISTER TWO BREATHS
If the unconscious casualty is not breathing, you will need to perform rescue breathing. Rescue breathing procedures are also called "ventilating the casualty." Ventilation simply means that you are supplying the casualty's lungs with fresh air. Even though the air comes from your lungs, it still contains plenty of oxygen. Room air contains about 20 percent oxygen; we use about 4 percent of this leaving 16 percent oxygen
available to the patient when mouth-to-mouth rescue breathing is conducted. The mouth-to-mouth technique of rescue breathing is normally used. An alternate technique, the mouth-to-nose method, is used when the casualty has a serious mouth or jaw injury, when the casualty's mouth cannot be opened, or when you are unable to achieve a tight seal around the casualty's mouth. Check for the presence of a stoma (an artificially-created opening in the neck and trachea). A stoma allows air exchange when the casualty's upper airway is blocked due to surgery or a medical condition such as cancer. If a stoma is present, perform mouth-to-stoma rescue breathing. Cover the patient’s mouth and nose when conducting mouth-to-stoma breathing to make sure the air does not escape through this route instead of entering the lungs. As you administer the two ventilations, observe the casualty's chest out of the corner of your eye to see if the chest rises and falls. It should take about one second to blow a breath into the casualty's lungs. Allow time between breaths for the chest to fall and the casualty to exhale. Avoid over inflation of the lungs, which can cause complications, including gastric distention, and can also increase the intra-thoracic pressure, making it difficult for blood to return to the fill the heart.
a. Mouth-to-Mouth. Mouth-to-mouth rescue breathing (figure 3-6) is also called mouth-to-mouth resuscitation. The following steps assume that you are maintaining the airway using the head-tilt/chin-lift method.
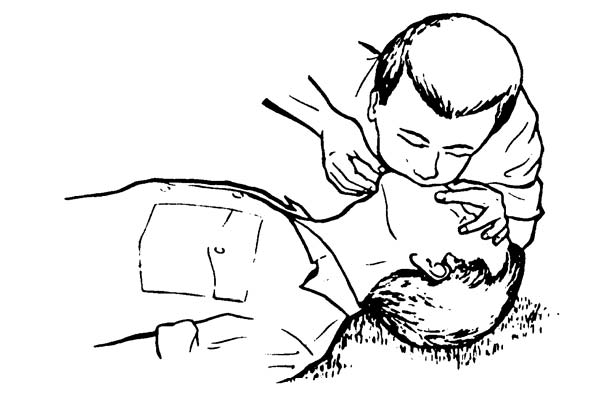
Figure 3-6. Administering mouth-to-mouth rescue breathing.
(1) Maintain airway. Keep the casualty's airway open (patent) by maintaining the head-tilt/chin-lift.
(2) Inhale. Take a deep breath.
(3) Pinch the nose. Use the thumb and index finger of your hand that is on the casualty's forehead to pinch his nostrils closed so that air will not escape when you blow air into his mouth. Keep the heel of your hand on the casualty's forehead and continue to apply enough pressure to maintain the head tilt. The fingertips of your other hand remain under the casualty's chin and continue to keep the chin lifted.
(4) Seal the mouth. Place your mouth over the casualty's mouth. Cover his mouth completely and make sure that your mouth forms an airtight seal so that air will not escape when you blow air into his mouth.
(5) Deliver the first breath. Blow a breath at a slow rate into the casualty's mouth. (Maintaining the open airway will keep the casualty's mouth slightly open.) If the airway is truly open, the chest should rise as his lungs fill with air.
(6) Take another deep breath. After blowing into the casualty's mouth, quickly break the seal over his mouth, take a breath of air, exhale, and then take another deep breath. The casualty's chest should fall as air escapes from his mouth after you break the seal. You may be able to hear or feel the exhaled breath also.
(7) Seal the mouth. Seal your mouth over the casualty's mouth again so that air will not escape.
(8) Deliver the second breath. Blow another breath into the casualty's mouth at a slow rate. Observe the casualty's chest.
(9) Break the seal and release nose. After delivering the second breath, break the seal over the casualty's mouth and release the nose. The casualty's body will exhale without further effort on your part.
b. Mouth-to-Nose. The mouth-to-nose rescue breathing (figure 3-7) is also called mouth-to-nose resuscitation.
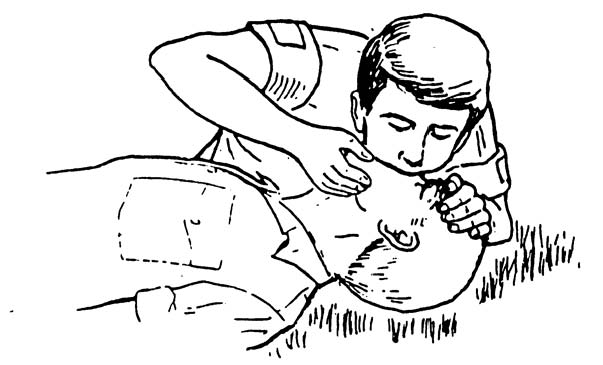
Figure 3-7. Administering mouth-to-nose breathing.
(1) Maintain airway. Keep the casualty's airway open by keeping the chin lifted.
(2) Inhale. Take a deep breath.
(3) Close the mouth. Use the hand that is lifting the casualty's jaw to close the casualty's mouth. No air should escape through the casualty's mouth when you perform your ventilations. Continue to keep the jaw in a "lifted" position. (If the head-tilt/chin-lift is being used, maintain the pressure on the forehead with your other hand to keep the casualty's airway open.)
(4) Seal the nose. Place your mouth over the casualty's nose. Make sure that your mouth forms a seal so that air will not escape when you blow air into his nose.
(5) Deliver the first breath. Blow a breath into the casualty's nose at a slow rate. If the airway is open, the chest will rise as his lungs fill with air.
(6) Take another breath. After blowing into the casualty's nose, quickly break the seal over his nose, take a breath of air, exhale, and take another deep breath. His chest should fall somewhat as air escapes from the casualty's nose after you break the seal. You may be able to hear or feel the exhaled breath also.
(7) Seal the nose. Seal your mouth over the casualty's nose again so that air will not escape.
(8) Deliver the second breath. Blow another breath into the casualty's nose at a slow rate and observe the casualty's chest.
(9) Break the seal and open mouth. After delivering the second breath, break the seal over the casualty's nose and allow his mouth to open slightly while continuing to maintain the open airway. (The mouth is opened in case there is an obstruction in the casualty's nasal passages.) The casualty's body will exhale naturally without effort on your part. If the mouth does not open readily, use your thumb to depress the lower lips slightly to separate the lips.
c. Mouth-to-Stoma. The mouth to stoma rescue breathing is used if a permanent or temporary opening has been made at the front base of the neck in order to open the airway to the atmosphere.
(1) Inhale. Take a breath.
(2) Close the mouth and nose, if needed. Use a hand to close the casualty's mouth and nostrils in order to prevent air escaping.
(a) This step is not needed if the casualty's upper airway has been closed surgically, as shown in figure 3-8.
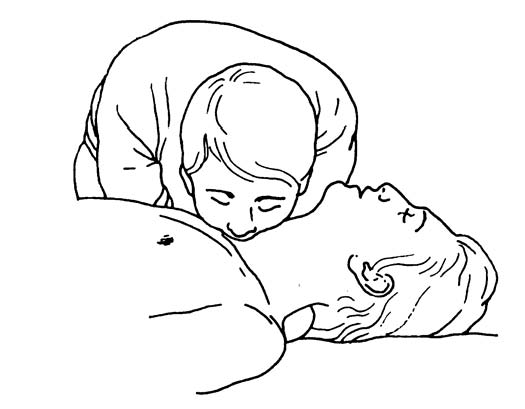
Figure 3-8. Administering mouth-to-stoma rescue breathing.
(b) If the casualty has a temporary tracheostomy tube in the trachea, the tube may have a cuff that can be inflated to seal off the airway above the stoma and thus prevent air from escaping through the mouth or nose.
(3) Seal the stoma. Place your mouth over the casualty's stoma. Make sure that your mouth forms an airtight seal so that air will not escape when you blow air into the stoma.
(4) Deliver the first breath. Blow a breath into the stoma. His chest should rise as his lungs fill with air.
(5) Take another breath. After delivering the first breath, quickly break the seal over the stoma, take a breath of air, exhale, and then take another breath. His chest should fall somewhat as air escapes from the stoma after you break the seal. You may be able to hear or feel the exhaled air also.
(6) Seal the stoma. Seal your mouth over the stoma again so that air will not escape.
(7) Deliver the second breath. Blow another breath at a slow rate into the stoma and observe the casualty's chest.
(8) Break seal. After delivering the second breath, break the seal over the stoma. If you are holding the casualty's mouth and nose closed, you can release them. The casualty's body will exhale naturally.
