a. Determine Type of Medication, Time of Administration, and Route of Injection.
This step is to determine the type of needle needed.
b. Perform Patient Care Handwash.
Wash hands according to instructions provided in your previous training whether you are in the clinic or field environment.
[otw_is sidebar=otw-sidebar-1]
c. Gather Required Equipment.
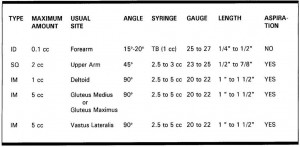
(1) Choice of needle. The length of the needle you choose will depend upon the type of injection. The gauge size you choose will depend upon the type of medication (see figure 1-3).
(a) Subcutaneous (SQ) injection. Subcutaneous injection requires a short needle. The length should be one-half to seven-eighths inch. Gauge size should be 23 to 25.
(b) Intradermal (ID) injection. The length of the needle should be one-fourth to one-half inch with the gauge size 26.
(c) Intramuscular (IM) injection. The length of the needle should be one to one and one-half inches with the gauge size 20 to 22.
(2) Choice of syringe. The choice of syringe depends on the amount of solution and the type of solution administered (see figure 1-4).
(a) When you select a syringe, check for the total capacity of the syringe. The syringe is usually calibrated in cubic centimeters (cc). Be sure the syringe is large enough to contain enough medication to give the shot. The size of the syringe should only be large enough to accommodate the dosage being given.
(b) Check the calibration of the syringe so you can place the exact amount of medication in the syringe (see figure 1-5).

d. Inspect Packaging for Defects.
Check to determine if the package has been opened or if it has any holes. If you note any water or discoloration that may indicate water has damaged the syringe, or if you suspect that the package has been tampered with in any way, discard the package and obtain sterile equipment.
e. Unpack the Syringe.
Remove the syringe from its packaging without contaminating any sterile parts. The sterile parts of the syringe are the needle adapter and the shaft of the plunger, which goes into the barrel. Any contamination could cause infection to the patient.
(1) Syringe in flexible wrapper.
(a) Peel the sides of the wrapper apart to expose the rear end of the syringe.
(b) Grasp the syringe by the barrel with the free hand.
(c) Pull the syringe from the packaging.
(d) Dispose of empty packaging in appropriate receptacle.
(2) Syringe in hard plastic tube (cartridge package).
(a) Press straight down on top of the tube with your thumb or use twisting motion.
(b) Press until you hear a distinct click. The click indicates the seal has not previously been broken. If you don’t hear the click, discard the syringe and get another tube.
(c) Lift the top (cap) off the tube (cartridge) and put it down on your working surface.
(d) Grasp the syringe by the barrel with a free hand.
(e) Pull the syringe from the tube (cartridge) on your working surface. Be careful not to contaminate the needle adapter of the syringe.
(f) Put the empty tube (cartridge) on your working surface.
(g) Using the free hand, hold the syringe between the first two fingers with the needle adapter forward, pointing away from the back of the hand.
f. Inspect Plunger of Syringe.
(1) Grasp syringe with the nondominant hand and pull plunger back and forth checking for smooth and easy movement.
(2) Visually check the rubber stopper (inside the syringe) to ensure that it is attached securely to the top end of the plunger, forming a seal. The rubber stopper may become stuck or detached from the top end of the plunger, breaking the seal.
(3) Discard the syringe and select another if the plunger is stuck or does not move smoothly. Repeat steps c through e above.
g. Unpack Needle.
Remove the needle from its packaging without contaminating it. Any contamination of the needle may cause infection to develop in the patient.
(1) Peel the sides of wrapper apart and expose the rear end of the needle.
(2) Grasp the cover of the needle and remove from wrapper, taking care not to touch the hub.
(3) Discard the empty wrapper in the appropriate place.
h. Assemble Needle and Syringe.
(1) Remove the protective cover from the needle adapter on the syringe. Holding the syringe in the nondominant hand and the needle by the protective cover in the dominant hand, insert the needle adapter into the needle hub.
(2) Tighten the needle with a one-fourth turn to ensure that it is attached securely to the needle hub.
(3) Do not touch the needle adapter or the hub to avoid contamination of the sterile surface.
i. Remove Protective Cover from Needle.
(1) Hold the needle and syringe in an upright position.
(2) Grasp the protective cover with the nondominant hand.
(3) Pull the protective cover from the needle straight off with an upward motion. Do not use a twisting motion as this may cause the needle to come off the needle hub.
j. Inspect Needle.
(1) Visually inspect the needle for the following flaws:
(a) Burrs. Rough edges on the needle that could tear the patient’s skin during the injection.
(b) Barbs. Hook-like edges that extend away from the needle edge and could cause injury to the patient.
(c) Needle damage. Bent or broken needle.
(d) Contamination. Rust or foreign particles on needles.
(2) If the needle has any of these defects, discard and obtain a sterile needle.
k. Replace Cover.
Place the protective cover back onto the needle.
l. Place Assembled Needle and Syringe on Work Surface.
(1) Leave the protective cover on the needle.
(2) Leave the plunger pushed fully into the barrel.
(3) Put the assembled needle and syringe in a convenient place on the working surface.
(4) Keep the assembled needle and syringe continually within range of vision.
NOTE: When you assemble a needle and syringe, you are responsible for maintaining sterility of the equipment.
