In this section, we will continue describing the procedures for giving an injection.
These procedures will differ according to the type of medicine and from the type of vial.
a. Verify Medication.
The medical specialist should check the doctor’s order or the therapeutic documentation care plan for the type, route, and dose of medication to administer.
b. Perform Patient Care Handwash.
Wash hands according to instructions provided in your previous training-whether you are in the clinic or field environment.
c. Gather Equipment.
The following should be placed on the medication tray.
(1) Correct type of medication.
(2) Sterile syringes.
(3) Appropriate sizes of needles, including extras.
(4) Skin antiseptic IAW local policy such as alcohol or Betadine swabs, sponges, or foil-wrapped germicide wipes.
(5) Container for destruction and disposal of needle.
d. Assemble Needle and Syringe.
See paragraph 1-13.
e. Check Drug Container Label.
The medical specialist verifies medication against the therapeutic documentation care plan.
(1) Verification should be made at least three times to ensure accuracy. This verification should happen at the following times:
(a) When the medical specialist obtains the container from the place of storage, usually a medicine cabinet.
(b) Before the medical specialist withdraws medication from the container.
(c) When the container is returned to the place of storage.
(2) Follow directions on container regarding expiration date and follow local policy regarding use of multidose vials.
(3) Check to determine if medication was stored properly (refrigerated).
f. Examine Rubber Stopper.
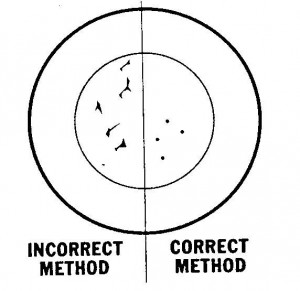
The rubber stopper should not be damaged. There should not be any small cores or plugs torn from the stopper due to improper injection of needles (see figure 1-6). Follow the examination procedures below:
(1) If vial is new, remove metal protective cap.
(2) Examine the rubber stopper for defects such as small cores or plugs torn in the stopper.
(3) If a defective stopper is identified, hold the vial to the light to examine for any foreign particles and to detect any changes in the color and consistency of the medication.
(4) Check the date that the multidose vial was opened and the expiration date on the medication.
(5) Follow the directions on the container regarding expiration date and follow local policy regarding use of multidose vials.
(6) Check to determine if the medication was stored properly; e.g., refrigeration.
(7) The dosage should be verified against the doctor’s orders or therapeutic documentation care plan.
g. Check Medication for Defects.
(1) If there are any foreign particles in the solution or if there is any change in color of the solution, discard the container and obtain another container.
(2) If the used container is dark colored glass, insert needle and draw some solution to examine its color; if defective, discard vial, syringe, and needle and obtain new solution. You may want to obtain guidance from your supervisor.
h. Prepare and Draw Premixed Medication.
The medical specialist prepares and draws medication from a stoppered vial (a vial that has been opened) in the following manner:
(1) Cleanse the stopper with an alcohol sponge. You should leave the sponge on the stopper at least 30 seconds.
(2) With the dominant hand, pick up the assembled needle and syringe and remove the needle cover. Pull the plunger out and fill the syringe with air equal to the amount of medication ordered.
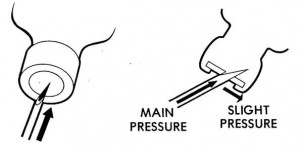
(3) With the free hand, pick up and invert the vial, and then insert the needle into the rubber stopper. Make certain the needle tip passes completely through the cap (see figure 1-7).
When inserting the needle, the bevel should face up with a slight pressure being exerted down and forward against the needle to prevent rubber from contaminating medication. To avoid contaminating the needle, the hub of the needle should not touch the rubber cap.
(4) Slowly draw the plunger of the syringe until slightly more than (about 0.2 cc more) the amount of medication prescribed in the doctor’s orders has been drawn into the syringe. This extra medication will be expelled when the syringe is cleared of air bubbles (step k).
i. Prepare and Draw Powdered Medication.
(1) Remove the metal protective caps of the stoppered vial containing the powdered medication and the vial containing the sterile diluent used to put the powdered medication into a solution.
(2) Cleanse the stoppers of both vials. (Blot the top of the stopper with an alcohol sponge rather than move it around in a circular motion. You can rub off fibers of the sponge onto the top of the stopper.)
(3) If the vial with the powdered medication contains air, the solution may be difficult to inject. Therefore, the medical specialist must withdraw a sufficient amount of air to allow the solution to be injected.
(4) Withdraw the required diluent (solution) using the procedure for the stoppered vial.
(5) Holding the vial with the powdered medication horizontally, insert the needle through the stopper and inject solution.
(6) Withdraw the needle. Hold the needle/syringe in nondominate hand, being careful not to contaminate the needle. Gently shake the vial until all of the powder is dissolved. Visually inspect the solution to ensure that the solution is well mixed. All powder should be thoroughly dissolved for maximum safety and effectiveness and to ensure that the required medication is delivered. Change the needle.
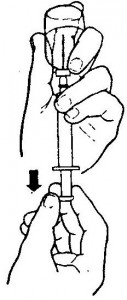
Select a needle according to the type of injection. See the criteria in paragraphs 1-13c(1) and (2) of this subcourse lesson. Push the plunger fully into the barrel to inject air equal to the amount of medication to be withdrawn. With the vial inverted, pull the plunger back, withdrawing slightly more (about 0.2 cc) than the prescribed medication (see figure 1-8).
(a) The tip of the needle should be kept in the solution while withdrawing the solution in order to prevent air bubbles in the syringe.
(b) Pull the plunger back to the desired cc mark on the barrel.
(c) Withdraw the needle from the container. Care should be taken not to separate the needle and syringe while withdrawing the needle.
(d) Verify the correct dosage in the syringe by raising the syringe to eye level and ensuring the forward edge of the plunger is at the desired level (prescribed dosage plus about 0.2 cc). Verify the correct dosage with the written order.
(e) Place the protective cover on the needle.
j. Ampule. Follow this procedure for the ampule.
(1) Lightly tap the top of the upright ampule to force trapped medication back from the bottle neck (see figure 1-9).
(2) Cleanse the neck of the ampule with an alcohol sponge.
(3) Wrap the neck of the ampule with the sponge and leave for 30 seconds.
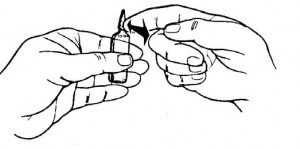
(4) Grasp the ampule with both hands (see figure 1-10). Snap the neck of the ampule by bending away from the breakline. Ampule should be snapped away from any person, including the patient, and the medication tray to prevent possible injury from flying glass.
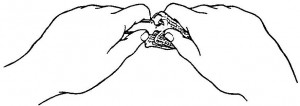
(5) Inspect the ampule for minute glass particles. If any glass particles are observed, discard the ampule and obtain another or use a filter needle.
(6) Pick up the assembled needle and syringe in dominant hand and remove the protective cover. Regardless of method used, care must be exercised not to contaminate the needle.
(7) Insert the needle and withdraw the medication in either of the following ways (see fig 1-11):
(a) Holding the ampule horizontally in the nondominant hand and the syringe in the dominant hand, insert the needle into the medication.
OR
(b) Placing the ampule upright on a flat surface and stabilizing it with the nondominant hand, insert the needle to withdraw the medication.
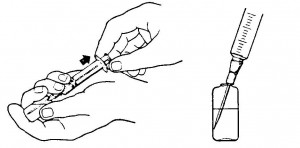
(8) The prescribed amount of medication plus 0.2 cc is withdrawn while keeping the needle immersed in solution.
(9) Withdraw the needle.
(10) Verify the correct dosage. Refer to the doctor’s orders
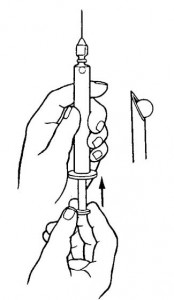
k. Clear Syringe of Air Bubbles.
Use the following procedures (see figure 1-12) to clear the syringe of any air bubbles.
(1) Hold the syringe with the needle pointing up.
(2) Pull back on the plunger slightly to clear all medication from the shaft of the needle.
(3) Flick the barrel lightly with your finger to force air bubbles to the top of the barrel.
(4) Pull the plunger back slightly and push forward until the solution is in the needle hub, clearing it of bubbles.
(5) Continue pushing plunger forward until the proper amount of medication remains in syringe (excess medication is expelled).
(6) Verify the correct dosage.
l. Cover needle with plastic protective cover to maintain sterility until the injection is performed.
