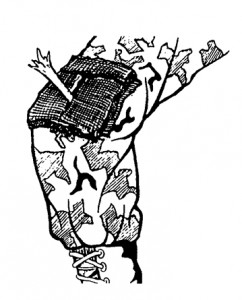
If a foreign object is impaled in a wound, do not attempt to remove the object.
Take measures to stabilize the object to prevent or reduce further injury and, at the same time, control bleeding. In some circumstances, it may be necessary to shorten the protruding object in order to move or evacuate the casualty.
NOTE: If an object is impaled in the casualty’s cheek, the protruding object may be removed, but the casualty must be carefully monitored for bleeding into the mouth.
a. If the casualty is conscious, tell him to remain still and not move the impaled object.
b. Expose the impaled object by cutting or removing clothing to expose the wound site.
c. If the object is protruding from an extremity, check the pulse distal to the wound to determine if circulation is impaired. If circulation is impaired, evacuate the casualty as quickly as practical.
d. If there is serious bleeding from the wound, apply manual pressure to the wound to help control bleeding while you prepare to dress and stabilize the object. If possible, have a fellow soldier or the casualty himself apply the pressure while you dress the injury.
CAUTION: Do not exert force on the impaled object or on the tissue directly adjacent to the edge of the impaled object.
e. Apply a dressing to the wound using a field dressing or three sterile pads. The dressing helps to stabilize the impaled object and protect the wound.
(1) Field dressing. Use your scissors to cut a field dressing halfway through, slip the cut around the impaled object, and secure the field dressing with the attached tails.
(2) Three pads. Cut three sterile dressings halfway through. Place the first dressing around the impaled object (impaled object in slit as shown in figure 8-1). Place the second dressing around the impaled object, but coming from the opposite direction. Place the third dressing around the impaled object, but coming at a right angle to the first two dressings. If no additional bulky dressings are to be applied, secure the dressings with a roller bandage or cravat as described in paragraph g.

f. Apply additional bulky dressings, if needed to build up the area around the impaled object to further protect and stabilize the object. The bulky material may resemble a doughnut with the impaled object in the “doughnut hole.”
g. Secure all dressings. Apply bandages, such as elastic bandages or cravats, to hold bulky dressings in place. The bandage should be tight, but not tight enough to interfere with blood circulation.
(1) If the wound is on an extremity, place a cravat under the limb with the center of the cravat on the side opposite that of the impaled object. Wrap the ends of the cravat around the injured extremity in opposite directions, covering the edges of the dressings. Tie the ends of the cravat away from the impaled object.
CAUTION: Do not anchor the bandage to the impaled object (that is, do not wrap the bandage around the object) or cause pressure on the object while applying the bandage.
(2) If the wound is on a limb, recheck the casualty’s circulation below the bandage. If circulation was not impaired before the bandage was applied but is now impaired, loosen and retie the bandage. Then recheck the circulation. If circulation is still impaired, evacuate the casualty as soon as possible.
h. Immobilize the injured area. Apply a splint or sling if appropriate. Make sure the splint or sling does not cause additional movement of the impaled object.
i. Take measures to prevent or control shock.
j. Evacuate the casualty to a medical treatment facility.
