If use of the MAST is appropriate, apply the device and prepare to inflate the MAST.
NOTE: There are several different MAST models. Follow the manufacturer’s instructions for applying, inflating, deflating and maintaining the MAST. You should be able to open the kit, position the MAST, and inflate the legs (paragraphs 7-6 and 7-7) within 90 seconds.
a. Open the Kit.
Open the MAST kit and remove the MAST (inflatable leg and abdominal sections) and the accessories (pump and hoses).
b. Unfold the Medical Anti-Shock Trousers .
Unfold the MAST and unfasten the Velcro closures. Unfold the MAST so the left leg overlaps the right leg. Make sure the outside Velcro fasteners face the ground and the valves are on the outside next to the ground.
c. Position the Medical Anti-Shock Trousers.
(1) If there is sufficient space below the casualty’s feet, lay the MAST out flat with the leg sections in the same direction as the casualty’s legs (trousers in same relative position as casualty’s pants).
(2) If there is not sufficient space below the casualty’s feet, lay the MAST flat beside the casualty with the leg sections in the same direction as the casualty’s legs. Position the top of the MAST abdominal section just below the casualty’s lowest rib. If the casualty is very short, roll up the ends of the leg sections at the ankles.
(3) If the terrain is rough and a backboard is available, lay the MAST flat on the backboard. The backboard can remain in place when you position the MAST under the casualty.
d. Prepare the Casualty.
Check for sharp objects in the casualty’s pants and gear. Remove these objects before applying the MAST. Remove or cut away restrictive or bulky clothing or gear that could prevent the MAST from stabilizing the casualty.
e. Place the Medical Anti-Shock Trousers Under the Casualty.
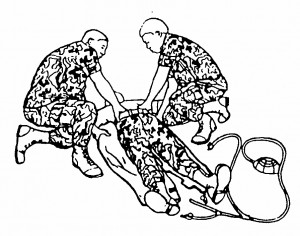
Have another soldier assist you put the MAST beneath the casualty. Serious injury or discomfort can result if the casualty has a pelvic injury or a traction splint and one person tries to apply the MAST alone. The steps given below can be used for a MAST placed below the casualty’s feet or beside the casualty. If your assistant is not a medical person, you should lift the casualty while the assistant slides the MAST in position. Figure 7-3 shows two medics applying the MAST.
CAUTION: Do not lift the casualty any higher than absolutely necessary. If a spinal injury is suspected, use the log roll technique described in Subcourse MD0001, Evacuation in the Field, and Subcourse MD0533, Treating Fractures in the Field.
(1) Lift the casualty’s legs high enough to slide the MAST underneath.
(2) Slide the MAST under the casualty’s legs and up to the buttocks area.
(3) Lift the casualty’s buttocks high enough to slide the MAST underneath.
(4) Slide the top portion of the MAST under the casualty’s buttocks and waist (figure 7-3). Position the top of the abdominal section just below the casualty’s lowest rib.

f. Wrap the Casualty’s Leg.
Either of the casualty’s legs may be wrapped first, but the left leg is usually wrapped first.
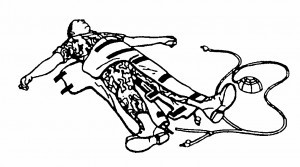
(1) Bring the left top part of the MAST across the casualty’s abdomen and bring the outer part of the left trouser leg over the casualty’s left leg (figure 7-4).

(2) Smooth the MAST leg around the casualty’s left leg.
(3) Align the Velcro strips.
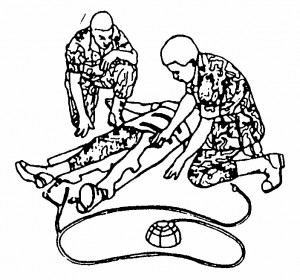
(4) Bring the inside part of the left trouser leg over the outer part of the trouser leg (the part lying on top of the casualty’s leg).
(5) Press the Velcro strips of the left trouser leg firmly together to secure the seam of the trouser leg (figure 7-5).

g. Wrap the Casualty’s Other Leg.
Wrap the right trouser leg around the casualty’s right leg using the same procedures given in paragraph f.
h. Wrap the Casualty’s Abdomen.
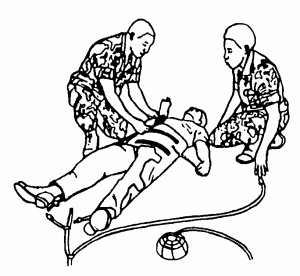
(1) Bring the right top part of the MAST across the casualty’s abdomen and over the part already lying on the casualty’s abdomen.
(2) Align the Velcro strips.
(3) Press the Velcro strips firmly together to secure the abdominal portion of the MAST (figure 7-6).

