a. Tension pneumothorax is a condition in which air continues to accumulate in the pleural cavity and increases pressure on the injured lung. Signs of tension pneumothorax include increased difficulty in breathing, shortness of breath, cyanosis, and the trachea moving from its normal position toward the uninjured side of the chest.
b. If signs of tension pneumothorax are present, perform a chest needle decompression. On the battlefield, unilateral penetrating chest trauma with progressive increases in difficulty breathing is an indication to perform chest needle decompression since other methods of assessment may be unavailable or impossible to assess.
c. If tension pneumothorax is present, perform a chest needle decompression using the following steps. The decompression is performed on the injured side of the chest (side of open chest wound). It allows the air that has become trapped within the chest to escape.
(1) Obtain a 14 gauge needle from the casualty’s first aid kit or from your aid bag. The needle should be two to three and a fourth inches in length to ensure it penetrates deep enough into the chest cavity. A catheter covers most of the needle, but does not cover the needle point
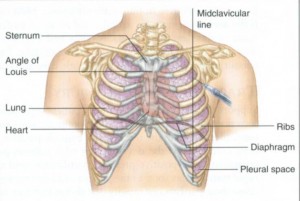
(2) Locate the second intercostal space (between second and third rib) on the mid-clavicular line (figure 3-7) on the injured side of the chest.

(3) Prepare the area with anti-microbial scrub if time permits.
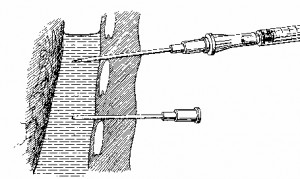
(4) Insert the needle point at a 90 degree angle over the top of the third rib into the second intercostal space (figure 3-8). Stop advancing the needle once a hiss of air is heard. You should feel a “pop” as the needle enters the chest cavity or you aspirate air (if using a syringe/needle combination).
NOTE: Over insertion of the needle can cause damage to underlying lung tissue or other vital organs. Care must be taken not to over insert the needle.
(5) Hold the catheter in place and remove the needle. Safely dispose of the needle.
(6) Tape the catheter in place and monitor the casualty. The catheter can be left in place as needed and flushed with saline every two hours to ensure potency. If the mission dictates, it may be advisable to remove the catheter and then monitor the patient closely for signs of building tension and then “re-needle” the chest if necessary.
REMEMBER: Once the patient develops a tension pnuemothorax, he will continue to develop tension until the patient receives a chest tube. The patient must be monitored closely.

d. If the ability to perform a needle decompression is not available loosen the bandages and lift the sealing material so the trapped air escapes from the pleural cavity. Then apply the sealing material to the wound again and tie the bandages.
