One of the objectives in treating an open chest wound is to keep air from entering the chest cavity through the wound.
Stopping air from entering the wound helps to keep the lung from collapsing or, at least, slows down the collapse. Since air can pass through a field dressing, airtight sealing material must be placed between the wound and the dressing to keep air from entering the wound.
a. Manufactured Devices.
Use a manufactured chest seal device if one is available.
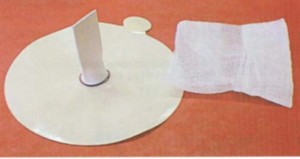
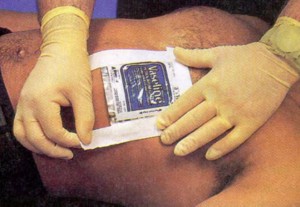
(1) Obtain an Asherman chest seal (figure 3-2) or other appropriate manufactured chest seal device from your aid bag.

(2) Use the included gauze to dry the area surrounding the wound as well as possible to increase adhesion with the dressing.
(3) If available apply tincture of benzoin around the wound area to increase adhesion of the dressing.
(4) If the patient has excessive chest hair, the area may need to be shaved to allow proper adhesion of the dressing.
(5) Remove the backing and expose the adhesive dressing.
(6) Tell the casualty to exhale and hold his breath. This forces some of the trapped air out of the chest cavity. The more air forced out of the chest cavity before the wound is dressed, the better the casualty will be able to breathe.
NOTE: If the casualty is unconscious or cannot hold his breath, place the adhesive dressing over the wound after his chest falls but before it rises again.
(7) Apply the adhesive dressing (5.5 inches in diameter) over the wound so that it adheres to the casualty’s chest and the one-way valve is over the penetrating wound. The one-way valve lets air and blood escape while preventing their re-entry. The clear pad design allows you to visually inspect the wound.
b. Improvised Occlusive Dressing.
If you do not have a manufactured seal available, you can improvise a seal using airtight material, such as the plastic envelope from a field dressing or a petroleum gauze packet. The following steps give procedures for sealing an open chest wound using a plastic envelope.
(1) Obtain a field dressing package. If the casualty is carrying a field dressing, use his dressing. Otherwise, obtain a field dressing from your aid bag.
(2) Open the plastic dressing envelope.
(a) Remove the bandage scissors from your aid bag.
(b) Cut one of the short ends of the plastic envelope and remove the inner packet (dressing wrapped in paper). Cut the envelope so as little as possible is cut off the main part of the envelope. Drop or place the inner packet where it will not become contaminated. You may place the packet on the casualty’s abdomen, for example.
(c) Cut the other short end of the plastic envelope and one of the long sides. You now have a rectangular piece of airtight plastic which can be used to seal the open chest wound.
CAUTION: Avoid touching the inside surface of the plastic envelope. The inner surface will be applied directly to the wound and should be kept as free from contamination as possible.
(3) Have the casualty exhale.
(a) If the casualty is conscious, tell him to exhale and hold his breath. This forces some of the trapped air out of the chest cavity. The more air forced out of the chest cavity before the wound is dressed, the better the casualty will be able to breathe.
(b) If the casualty is unconscious or cannot hold his breath, place the plastic envelope over the wound after his chest falls but before it rises again.
(4) Place sealing material over the wound.
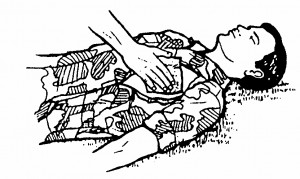
(a) Place the inside surface of the plastic envelope (the side without printing) directly on the chest wound to seal the wound (figure 3-3).

(b) Check the plastic envelope to make sure it extends two inches or more beyond the edges of the wound in all directions. If the envelope does not have a two-inch margin, it may not form an airtight seal and may even be sucked into the wound.
(c) If the envelope is not large enough or is torn, use foil, material cut from a poncho, cellophane, a plastic MRE (meal ready-to-eat) package, or similar airtight material to form the seal.
CAUTION: If an impaled object is protruding from the chest wound, place air tight material around the object to form as airtight a seal as possible.
(5) Tape sealing material in place. Use the tape from your aid bag to tape down all four edges of the plastic envelope. When the casualty inhales, the plastic is sucked against the wound and air cannot enter the wound.
CAUTION: If the sealing material is not taped down, it must be held in place until the dressing is applied. If the casualty is able, he can hold the sealing material in place. Otherwise, you must keep the sealing material in place while you prepare to dress the wound.
NOTE: Figure 3-4 shows a petroleum gauze packet being used to seal a sucking chest wound.

