If blood continues to seep from the dressing on a limb after you have applied and secured the field dressing, applied manual pressure, and elevated the wound (if applicable), apply a pressure dressing.
The objective of applying a pressure dressing is to stop the bleeding, not to stop all blood circulation below the wound. (Stopping all blood circulation would endanger the body tissue below the pressure dressing.) A pressure dressing is usually not required unless arterial or heavy venous bleeding is involved.
CAUTION: A pressure dressing is applied only to a wound on an arm or leg.
a. Prepare the Wad.
Make a “wad” by folding material such as a muslin bandage (cravat) from your aid bag, a rag, material torn from clothing, or similar material. Fold the material several times.
b. Prepare the Bandage.
The wad is secured by a bandage, usually a cravat made from a muslin bandage or similar material.
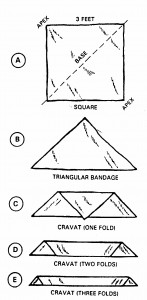
Other materials such as a handkerchief, sock, or strip of cloth torn from a shirt can also be used. Wire and narrow material (such as a shoestring) should not used since they are likely to damage blood vessels and nerve tissue. Cravats can be made from a muslin bandage or from a square of material about three feet on each side in the following manner.
(1) Fold the square of material along the diagonal (figure 2-11 A) and cut the material in half (figure 2-11 B). You now have two triangular bandages. One triangular bandage is used for the pressure dressing. The remaining triangular bandage can be used to make the tourniquet band, if needed, or used as a sling, swathe, or additional securing bandage.
(2) Fold the top (apex) of the triangular bandage so it touches the base (cut diagonal) of the triangular bandage (figure 2-11 C). This is a one-fold cravat.
(3) Fold the material two more times (figures 2-11 D and E).

c. Position the Wad.
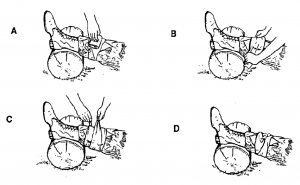
Place the wad of material on top of the field dressing pad directly over the wound (figure 2-12 A).
CAUTION: The pressure dressing is applied on top of the field dressing. The field dressing is not removed or retied. Moving the field dressing would interfere with any clot which had begun to form.
d. Apply the Bandage.
(1) Place the bandage (cravat) over the wad and wrap the bandage tightly around the injured limb (figure 2-12 B).
(2) Bring the ends of the bandage back over the wound (the ends come from opposite directions), covering the edges of the wad if possible (figure 2-12 C).
e. Tie the Bandage.
Tie the ends of the bandage in a non-slip knot directly over the wound (figure 2-12 D). The bandage should be tight enough so only the tip of one finger can be inserted under the knot. Do not tie the bandage so tight that it cuts off blood circulation.
f. Apply Manual Pressure.
Apply additional pressure by pressing firmly with your hand over the pressure dressing. If the casualty is able, have him apply the manual pressure himself.

