4-1. PURPOSE OF DRESSINGS
a. A dressing is any sterile material used to cover a wound. A sterile dressing is used to:
(1) Protect the wound from bacteria in the environment.
(2) Protect the environment from bacteria in the wound.
(3) Absorb drainage.
b. A well-applied dressing makes the patient feel like he is receiving good health care. Psychologically, this makes the patient feel better.
4-2. DRESSING MATERIALS
Various types of dressing materials can be used when applying or changing a dressing. The following are those most frequently used.
a. Coarse Mesh Gauze Sponge. Coarse mesh gauze sponge (figure 4-1) is commonly used as an intermediate layer in many dressings. It is available in several sizes, but the ones used routinely are 2 x 2 inches, 4 x 4 inches, and 4 x 8 inches.
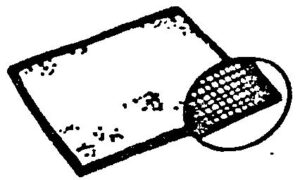
b. Abdominal Pad. The abdominal (ABD) pad (figure 4-2) is a large, thick, multilayered absorbent dressing. It is used as an intermediate layer in many dressings. It is primarily used for postoperative abdominal incisions.
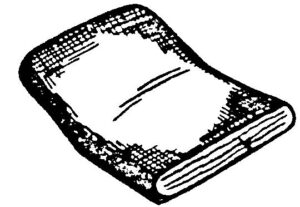
c. Telfa Pad. The Telfa pad (figure 4-3) is a pad with a plastic-like coating on one side of gauze dressing which prevents the dressing from sticking to the wound.

d. Petrolatum (Vaseline) Gauze. The petrolatum gauze (figure 4-4) consists of gauze coated with petroleum jelly. It is used to protect tissue from drying, to prevent adherence to the wound, and to create an airtight seal.

4-3. BANDAGES AND TAPES
The dressing is normally secured by a bandage. In some situations, though, tape is used to keep the dressing over the wound. Bandages can also be used to wrap and protect a body part even if no separate dressing material is used.
a. Bandages.
(1) Kling or Kerlix bandage. Kling and Kerlix bandages are loosely woven or knitted roller gauze bandages that are soft and conform easily. This bandage is highly absorptive and is appropriate when a bulky dressing is needed.
(2) Elastic bandage. Elastic bandages are made from woven material that can be stretched and molded around the body part. If a sterile bandage is not required, an elastic bandage can be reused on the same patient.
(3) Roller gauze bandage. Roller gauze bandages are made from loose mesh material. They are available in various widths from 1 to 4 inches and are usually 5 yards long.
b. Tapes.
(1) Adhesive tape. Adhesive tape is made from cotton, cloth, paper, or foam. It is available in several widths. In addition to being used to secure dressings, the adhesive tapes are used to secure splints, immobilize various parts of the body, and to strap joints to prevent or treat athletic injuries. An adhesive solvent is used to remove any adhesive that sticks to the skin around the wound when the tape is removed.
(2) Hypoallergenic tape. Hypoallergenic tape is made from paper and is porous to allow air exchange.
(3) Plastic tape. Plastic tape is transparent and porous to allow air exchange.
4-4. REQUIREMENT TO CHANGE OR REINFORCE A DRESSING
a. The physician or the supervisor orders when the dressing will be applied and how often the dressing will be changed. The order will also specify if the wound is to be cleaned.
b. Under field conditions, in the absence of a physician’s or supervisor’s order, the medical specialist assumes the responsibility for changing a dressing.
c. Sometimes a dressing may need changing because it is soaked with seepage from the wound. If the circumstances or the physician’s or supervisor’s order prohibits the change, reinforce the area by covering it with another dressing. Label it “reinforcement” and write the date, time, and your initials on it.
4-5. REMOVING A SOILED DRESSING
Incisions and wounds that have been sutured will normally have two layers of dressing. One layer consists of gauze pads laid directly over the closed cut. A larger dressing will then be placed over the gauze pads. This second (outer) dressing covers more area than the inner dressing (gauze pads). If the wound is on the arm or leg, the dressings are normally secured with a bandage. If the wound is on the trunk of the body, such as an abdominal wound, the outer dressing is normally secured by tape. In the following example, the sterile dressing being changed covers an abdominal wound.
a. Verify Patient’s Identity. Make sure that the patient whose dressing is to be changed is the patient for whom the action was ordered. Ask the patient his name. Also compare the patient’s name on the orders with the name listed on the patient’s bed card and identification bracelet.
b. Reassure the Patient. Provide privacy if possible by placing a screen or curtain around the patient or by closing the door. Gain the patient’s help and confidence by telling him why you are changing the dressing.
c. Wash Hands. Perform a patient care handwash. Handwashing may not always be possible in a field situation; however, every effort should be made to provide handwashing facilities.
d. Obtain Necessary Equipment and Supplies. The following items are normally used.
(1) Dressings–4-in x 4-in (10-cm x 10-cm) and 4-in x 8-in (10-cm x 20-cm) sponges.
(2) Gauze pads (sponges).
(3) Cotton-tipped applicators gauze pads may be used instead.
(4) Tape.
(5) Adhesive solvent.
(6) Basins for adhesive solvent and for normal saline.
(7) Sterile towels (for sterile field).
(8) Gloves.
(9) Scissors.
(10) Sterile forceps.
(11) Saline solution.
(12) Solution basin, if applicable.
(13) Drain, if applicable.
e. Prepare the Patient. Position the patient so that the wound site is easily accessible. Expose the wound area by removing the patient’s clothing and/or by folding the bed linens, gown, or pajamas away from the wound area. Do not expose any more of the patient’s body than is necessary.
f. Prepare the Work Area.
(1) Clear all items off the bedside stand or the over-the-bed table.
(2) Clean and dry area where the sterile field will be established if needed.
(3) Cut the tape strips to the size that is required to secure the dressing.
(4) Attach one end of each tape strip to an area that can be easily reached.
(5) Pour adhesive solvent into the solvent basin.
(6) Pour the disinfecting solution into a solution basin.
(7) Put on mask and sterile gloves.
g. Remove 0uter Dressing. Do not put pressure on the wound when removing the dressings. Pressure causes pain, additional injury, and interferes with the healing process.
(1) Loosen the ends of the tape attached to the patient’s skin (figure 4-5).
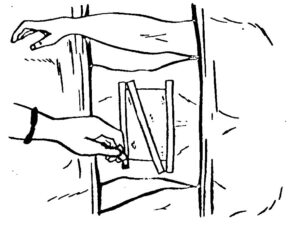
(2) Peel ends toward the wound while holding the skin with the other hand. Do not remove tape in a direction away from the wound. If you peel going away from the outer dressing, you will create tension on the wound, which may disrupt the scab or tear the skin.
(3) Once the tape has been separated from the skin, remove the dressings.
(4) Check the dressings for odor, discoloration, and drainage.
(5) Discard the outer dressing in a contaminated waste container.
h. Prepare to Remove Inner Dressings.
(1) Wash your hands.
(2) Unfold the sterile towels so as to create a sterile field.
(3) Put on sterile gloves and mask.
i. Remove Inner Dressings.
(1) Grasp the edge of the top inner dressing with the forceps and gently roll the dressing off the wound.
(a) Point the tips of the forceps downward.
(b) If the dressing sticks to the wound, moisten the dressing with sterile water to soften surface of wound. If moistening the dressing does not loosen the dressing, check with your supervisor.
(2) Check the dressings for odor, color, and drainage. Report any abnormal wound drainage to your supervisor.
(3) Discard the dressing into a contaminated waste container without touching the contaminated side of the dressing to yourself or to any surface.
(4) Continue until all of the inner dressings have been removed and discarded.
(5) Drop forceps onto the glove wrap.
j. Remove the Adhesive. Gently rub a solvent-soaked cotton-tipped applicator or gauze pad over the adhesive around the wound. Removing the adhesive that sticks to the skin reduces the chance for skin breakdown (irritation) and adds to the patient’s comfort.
k. Observe Skin and Wound Site. Observe the skin for signs of irritation (redness, rash, and/or swelling). Inspect the wound for:
(1) Redness.
(2) Swelling.
(3) Pus (usually yellow fluid; may be blood-tinged, greenish, or brown).
(4) Putrid (bad) odor.
(5) Unusual color.
(6) Condition of suture (joining of edges of wound).
(7) Condition of drains.
(8) Healing.
4-6. CLEANSING A WOUND
Cleanse the wound if order indicates. Dip each cotton-tipped applicator or gauze sponge into a saline solution before using it to clean the wound. The cleansing strokes are different for linear wounds than for circular wounds.
a. Cleansing a Linear Wound. The steps for cleansing a linear wound are shown in figure 4-6.
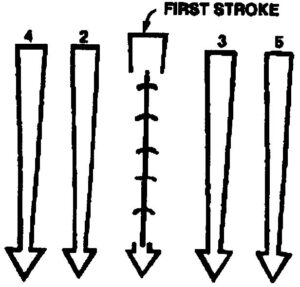
(1) Stroke 1. Swab (wipe) the area directly over the wound with a single stroke. Discard the applicator (sponge) into the container for contaminated wastes.
(2) Stroke 2. On the patient’s right side, swab (wipe) the area next to the wound with a single stroke. Discard the applicator (sponge).
(3) Stroke 3. On the patient’s left side, swab (wipe) the area next to the wound with a single stroke. Discard the applicator (sponge).
(4) Stroke 4. On the patient’s right side, swab (wipe) the area next to the second stroke with a single stroke. Discard the applicator (sponge).
(5) Stroke 5. On the patient’s left side, swab (wipe) the area next to the third stroke with a single stroke. Discard the applicator (sponge).
b. Cleansing a Circular Wound. Steps for cleansing a circular or puncture wound are illustrated in figure 4-7.
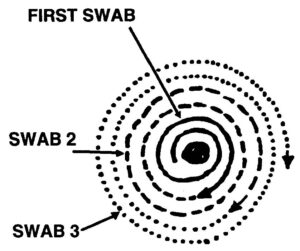
(1) Stroke 1. Starting at the center of the wound, swab the area in an outward circular spiral. Then discard the applicator (sponge).
(2) Stroke 2. From the spot where the first stroke ended, continue swabbing (wiping) in an outward circular pattern for about one and one-half revolutions. Then discard the applicator (sponge).
(3) Stroke 3. From the spot where the second stroke ended, continue swabbing (wiping) in an outward circular pattern for about one and one-half revolutions. Then discard the applicator (sponge).
(4) Stroke 4. From the spot where the third stroke ended, continue swabbing (wiping) in an outward circular pattern for about one and one-half revolutions. Then discard the applicator (sponge). Continue cleaning the area, if needed, until the area around the wound has been cleansed.
4-7. PROCEDURES FOR APPLYING A STERILE DRESSING
a. Change Gloves or Forceps. If you are using the sterile gloves and forceps and your gloves have not been contaminated by the wound, use a new sterile forceps. If you are not using a forceps or if your gloves have been contaminated by contact with the drainage from the wound, remove your gloves and put on new sterile gloves.
b. Dry the Wound. Pat the wound dry with sterile gauze sponges.
(1) Start at the center of the wound.
(2) Move outward toward the wound edges.
c. Apply a Sterile Inner Dressing. The number of gauze pads used may vary depending upon the wound.
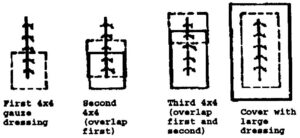
(1) Lay a sterile 4 x 4 gauze dressing over the lower part of the wound (figure 4-8, first).
(2) Overlap the first dressing with a second dressing (figure 4-8, second).
(3) Overlap the second dressing with a third dressing (figure 4-8, third).
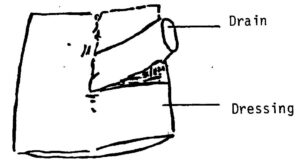
c. Apply Outer Dressing. Completely overlap all the inner gauze dressings with a large outer dressing (figure 4-8, large). If a drain is in place, cut one of the dressing squares halfway through and position it around the drain (figure 4-9).
d. Secure Outer Dressing.
(1) Remove your gloves and mask.
(2) Place a strip of tape diagonally across the outer dressing so that both ends of the tape are anchored to the skin.
(3) Place a strip of tape along one of the long edges of the dressing so that both ends of the tape are anchored to the skin and the rest of the strip is half on the dressing and half on the skin.
(4) Place a strip of tape on the opposite long edge using the same procedure. (Finished product will resemble that shown in figure 4-5.)
(5) Make sure that the dressing is secure, but is not constricting blood flow below the dressing.
(6) Write the date and time the dressing was changed on one of the tape strips and initial it.
4-8. FINAL PROCEDURES
a. Remove and discard contaminated materials according to the local SOP.
b. Perform a patient care handwash.
c. Tell the supervisor that the dressing has been changed. Report the appearance of the wound, the amount and description of drainage, and any other observations made during the procedure.
d. Record the following data on the patient’s records or other form as appropriate.
(1) Date of dressing change.
(2) Time of dressing change.
(3) Appearance of wound before cleansing.
(4) Appearance of wound after cleansing.
(5) Amount of drainage.
(6) Characteristics of wound and drainage.
e. Submit the report according to the local SOP.
