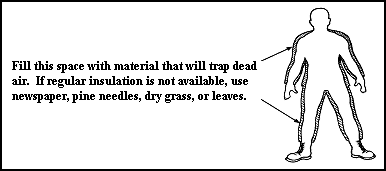
Soldiers should understand the design principles of the military cold-weather
clothing system. These principles are: insulate, layer, and ventilate. There are
four ways to make these principles work for you: keep it Clean, avoid
Overheating, wear it Loose, and keep it Dry. By remembering the "buzz word"
COLD, you can quickly check your clothing.
Insulation material reduces the amount of heat loss. By regulating the amount
of insulation, an individual can regulate the amount of heat lost or
retained.
Several layers of clothing provide more insulation and movement than one
heavy garment, even if the heavy garment is as thick as the combined layers. Air
pockets trapped between the layers provide insulation and warmth.
Ventilation helps maintain a comfortable body temperature by allowing excess
heat and moisture to escape.
Dirty clothes are cold clothes. Dirt and grease clog the air spaces in
clothing and reduce insulation.
Select comfortable clothing and do not overdress. In cold weather, it is
better to be a little cool rather than risk being overheated.
All items of the cold-weather uniform are large enough to allow wearing of
the appropriate number of layers. Your field jacket may appear too large without
all of the layers designed to fit under it. If the uniform items do not fit
loosely, the insulation that keeps you warm will be greatly reduced.
KEEP IT DRY
It is important to keep clothing dry, since wet clothing conducts heat away
from the body more quickly than dry clothing. Moisture soaks into clothing from
two directions: the inside and the outside.
From the outside you must guard against melting snow; from the inside you
must guard against sweating. Brush snow and frost from clothing before entering
any heated shelter or vehicle, and avoid overheating.
2-2. COLD-WET VERSUS COLD-DRY
As mentioned in Chapter 1,
temperatures that are above 14°F (-10o C) are considered cold-wet
conditions; temperatures consistently below 14oF will cause cold-dry
conditions. Cold-wet conditions usually involve a freeze/thaw cycle, often
accompanied by rain or wet snow. This type of weather is hard to dress for,
since each soldier must battle the elements to keep his clothing dry. During
cold conditions, the ground is usually frozen and the snow is dry. Athough the
temperatures during the cold-dry conditions may be lower than during cold-wet
conditions, it is easier to stay warm.
|
COLD-WET |
|
COLD-DRY |
|
|
OR |
|
|
DOWN TO 14oF |
|
BELOW 14oF |
Figure 2-3. Cold-wet versus cold-dry.
2-3. THE COLD-WEATHER UNIFORM
There are many layers of clothing that must be worn in a cold weather
environment. The first layer of clothing is the T-shirt and shorts. The second
layer is a set of thermal underwear, which consists of an undershirt and
underpants. You should wear only the clothing needed to keep comfortable and
warm.
The scissors-type suspenders must be the last thing next to the outer layer,
or else the layers cannot be tucked inside the trousers. The underpants and all
succeeding layers of trousers are supported from the metal hooks on the
suspenders. The suspenders allow the underpants and trousers to be worn loosely
at the waist so that circulation and ventilation are not restricted.
Wear the wool shirt outside the trousers, which provides another method of
ventilation. You can increase the waist size of this shirt by removing the
stitching in each dart at the sides of the shirt.
Wear the field trousers as an outer garment in the cold-wet environment. In
the cold-dry environment, wear the nylon liners inside the field trousers during
periods of inactivity. On the inside of each cargo pocket on the trousers is a
tape that runs through a hole on the side of the pocket. The tape ties around
the thighs and keeps the cargo in the pocket from rubbing and irritating the
legs. For warmth and to prevent entry of snow, tie the drawstrings around your
ankles outside the boots into the boot lacing, and tuck the bowknots under the
trousers.
The field jacket is worn with the liner in both cold-wet and cold-dry areas.
Wear the coat and liner directly over the wool shirt. Remove the liner in mild
weather or when activity increases.
In a cold-dry environment the parka is worn with a liner. The waist is
adjustable for ventilation and warmth with a drawcord, and the skirt has a
"split-tail" that can be tied tightly around each leg for warmth. During a
period of severe cold, when activity is less, wear the parka with liner over
your field jacket with liner. Remember: do not overdress or you will sweat.
Do not dry nylon on drying lines too close to the heat; too much heat will
melt the nylon, destroying its insulating value.
Keep the head covered to stay warm; a warm head even warms the feet. Wear the
cold-weather cap or balaclava under your helmet or under the hood to your field
jacket. When wearing the cold-weather cap as an outer headpiece, the lower flap
may be folded up over the top and fastened with hook-pile tape straps in front.
In a cold-dry environment, wear the winter hood over the cap or the helmet.
Adjust the hood by using the drawstrings on either side of the hood and the
elastic strip at the back. To provide minimum protection for the face from the
wind, bend the wire in the fur cuff of the hood so that you have a small opening
for your face. This allows visibility but less protection.
The feet are hard to keep warm and dry, so protect them. The insulated boots
(black for cold-wet conditions and white for cold-dry conditions) are warm and
waterproof. The white insulated boot is the best cold-weather footwear today.
When you are active, your feet will sweat and, because of the waterproof rubber
lining, the moisture will remain in the socks or in the bottom of the boots. The
feet, even if damp, will stay warm because the heat given off by your body will
remain inside the boots. If the boots are worn for long periods, the feet become
white and wrinkled when you remove the boots. This is no cause for alarm.
Drying, massaging with foot powder, warming and putting on dry socks will
correct this. If you are inactive for long periods, your feet may become cold.
Exercises such as knee bends, stamping your feet, running in place, or wiggling
your toes will make them warm. Elevate the feet whenever possible to aid blood
circulation. Don't wear socks that are too tight, and wear only one pair of
cushion-sole socks at a time. Change your socks at least twice a day. Most
important, stay active.
Care of your boots is important. Wash boots inside and out with soapy water
at least once per month or as required by unit SOP you want your feet to keep
warm, you must keep the insulation dry. Inspect your shoes often and repair any
holes or punctures immediately. Temporary repairs can be made by patching the
hole with any kind of tape; even chewing gum can be used. Seal the hole quickly
to prevent the insulation from becoming wet. If one of your boots feels heavier
than the other, the insulation is probably wet and they should be turned in for
new ones.
Insulated boots must be tested annually to ensure they are waterproof and
have less than 0.01 percent moisture in the insulation. The air valve on the
outside of the boot is used to equalize pressure when worn at high altitudes and
adjusted again upon return to low altitudes. To equalize the pressure in the
boot, open the valve for a few seconds and immediately close it. The valve
should be kept closed at all other times to prevent moisture from entering.
Never open the valve unless the boot pressure around your foot causes
discomfort.
You can wear overshoes over the leather boots on wet or muddy terrain. The
overshoes are not as warm and dry as the insulated boots. Make sure your socks
are dry and that your boots are loosely laced so as not to restrict
circulation.
2-4. EXTENDED COLD-WEATHER CLOTHING SYSTEM (ECWCS) (TEST)
The ECWCS is issued as a one-for-one replacement for the current standard
cold-wet clothing system. System components use the most recent materials and
technology. The result is a reduction in weight and bulk from the current
cold-wet clothing system without loss of protection from the cold. The ECWCS
uses the layer approach that draws moisture away from the body and should be
worn as discussed below.
FIRST LAYER
This consists of polypropylene undershirt and shorts. They are worn next to
the skin. They are designed to draw moisture away from the skin, thereby
reducing conductive heat loss. You must make sure that no other item is placed
between these items and your skin.
SECOND LAYER
The second layer contains a synthetic fiber pile (SFP) shirt and polyester
batting trouser liners. The SFP shirt and trouser liners provide insulation. The
shirt is designed to dry quickly if it becomes wet and to provide a high degree
of insulation. It should not be worn as an exterior garment in wet or windy
conditions, since the loose weave provides little protection against wind chill.
If the shirt gets wet, it will reduce the insulation value.
The trouser liners are designed to be worn during little or no activity. They
should not be worn during heavy activity such as skiing or snowshoeing.
THIRD LAYER
This consists of polyester batting field jacket liner and field trousers. The
jacket liner should only be used for extra insulation during periods of little
activity. This liner is designed to be used as a separate jacket; it should not
be attached to the parka. The trousers provide a durable wind-resistant,
water-repellent layer to protect the insulating underpants and trouser
liners.
FOURTH LAYER
Windproof, waterproof parka and trousers make up this layer. The parka and
trousers provide windproof and waterproof shell garments to protect the first
three layers.
The parka should be the outer garment, which is always worn when doing any
activity outside a shelter. It is waterproof, yet the fabric is breathable so
that body moisture can escape. The hood is designed to give full protection from
wind and snow and does not prevent your seeing the area around you. It has
underarm zippers to allow air to circulate during heavy activity. The trousers
are made of the same material as the parka and are very warm. They should be
worn only when necessary to prevent the field trousers from becoming wet.
FIFTH LAYER
This consists of standard camouflage overwhites.
2-5. TIPS ON WEAR AND MAINTENANCE OF CLOTHING
The previous discussion on the layers of cold-wet and cold-dry uniforms
describes how each system functions. In some units, the cold-dry field trouser
liners are often substituted for the wool field trousers of the cold-wet system
and function well in a cold-wet environment. Your commander and unit standing
operating procedure (SOP) will determine what uniform and components will be
worn and carried in the field.
DRYING WET CLOTHING
Hang items separately from drying lines inside the tent. Do not place
anything too close to a stove or over steaming pots; steam will cause further
dampness.
DRYING DAMP CLOTHING
Damp items can be hung on the rucksack during movement. Pin damp socks to
load-carrying equipment or shirt during movement or just inside the last layer
of clothing. Do not place damp clothing in sleeping bags. This will only make
sleeping bags wet, and they are harder to dry than clothing.
Small items can be placed between the sleeping bag and the sleeping mat under
your legs. When washing clothes without soap, dry-rub and air clothing and
sleeping bags.
Never warm your feet next to an open fire. The boots will melt and burn
because of their insulation before the feet become warm.
Try never to wear VB boots in a sleeping bag. Sometimes the tactical
situation is such that boots must be worn while sleeping. If so, the feet must
be dried and massaged with foot powder, and dry socks must be put on. Wearing
the VB boot while sleeping does not let your feet dry out. After VB boots have
dried, place them underneath your sleeping bag on top of your sleep pad when
temperatures are below 0oF.
2-6. COLD-WEATHER EQUIPMENT
The sleeping equipment consists of a sleeping bag, an insulated sleeping pad,
and a waterproof bag. There are two types of sleeping bags:
(1) Sleeping bag type I, intermediate cold, temperature range
+45oF to +10oF, consists of a mummy-shaped bag with hood,
insulated sleeping pad, and a waterproof bag.
(2) Sleeping bag type II, extreme cold, temperature range of +10oF
to -50oF, is also available.
Whatever clothing is necessary must be worn with both bags to stay warm and
comfortable at the lower temperature ranges. As a minimum, long underwear, sleep
shirt, dry socks, and head protection should be worn while sleeping.
The insulated sleeping pad has replaced the pneumatic mattress. Use the
insulated sleeping pad under the sleeping bag for warmth and comfort and to keep
your sleeping bag dry.
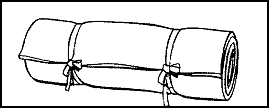
Figure 2-4. Sleeping pad.
The bag must be kept dry if it is to keep you warm. Sleeping bags become wet
from outside moisture, from sweating on the inside of the bag, and from water
escaping from the mouth or nose into the sleeping bag.
To keep outside moisture from wetting the bag, place protective insulation,
pine or spruce boughs, a poncho, or an insulated sleeping pad under the bag.
Avoid sweating by wearing the least amount of clothing to keep warm inside the
bag, and by using the proper sleeping bag for the temperature conditions. Do not
breathe into the bag or moisture will collect and wet the bag or form ice
crystals. If your face gets cold, cover it with a towel, muffler, balaclava, or
sleeping hood. The sleeping shirt with hood is specifically designed for use
with the types I and II sleeping bags.
When it is not in use or being carried, open the sleeping bag wide so that
fresh air can get into it. Turn it inside out so that the sun and wind can dry
it. Always shake the bag out and fluff it up before and after use to provide for
more trapped air between the layers of the wind-resistant/water-resistant outer
shell.
Always carry your sleeping bag in the waterproof carrying bag. This protects
the bag and helps keep it dry. Ensure that the top bag is securely tied to
prevent snow or other moisture from getting inside and wetting the sleeping bag.
The following suggestions will help you keep warm and comfortable in the
sleeping bag:
-
Eat just before getting into the bag. This gives you energy and helps you
to stay warm.
-
Always relieve yourself just before going to bed. The act of getting out
of a warm sleeping bag to go outside can be a chilling experience.
PACKING YOUR RUCKSACK
When you load your rucksack for skiing or climbing, pack heavy items at the
bottom and next to the frame. This places the weight on your hips, which is
necessary for good balance. Place hard or sharp objects inside the load where
they will not rub on the bag and your back. When walking or snowshoeing, raise
the center of gravity and take more of the load on your shoulders. Articles that
are often needed are placed in the outside pockets for easy reach. Keep maps and
other flat objects in the flap pocket.
ADJUSTMENT
Adjust the straps so that you can move the top part of your body and swing
your arms freely. Adjust the shoulder straps so that the lower back straps fit
just above the belt line.
2-7. LOAD-CARRYING EQUIPMENT
The all-purpose lightweight individual carrying equipment (ALICE) rucksack
comes in sizes medium and large. Make sure you are equipped with the large ALICE
in a cold environment.
In cold-weather operations, you should follow the packing list set forth in
your unit SOP to organize your rucksack. The main consideration is to avoid
having to unpack during halts to get frequently needed items. The following
illustrates a method of organizing your rucksack:
-
Small external pockets. These contain small high energy foods
(candy, cereal bars) to be eaten while on the move.
-
Large external pockets. These contain rations to be eaten for
morning and evening meals. Take extra socks, scarves, and a spare cap. The
openings behind the pockets can be used for skis or other items.
-
External attachment points. The sleeping pad is attached to the
bottom of the pack or under the top flap (wrapped inside sandbags) and other
combat items as required.
-
Top flap. It contains camouflage overwhites and pack cover.
-
Main compartment. Place the sleeping bag in the bottom of the
rucksack. Spare clothes are placed in the upper half of the compartment for
easy reach.
-
Camouflage. A white cotton cover is provided that covers the entire
rucksack, excluding the shoulder straps. Use it when wearing your overwhites.
-
Care and maintenance. Check your rucksack for damages before and
after an operation. Repair damages immediately or turn in through supply
channels for a replacement.
-
Emergency quick-release of the rucksack. When quick removal of the
rucksack is needed, unsnap the fastener. Pull down on the quick-release
fastener on the left shoulder strap, shift the rucksack toward the right
shoulder, and let it drop to the ground.
-
Cargo support shelf. The rucksack can be converted to a cargo
carrier by removing the combat pack and replacing it with the cargo support
shelf. You can carry square, rectangular, or box-type items such as radios,
water cans, and fuel cans.
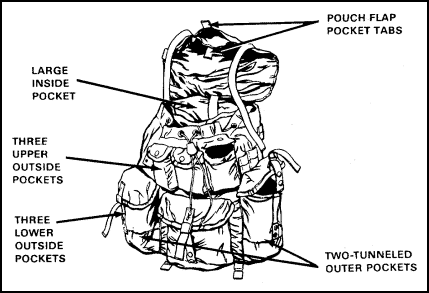
Figure 2-5. Load-carrying equipment.
2-8. OVER-THE-SNOW MOVEMENT EQUIPMENT
Before you are instructed to use snowshoes or skis, your chain command will
first determine if movement by foot is possible. In shallow snow (8 inches or
less) or heavily crusted snow, movement on foot for inexperienced skiers
provides better maneuverability with the least effort.
SNOWSHOES
Snowshoes consist of a white magnesium frame laced with nylon-coated steel
cable. They are about 48 inches by 12 inches weigh 3.3 pounds with bindings.
When properly adjusted, the toe of the boot will be about halfway across the
opening in the snowshoe; the toe strap should be firm, but not tight enough to
restrict circulation; and the heel straps should permit some side-to-side
movement. When used correctly, snowshoes provide better mobility than walking.
In most instances, skis are preferred over snowshoes. When using snowshoes, you
cannot back up or swim; be careful when moving over thin ice. The traction
needed to ascend or descend with snowshoes can be increased by waxing. The use
of ski poles with snowshoes aids movement and reduces fatigue.
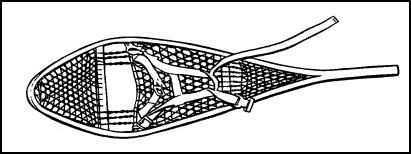
Figure 2-6. Snowshoe and snowshoe binding.

Figure 2-7. Snowshoe binding attached to VB boot.
SKIS
The standard military skis are about 208 centimeters (82 inches) in length,
and have a hole in the tip for towing, a groove in the heel for attaching mohair
climbers, and metal edges.
SKI POLES
Ski poles can be very useful in steep terrain. The military ski pole consists
of a steel shaft with rubber handgrips and baskets, and a leather wrist strap.
The poles come in three lengths: 130 centimeters (51 inches), 137 centimeters
(54 inches), and 147 centimeters (58 inches). When fitting the poles, you should
stand on the floor and place the pole at your side; it should come to the point
of your shoulder (about 1 inch below the top of the shoulder).
MOHAIR SKI CLIMBERS
The mohair climbers are attached to the bottom of the skis for added grip
when climbing steep slopes. The climbers consist of a cotton-backed mohair pile
and are attached to the skis by five web straps.
2-9. MISCELLANEOUS EQUIPMENT
SUNGLASSES
Polarized sunglasses should always be worn on bright days when the ground is
covered by snow. Failure to wear the sunglasses, even on overcast days when the
need seems less, may result in blindness.
PROTECTIVE MASK
There is an M4 cold-weather winterization kit available for your protective
mask. Make sure you install this winterization kit for operations in the
northern environment.
CANTEENS
In cold weather the plastic canteen will freeze very quickly if carried in
the standard fabric carrier. Since the canteen cannot be placed directly on
heat, there is no quick method for thawing. Whenever possible, the canteen
should be carried in one of the interior uniform pockets, or wrapped in clothing
and placed in the rucksack to ride against your back. In extreme cold, do not
fill the canteen over two-thirds full; this allows for expansion if the water
freezes.
The insulated canteen is a one-quart capacity stainless steel vacuum bottle.
It is provided with a cotton duck cover and a stainless steel cup. A new arctic
canteen will keep water from freezing at -40oF for 6 hours. The
following are some tips in using the arctic canteen:
-
Fill the canteen using your canteen cup.
-
Fill to within half an inch of the neck.
-
Do not drop or dent.
-
Put it in your sleeping bag at night.
-
Carry the canteen in an M60 bandoleer near your body.
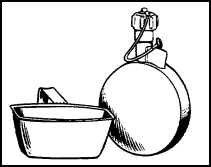
Figure 2-8. Insulated canteen with cup.


