Your mission may take you to an arctic or subarctic region. You expect to
have all personal equipment and other members of your unit with you wherever you
go. But you could find yourself alone in a remote area with little or no
personal gear.
Brief the soldier on the route before setting out on a march; he should
memorize details if possible. A soldier can become separated from the main body
of troops, especially if an action is fought. This applies mainly to night
battle or bad weather. It can also happen if he is careless and march discipline
is poor.
If all is quiet and there are no battle sounds or aircraft to guide you to
friendly lines, go back to the last known position. If you cannot go back,
consider carefully the journey already made and the distances and directions
from the starting point.
Opinions should be taken from the group. Search parties should be sent out to
find the next known steering mark. Trails must be marked carefully so that the
search party can return to guide the main group forward or to rejoin the group,
should their search be unproductive. Meanwhile, the rest of the group should
seek shelter.
If the search party fails to find any known location, perform the steps
below, but remember to think clearly and keep calm.
Sometimes tents or other regular shelters are not available. In summer, if
the weather is mild, you may need protection only from insects. In the winter,
however, you cannot stay in the open for long periods unless you are moving. In
case of emergency, you must know how to protect yourself from the effects of the
weather.
If natural shelters such as caves or rock ledges are available, they should
be used. If they are not, a temporary improvised shelter must be built.
The type of shelter to be built depends on the equipment and materials
available. By the proper use of materials available, some sort of shelter can be
built during any season of the year. In open terrain a shelter can be built
using ponchos, canvas, snow blocks, or other materials. Snow caves, snow
trenches, snow houses, or snow holes may be built in the winter. In the woods, a
lean-to is normally preferred to other types of shelter. In cold-weather areas,
nature provides you with the means to prepare a shelter. Your comfort, however,
greatly depends on your initiative and skill at improvising.
PONCHO SHELTERS
The simplest type of shelter can be made by pulling the poncho over your
sleeping bag. For additional comfort, various types of shelters and lean-tos can
be made by attaching your poncho to trees, tree branches, or poles.
To build a one-man shelter from one poncho, spread the poncho on the ground,
hood side up. The hood opening must be tightly closed by adjusting and tying the
drawstrings. The poncho is raised in the middle of its short dimension to form a
ridge, with the stake out at the corners and sides. Snow, sod, or branches are
used to seal the side and one end of the shelter to provide additional
protection from the wind and to retain heat.

Figure 10-1. One-man shelter.
A two man shelter can be made from two ponchos. Spread the ponchos on the
ground with the hood side up and the long sides together so that the snap
fastener studs of one poncho may be snapped into those of the other poncho, The
ponchos are raised where they are joined to form a ridge. The shelter is then
staked out at the sides and corners. A third poncho may be snapped into the
other ponchos to form a ground cloth.

Figure 10-2. Two-man shelter.
LEAN-TO SHELTER
The lean-to shelter is built in forested areas and is made of trees and tree
limbs. A poncho, a piece of canvas, or a parachute, in addition to boughs, may
be used for covering. Depending on the number of people to be sheltered, two
types of lean-tos (single and double) are built. Boughs should be laid in the
shelter like overlapping shingles (the same as on a live tree).

Figure 10-3. Single lean-to.
To save time and energy, use two trees the right distance apart and sturdy
enough to support the crosspiece. If suitable trees are not available, use two
forked poles or build two A-frames to hold the crosspiece. A large log is laid
at the back for added height. Stringers about 3 meters long and 10 centimeters
in diameter are then placed 45 centimeters apart from the crosspiece over the
top of the log in the rear. Available coverings, ponchos, boughs, and so forth
are then placed on top of the stringers. A double lean-to is made by building
two single lean-tos facing each other with the fire in between.
Any kind of an open fire can be used to heat the lean-to. The best kind for a
large lean-to is the log fire. Precautions must be taken to prevent the fire
from burning too hot and burning down the shelter. A fire reflector may be built
of green logs or poles to reflect the heat into the shelter and to serve as a
windbreak to keep the fire burning steadily.
TREE SHELTERS
In wooded areas, the tree-pit shelter furnishes temporary protection. Select
a large tree with thick lower branches and surrounded with deep snow. Enlarge
the natural pit around the tree. The walls and floor are lined with branches and
boughs. Try not to disturb the snow that may be on the branches.
An emergency shelter for one man can be built by cutting down a coniferous
tree at a point about 1 meter from the ground.

Figure 10-4. Tree-pit shelter.
After the tree has fallen, the branches on the underside are trimmed away and
the cut material used for insulation on the ground.
WIGWAM
A wigwam or tepee can be built in wooded areas by tying a number of poles
near the top and spreading them at the bottom to form a large circle. This
framework is then covered with ponchos, a parachute, or any other suitable
material.
SNOW WALL
In open terrain with snow and ice, a snow wall may be built for protection
from strong winds. Blocks of compact snow and ice are used to build a windbreak.
Be careful not to get covered up by drifting snow, which may accumulate on the
lee side of the wall.
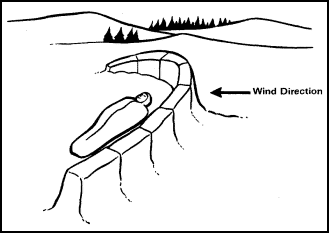
Figure 10-5. Snow wall.
SNOW TRENCH
A snow trench provides shelter quickly. It is built by burrowing into a
snowdrift or by digging a trench in the snow and making a roof of ponchos or ice
and snow blocks supported by skis, ski poles, or snowshoes. Boughs can be used
for covering the roof and for the bed. Figure 10-6 shows one method of roofing
over the trench by leaning snow blocks against each other.
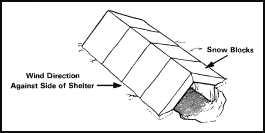
Figure 10-6. Snow trench.
SNOW CAVES
A snow cave can be used as an improvised shelter in the open areas where deep
and compacted snow is available. Normally, a suitable site can be located on the
lee side of a steep ridge or riverbank where drifted snow collects, and it is
wind packed.
The tunnel entrance must give access to the lowest level of the chamber. This
is the bottom of the pit, where cooking is done and equipment is stored. The
snow cave must be high enough to provide comfortable sitting space. The sleeping
area must be on a higher level than the highest point of the tunnel entrance,
where there is warmer air.
The roof must be arched for strength so that drops of water forming on the
inside will not fall on the floor. This water will follow along the curvature of
the roof and sides, glazing over the walls when frozen. The roof must be at
least 30 centimeters thick. The size of the snow cave depends upon the number of
men that will occupy it. A large cave is usually warmer and more practical to
build and maintain than several small caves.
The shape of the snow cave can be varied to suit conditions. When the main
cave is built, short side tunnels are dug to make one- or two-man sleeping
rooms, storage space, latrine, or kitchen space.
In building the snow cave, locate a deep snowdrift at least 3 meters deep.
Newly fallen, powdery, or loose snow should not be used. The depth of a
snowdrift may be tested with a sharpened branch or young tree about 4 meters
long, or with the ski or shorter ski pole. The entrance must be chosen carefully
so that wind will not blow into the cave or block the entrance by drifting snow.
The entrance should be built so that it is about 45 degrees from the downwind
side. A small tunnel is burrowed directly into the side of the snowdrift for 1
meter. A chamber is excavated from this tunnel. Excavation is done to the right
and left, so that the length of the chamber is at right angles to the tunnel
entrance. Personnel doing the digging will become wet from perspiration and from
the snow inside the cave. They should wear the minimum amount of clothing to
ensure that they have a change of dry clothing when finished.
The cave can be heated with the one-burner gasoline stove or with candles.
The fires should be put out when personnel inside the cave are sleeping, thus
reducing the danger of fire, asphyxiation, or carbon monoxide poisoning. If the
weather is severe and it is necessary to have a fire while sleeping, an alert
fire guard must be posted in each cave. The ventilation holes must be inspected
every 2 or 3 hours to ensure that they have not become clogged by snow or
ice.
To ensure that the cave is warm, the entrance should be blocked with a
rucksack, poncho, or snow block when not in use. All available material such as
ponchos, cardboard from ration boxes, brush, and boughs should be used for
ground insulation.
Walking on the roof may cause it to collapse. At least two ventilator holes
are used, one in the roof and one in the door. A ski pole can be stuck through
the roof ventilator to clear it from the inside. Extra care must be taken to
keep air in the cave fresh when cooking or heating. The entrance should be
marked by placing a pair of skis, or other equipment, upright on each side of
the entry way.
Building a snow cave requires practice. Large shelters are usually more
efficient for squad-size units and larger units. The most critical decision is
when and where to stop and build the shelter.
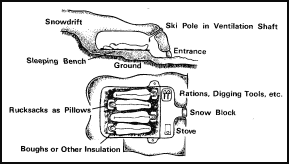
Figure 10-7. Snow cave.
INDIVIDUAL SNOW HOUSE
If you are alone and have need of a shelter quickly, you can build a small
individual snow house. It is box-shaped, and the only building materials needed
are snow blocks. Cut snow blocks 40 by 40 by 80 centimeters. Lay them on edge to
a length of 2.5 meters and a width of 1 meter. Build the walls up to a height of
about 1 meter. When you have the walls built, make an A-shaped roof by leaning
together pairs of blocks. Fill in the ends with snow blocks and chink all the
crevices with soft snow. Cut a hole in the end of the leeward side large enough
to crawl into. When you are inside, make one or two small holes near the top for
ventilation. Block up the end with a snow block or with your rucksack.
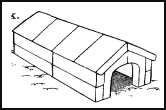
Figure 10-8. Individual snow house.
SNOW HOUSE OR IGLOO
An igloo makes an excellent shelter in snow and glacier areas when other
materials are not available or when the snow is so hard that it can be cut into
blocks. Cracks in the igloo are then covered with loose snow. To increase the
head room and to prevent water droplets from forming inside the igloo, the
corners of the blocks may be cut off to form a round and smooth interior.
A shelter may be built over the entrance in the same manner as the igloo, and
it should be 1 to 2 meters long and about 1 meter wide and 1 meter high. This
shelter provides more protection and warmth inside the igloo and a place to
store equipment. Blocks of snow or other material may be placed at both the
outside and the inside entrances of the tunnel for more warmth. Make a
ventilation hole near the top and at the same height as the fifth or sixth row
of snow blocks. The hole can be kept open by placing a ski pole or long stick
into it and clearing it out as needed. The igloo is heated with a one-burner
stove or with candles.
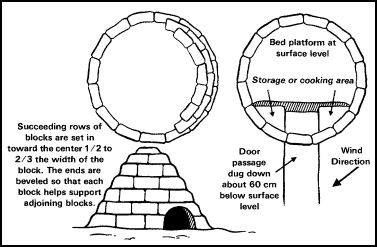
Figure 10-9. Snow house.
10-4. FOOD
The chances of finding different types of food vary in cold-weather areas
depending on the time of year and the place. Shores normally are scraped clean
of all animals and plants by winter ice. Food can still be found north of the
timberline, even when such foods as mice, fish, and grubs are not available.
STORAGE AND PRESERVATION
If a large animal is killed or a large number of small game are found, you
should store or preserve some of the meat for future use. Freezing is the best
way to preserve fresh meat or fish. It may be necessary to protect your supplies
from small animals. This can be done by hanging these supplies about 2 meters
from the ground.
FISH
There are few poisonous fish in cold-weather areas, but some fish, like the
sculpin, lay poisonous eggs. The black mussel may be poisonous at any season and
is as deadly as strychnine. In cold regions do not eat shark meat; it is
poisonous. In coastal streams and rivers, salmon moving upstream to spawn may be
plentiful; however, their flesh deteriorates as they travel away from the coast,
making them unfit to eat except in an emergency. A salmon that has been in fresh
water long enough to turn a brilliant red is decaying and may be unfit to
eat.
Coastal waters are rich in all seafoods. Grayling, trout, white fish, burbot,
and pike are common to the lakes, ponds, and arctic coastal plains of North
America and Asia. River snails or freshwater periwinkles are plentiful in the
rivers, streams, and lakes.
Fish can be speared, shot, netted, hooked, caught by hand, or stunned by a
rock or club. Fish hooks can be improvised from pins, pieces of wire, or any
other metal object that can be bent into a hook. Pieces of meat, insects, or
minnows can be used for bait. Some fish will nibble at any small object that
hits the water. Cod will swim up to investigate strips of cloth or bits of metal
or bone, and they are easily caught. A net can be made out of stout twine or
from the inner strands of parachute suspension lines. These strands can also
serve as fishing lines.
LAND ANIMALS
Deer, caribou, reindeer, musk-oxen, moose, elks, mountain sheep, goats,
bears, and other such animals are found in most cold-weather areas.
Tundra animals include rabbits, mice, lemmings, ground squirrels, wolves, and
foxes. Where there are trees, the porcupine is often encountered. The porcupine
can be easily clubbed or shaken out of trees. Pick up a porcupine only after it
is dead.
Hunting is better during the early morning or late evening when the animals
are moving to and from feeding and bedding grounds and water. Large game such as
moose and caribou should be shot just back of the front shoulder or, if the
range is short and you are sure of your shot, in the neck. These large animals
are fairly easy to stalk and kill, and their skins are also useful for survival.
Bears should be shot just forward of the front shoulder to stop them or, if you
are sure of your shot, in the neck. To successfully hunt these land animals you
should know something of their characteristics:
-
Caribou or reindeer are usually very curious. It is possible to attract
them near enough for a shot by waving a cloth and moving slowly toward them on
hands and knees.
-
The technique of imitating a four-legged animal may also cause a wolf to
come closer to a hunter.
-
Moose may be found in heavy brush or around the shoreline of lakes.
-
Mountain goats and sheep are cautious and hard to approach. They can be
surprised, however, by moving quietly downwind while they are feeding. If
possible, stay on higher ground than they are on.
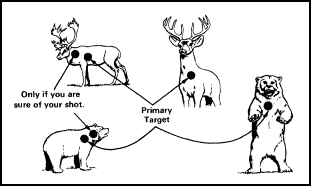
Figure 10-10. Hunting land animals.
-
Musk oxen leave cattle-like tracks and droppings. When alarmed, they group
together in a circle with their heads facing out and remain in that position
unless approached, then one or more bulls may charge.
-
Bears are always dangerous. A wounded bear is most dangerous and should
not be followed into cover. The polar bear is a tireless, clever hunter with
good sight and an extraordinary sense of smell. Be careful that you don't
become the hunted instead of the hunter.
-
Rabbits often run in circles and return to the same place when they are
frightened. A running rabbit can sometimes be stopped by whistling. Snares
made of wire and placed on small game trails, arranged so that the animal will
place his head through the loop, are an excellent means of catching rabbits.
-
The quick-kill method can be used on most small animals and sometimes on
larger animals after they have been shot and are on the ground. The method is
simple and consists of cutting the animal's throat with a sharp knife. This
system not only kills the animal but bleeds him at the same time.

Figure 10-11. Snaring a rabbit.
SEA ANIMALS
During winter and spring, sea mammals — seals, walruses, and polar bears —
are found on the frozen pack ice and on floes in open water.
Seals are hard to approach but can be stalked. Keep downwind and avoid sudden
moves. A white camouflage suit will help. Advance only when the animal is
sleeping. Do not eat the liver of the bearded seal, because its high vitamin A
content may cause you to be sick.
Walruses are found on pack ice and must be approached by boat. Because of its
large size and boldness, the walrus is one of the most dangerous animals in the
arctic.
Polar bears are found in almost all arctic regions but rarely appear on land.
Avoid them if possible. If it is necessary to kill one for food, do not eat the
liver. The liver is high in vitamin A, which may cause you to be sick. Never eat
any bear meat unless it is cooked; it is always diseased.
BIRDS
The breeding ground of many birds is in the arctic. Ducks and geese build
their nests near ponds on the coastal plains during the summer and provide an
important source of food. Grouse and ptarmigan live in mountainous terrain and
brush-covered areas in arctic and subarctic areas. Sea birds may be found on
cliffs or small islands on the coast. Sea birds, ravens, and owls are useful for
food.
In winter, owls, ravens, grouse, and ptarmigans are the only birds available.
Ptarmigans and grouse are easily approached and are very tame. Although they are
hard to locate because of the protective coloring, they provide a good source of
food because they can be killed with a stone or a club.
PLANTFOOD
Most plants that grow in cold regions can be eaten. The water hemlock and the
baneberry are the only poisonous plants. The water hemlock is one of the world's
most poisonous plants. It can be recognized by where it grows, always in wet
ground, and by the following characteristics: a hollow, partitioned bulb at the
base of a hollow stem, spindle-shaped roots, and a foul odor, which is very
noticeable in the root and bulb. The water hemlock is abundant in marshes near
southern beaches and around marshy lakes in interior river valleys. It is never
found on hillsides or dry ground. The baneberry is normally found on hillsides
or in forested bog areas. Some mushrooms are poisonous and should not be eaten.
Although the cold-region areas have many kinds of berries that are edible, most
will not be available in the winter.
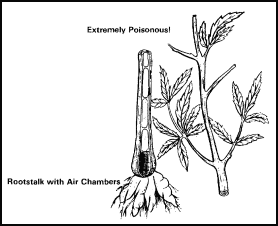
Figure 10-12. Water hemlock.
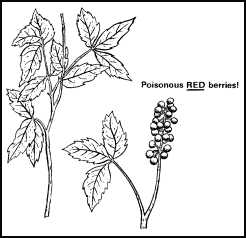
Figure 10-13. Baneberry.
10-5. USEFUL KNOTS
A rope is only a limp coil of hemp or nylon. It is useful only when you are
able to attach it to itself or another object. The six basic knots described
below will fit all your needs for tying rope together or onto equipment or
personnel.
THE HALF HITCH
The half hitch is used to secure the end of a rope to some other object or to
secure other knots.

Figure 10-14. Half hitch.
THE OVERHAND KNOT
The overhand knot is used to make a knotted rope for a handline or to
temporarily whip the end of a rope to keep it from unraveling.
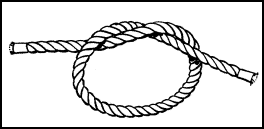
Figure 10-15. Overhand.
THE SQUARE KNOT
The square knot is used to tie the ends of two ropes of equal width together.
The knot should be secured by tying a half hitch on each side of the knot. If
properly tied, the square knot will not slip or jam. Be careful to follow Figure
10-16 or you may end up with a "granny knot," which can slip and jam.
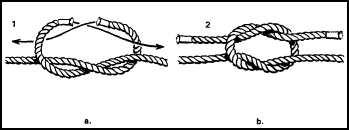
Figure 10-16. Square.
THE CLOVE HITCH
The clove hitch is the most useful of the hitches. It can be used to tie the
end of a rope to a post or eye, or it can be used to secure the middle of a rope
without using the ends.
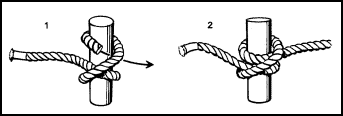
Figure 10-17. Clove hitch.
THE DOUBLE SHEET BEND
The double sheet bend is used for tying two ropes together of different
width.

Figure 10-18. Double sheet bend.
THE BOWLINE
The bowline is used to form a loop on the end of the rope that will not slip.

Figure 10-19. Bowline.
Remember the qualities of a good knot: it is easy to tie, it does not jam and
become hard to untie, and it does not slip when weight is put on it.


