Communications are exchanges of information by two or more parties. The
information must be transmitted and received/understood.
You must know how to communicate with your leaders and fellow soldiers.
You must be able to tell:
There are several means of communications. Each has its own capabilities,
advantages, and disadvantages. Those you can use are described in this section.
Radios are a frequently used means of communications. Radios are particularly
suited for use when you are on the move and need a means of maintaining command
and control. Small handheld or backpacked radios that communicate for only short
distances are found at squad and platoon level. As the need grows to talk over
greater distances and to more units, the size and complexity of radios are
increased.
To put these radios to good use, you must first look at some of the things
that affect radio communications. To communicate with each other, radios must
have a common frequency. They must also be able to transmit and receive the same
type signal. Most infantry radios are FM (frequency modulated) and will not
communicate with AM (amplitude modulated) radios. Squelch settings on the radios
must also be used correctly.
Factors that affect the range of radio equipment are weather, terrain,
antenna, power, and the location of the radio. Trying to communicate near
man-made objects such as bridges and buildings may also affect radio
transmissions. Interference in the form of static often occurs when you use
radios near powerlines or electrical generators. Interference may also come from
other radio stations, bad weather, or enemy jamming.

Many of the things that may cause poor radio communications can be corrected
by using common sense. Such things as making sure that you are not trying to
communicate from under a steel bridge or near generators and powerlines, using
the best available antenna for your needs, and selecting the best site for your
radio help insure more reliable communications. You can also reduce the effects
of enemy jamming by employing antijamming techniques.
Radio is one of the least secure means of communicating. Each time you talk
over a radio, the sound of your voice travels in all directions. The enemy can
listen to your radio transmissions while you are communicating with other
friendly radio stations. You must always assume that the enemy is listening to
get information about you and your unit, or to locate your position to destroy
you with artillery fire. Everyone who uses radios must know the defensive
techniques available to prevent the enemy from getting information.
VISUAL COMMUNICATIONS
The enemy's ability to interfere with your radio signals is causing more
emphasis to be placed on visual communications for command and control. Visual
signals include arm-and-hand signals, pyrotechnics, smoke, flashing lights,
panel markers, and aircraft maneuvers.
The effectiveness of any visual signal depends on a set of prearranged
meanings. You assign prearranged meanings to visual signals to the soldier
sending the signal and the soldier seeing the signal so both have the same
understanding of what that particular signal means. Your commander will set
prearranged meanings for pyrotechnics, smoke, and flashing lights. Generally, a
listing of prearranged messages using these signals is contained in your unit
SOP or communications-
electronics operation instructions (CEOI).
Panel markers are a series of cloth panels that you spread on the ground to
communicate with aircraft. They are useful when you do not have radio contact
with friendly aircraft, when ground units and/or aircraft are on radio listening
silence, when your radio equipment has been damaged or destroyed, or when enemy
jamming makes radio communications difficult or impossible. When standard cloth
panels are not available, you can use field expedients such as clothing,
branches, rocks, or snow.
Panel codes, as well as arm-and-hand signals, have standard prearranged
meanings. The prearranged meaning of arm-and-hand signals may be found in FM
21-60. Information is usually taken from those publications and placed in
unit CEOIs and SOPs.
Visual signals have some shortcomings that limit their use. For example,
visual signals can be easily misunderstood. Some visual signals are restricted
during poor visibility such as at night or in dense terrain. Of course, at other
times, they can be intercepted by the enemy who may, in turn, use similar visual
signals to create confusion.
SOUND COMMUNICATIONS
Sound signals, like visual signals, depend upon a set of prearranged
meanings. Sound signals include the use of the voice, whistles, horns, weapons,
and other noise-making devices to transmit simple messages over short distances.
Also, like visual signals, sound signals are vulnerable to enemy interception
and use. Battle noise can obviously reduce the effective use of sound signals.
They have their greatest application as command post warning alarms. The
prearranged meanings for sound signals are usually established by local
commanders, and a listing of such meanings is commonly found in unit SOPS and
the CEOIs. Sound signals, like visual signals, can be easily misunderstood.
WIRE COMMUNICATIONS
Wire is another type of communications used in infantry units. Although
installing a wire network takes more time than installing a radio, wire lines
are usually more secure than radio. When you talk over wire lines, your voice
travels through the wire lines from one telephone to another and is generally
not sent through the air. Wire lines will give better communications in most
cases because they are less subject to interference from weather, terrain, and
man-made obstacles. Wire lines also protect you from enemy electronic warfare
actions such as jamming.
Wire lines are subject to breakage by enemy artillery and air strikes and by
friendly forces who accidentally cut the lines when driving over them with
tracked and wheeled vehicles. It is important, therefore, to install wire lines
properly to reduce the possibility of breakage. When laying wire lines, first
consider the tactical situation. In a fast-moving situation, the use of wire may
be impractical. In a static situation, you have more time to install wire lines.
Consideration must be given to the enemy's ability to jam radios and to
locate positions through direction finding when you communicate by radio. If the
enemy has displayed such capabilities, wire should be considered as an
alternative to radio. The terrain will also influence use of wire
communications. Wire laying may be difficult in dense vegetation, in swampy
areas, or in mountainous terrain. Rain, snow, and temperature extremes may also
influence wire laying. Men and equipment to lay wire lines should be available.
MESSENGER COMMUNICATIONS
Unlike other infantry communications, messengers are a means of transmitting
large maps, documents, and bulk material, as well as oral or written messages.
Message centers serve as a central point for receiving and distributing
message-type information. They are located at battalion or higher level
headquarters. Messenger service may be limited, however, because messengers are
subject to enemy action, require more time than radio or wire communications,
and do not afford real time writer-to-reader exchanges.
RADIOTELEPHONE PROCEDURE
Radiotelephone procedure is a set procedure for using a radio or telephone.
It speeds the exchange of messages and helps avoid errors. The rules
listed below will help you use transmission times efficiently and avoid
violations of communications security.
1. Transmit clear, complete, and concise messages. When
possible, write them out beforehand.
2. Speak clearly, slowly, and in natural phrases. Enunciate each word. If a
receiving operator must write the message, allow time for him to do so.
3. Listen before transmitting, to avoid interfering with other transmissions.
4. ALWAYS ASSUME THE ENEMY IS LISTENING.
PHONETIC ALPHABET
To help identify spoken letters, a set of easily understood words has been
selected. Those words help to avoid confusion. BRAVO, for example, is the
phonetic word of the letter B, and DELTA is the phonetic word for the letter D.
BRAVO and DELTA are less likely to be confused in a radio message than B and D.
Use the phonetic alphabet to:
-
Transmit isolated letters.
-
Transmit each letter of an abbreviation.
-
Spell out unusual or difficult words.
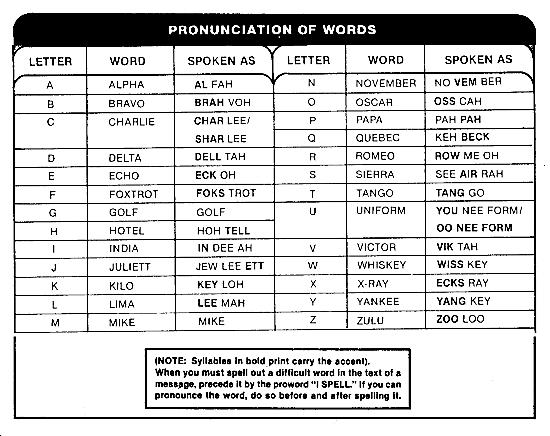
Example: The word MANEUVER must be transmitted and can be pronounced.
"MANEUVER - I SPELL-Mike-Alpha-November-Echo-Uniform-Victor-Echo-Romeo -
MANEUVER."
If you cannot pronounce the word, do not attempt to pronounce it. Instead,
precede the word with the proword "I SPELL."
Example The word EVACUATE must be transmitted and cannot be pronounced. "I
SPELL -Echo-Victor-Alpha-Charlie-Uniform-Alpha-Tango-Echo."
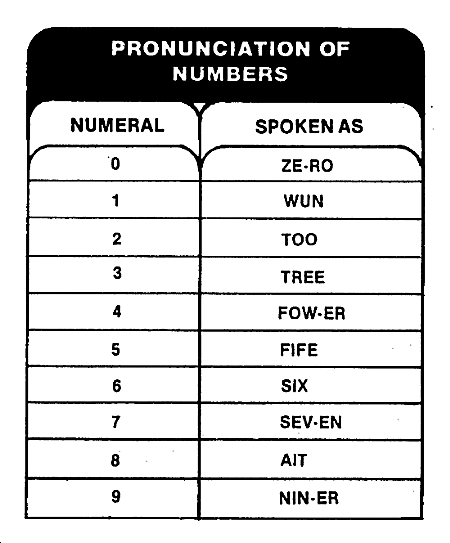
Transmit multiple digit numbers digit by digit. Two exceptions to this are
when transmitting exact multiples of thousands and when identifying a specific
code group in a coded message. When calling for or adjusting field artillery or
mortar fire, it is necessary to transmit, when applicable, exact multiples of
hundreds and thousands using the appropriate noun.

PROWORDS
Certain procedural words (prowords) which have distinct meaning should be
used to shorten transmissions and avoid confusion.


COMMUNICATIONS SECURITY
Communications security keeps unauthorized persons from gaining information
of value from radio and telephone transmissions. It includes:
-
Using authentication to make sure that the other communicating station is
a friendly one.
-
Using only approved codes.
-
Designating periods when all radios are turned off.
-
Restricting the use of radio transmitters and monitoring radio receivers.
-
Operating radios on low power.
-
Enforcing net discipline and radiotelephone procedure (all stations must
use authorized prosigns and prowords, and must transmit official traffic
only).
-
Using radio sites with hills or other shields between them and the enemy.
-
Using directional antennas when feasible.
RADIO EQUIPMENT
A soldier should be familiar with the AN/PRC-77 radio and the two
types of squad radios. One type of squad radio is the AN/PRC-68 Small Unit
Transceiver (SUT). The other comes in two parts the AN/PRT-4
(transmitter) and the AN/PRR-9 (receiver).
To operate the AN/PRC-77 radio:
-
Install the battery.
-
Replace the battery compartment and close both latches at the same time.
-
Select the antenna (plus antenna base) and tighten it down.
-
Connect the handset.
-
Select the frequency band.
-
Set the frequency using the tuning control knobs.
-
Turn the function switch to ON.
-
Turn the volume control knob about half a turn.
-
Depress the push-to-talk switch on the handset to talk and release it to
listen.
-
Adjust the volume control to the desired level.


To operate the AN/PRC-68 radio:
-
Install the battery.
-
Set the channel position (0 through 9) (your leader will tell you which
channel to use).
-
Connect the handset.
-
Connect the antenna.
-
Turn the PWR OFF/ON/SQUELCH switch to ON.
-
Turn the PWR OFF/ON/SQUELCH switch to SQUELCH (this switch is
spring-loaded and will return to ON when disengaged).
-
Turn the volume knob to adjust loudness of received signal.
-
Depress the push-to-talk switch on the handset or the back of the radio to
transmit and release it to listen.
|
NOTE: Handset is not a part of AN/PRC-68 (H-189 and H-250
handset). |

To operate the AN/PRR-9 radio:
-
Insert the tubular BA-505/U battery through the battery clip and into the
mating connector of the receiver.
-
Clip the receiver to your helmet.
-
Loosen the antenna retaining screw and rotate the antenna upright
(re-tighten retaining screw).
-
Set the receiver control.
For receiving with squelch, turn the receiver control knob clockwise from its
OFF position. Set it to a comfortable listening level when voice or tone is
heard. If the control knob is turned clockwise to its last position, the squelch
is turned off (background noise will start). To reactivate the squelch, turn the
control knob to OFF, then back about halfway toward ON.
For receiving without squelch, turn the receiver control knob fully clockwise
from its OFF position. Turn it counterclockwise to a comfortable listening
level. Do not use squelch when signals are weak or in terrain unfavorable for
good reception.
Wear the receiver either on your combat suspenders or clipped to your pocket,
belt, or helmet. Use a lanyard to tie the receiver down.
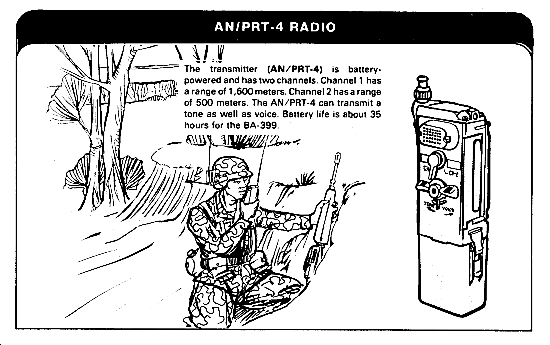
To operate the AN/PRT-4 radio:
-
Release both battery case clamps and remove the battery case.
-
Insert a BA-399/U battery into the mating connector at the bottom of
transmitter.
-
Replace the battery case and secure the clamps.
-
Raise the collapsible antenna to its full height.
-
Set the upper selector switch in the CH-1 position for channel 1 or the
CH-2 position for channel 2.
-
Set the TONE-VOICE switch.
For a tone signal, turn the tone-voice switch to the TONE position and hold
it in that position for as long as the tone signal is needed. Release the switch
at the end of that time.
For voice communications, turn the tone-voice switch to the VOICE position
and hold it in that position while transmitting. Speak into the microphone
located above the channel selector switch. Release the tone-voice switch at the
end of the transmission.
To permit transmissions in only one mode, position the override spring on
either VOICE or TONE, depending on which is needed.
Wear the transmitter clipped to your pocket, belt, or suspenders. To prevent
loss of the transmitter, use a lanyard to tie it down.
WIRE AND TELEPHONE EQUIPMENT
When in the defense, units normally communicate by wire and messenger instead
of by radio. Your leaders will often have you lay the wire and install and
operate the field phones.
WIRE-LAYING TECHNIQUES
A surface line is field wire laid on the ground. Lay surface lines
loosely with plenty of slack. Slack makes installation and maintenance easier.
Surface lines take less time and fewer soldiers to install. When feasible, dig
small trenches for the wire to protect it from shell fragments of artillery or
mortar rounds. Conceal wire routes crossing open areas from enemy observation.
Tag all wire lines at switchboards and at road, trail, and rail crossings to
identify the lines and make repair easier if a line is cut.
An overhead line is field wire laid above the ground. Lay overhead
lines near command posts, in assembly areas, and along roads where heavy
vehicular traffic may drive off the road. Also, lay them at road crossings where
trenches cannot be dug, if culverts or bridges are not available. Those lines
are the least likely to be damaged by vehicles or weather.
The telephone set TA-1 is a sound-powered phone that has both a visual and an
audible signal. It has a range of 6.4 km using WD-1 wire.

To install the TA-1 telephone:
-
Strip away half an inch of insulation from each strand of the WD-1 wire
line.
-
Depress the spring-loaded line binding posts and insert one strand of the
wire into each post.
-
Adjust signal volume control knob to LOUD.
-
Depress the generator lever several times to call the other operator and
listen for buzzer sound.
-
Turn the buzzer volume control knob until the wanted volume is obtained.
-
Look at the visual indicator to see if it shows four white luminous
markings.
-
Depress the push-to-talk switch to reset the visual indicator.
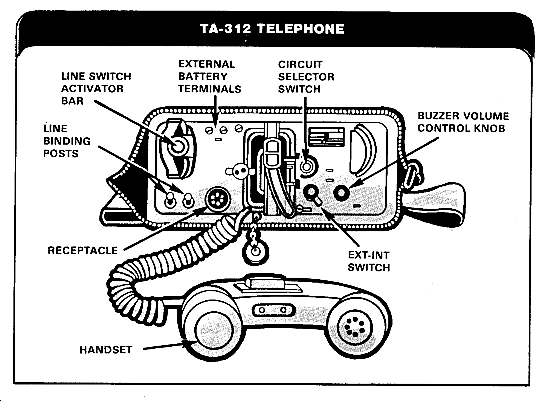
The telephone set TA-312 is a battery-powered phone. It has a range of 38 km
using WD-1 wire.
To install the TA-312 telephone:
-
Strip away one-half inch of insulation from each strand of the WD-1 wire
line.
-
Depress the spring-loaded line binding posts and insert one strand of the
wire into each post.
-
Adjust buzzer volume control knob to LOUD.
-
Turn the INT-EXT switch to INT.
-
Turn the circuit selector switch to LB.
-
Insert the two BA-30 batteries into the battery compartment (one up and
one down).
-
Seat the handset firmly in the retaining cradle.
-
Turn the handcrank rapidly a few turns. Remove the handset from the
retaining cradle and wait for the other operator to answer.
-
Depress the push-to-talk switch to talk. Release the push-to-talk switch
to listen.
REEL EQUIPMENT CE-11
The reel equipment CE -11 is a lightweight, portable unit used for laying and
picking up short wire lines. It has the following components:
-
Reeling machine, cable, band, RL-39, with an axle and crank, carrying
handles, and straps ST-34 and ST-35.
-
Telephone set TA-1/PT.
-
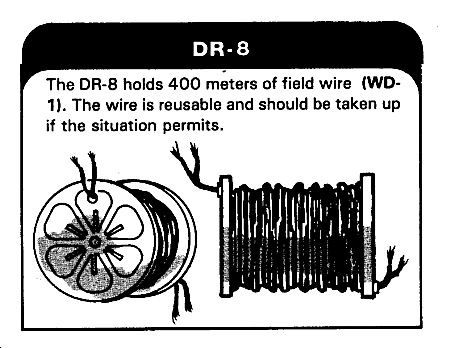
The RL-39 component mounts the reel cable DR-8 that will hold 400 meters
of field wire WD-1/TT. The DR-8 and the wire are separate items and ARE NOT
part of the CE-11 or the RL-39.
The major parts of the CE -11 may also be authorized by TOE as separate items
and not as a complete unit CE -11.


