LESSON 6 Perform Cardiopulmonary Resuscitation on a Child or Infant.
TEXT ASSIGNMENT Paragraphs 6-1 through 6-7.
LESSON OBJECTIVES After completing this lesson, you should be able to:
6-1. Identify the proper procedures for opening the airway of a child.
6-2. Identify the proper procedures for opening the airway of an infant.
6-3. Identify the proper procedures for performing mouth-to-mouth-and-nose rescue breathing.
6-4. Identify the proper procedures for performing one-rescuer CPR on a child.
6-5. Identify the proper procedures for performing one-rescuer CPR on an infant.
SUGGESTION After you have completed the text assignment, work the exercises at the end of this lesson before beginning the next lesson. These exercises will help you to achieve the lesson objectives.
Overview
6-1. CHECK FOR RESPONSIVENESS
Rescue breathing and cardiopulmonary resuscitation efforts must be modified if the casualty is an infant (under 1 year of age) or a child (1 to 14 years of age, as defined by the onset of puberty, or presence of secondary sex characteristics.). As with an adult, your first efforts are to determine if the casualty is responsive (conscious). Tap the casualty on the shoulder or gently shake the casualty.
a. If the casualty responds, determine if the child or infant is in need of aid. Check for breathing problems, bleeding, fractures, other injuries, and illness.
b. If the casualty is not responsive (unconscious) or if the casualty is conscious but is not breathing adequately (poor air exchange or complete blockage), proceed to initiate rescue breathing and, if necessary, perform cardiopulmonary resuscitation.
6-2. OPEN THE AIRWAY
a. Call For Help. Call for assistance. You can do this at the same time you are positioning the casualty. If someone responds to your request for aid, send him to obtain professional medical help while you perform rescue breathing or CPR. Do not leave the casualty in order to obtain help.
b. Position the Casualty. Lay the casualty on his back on a firm, flat surface and out of danger. When moving an infant or child, always support the head and neck to prevent rolling and twisting. Position his head so that his face is up and his nose openings are straight up over his ear openings. This provides a slight head-tilt which will help to open the airway, but without hyper-extending the neck as does the head-tilt/chin-lift method used with adults. If an infant’s head is tilted too far back, his trachea may collapse because the tracheal rings are not sufficiently developed.
c. Open the Airway. Open the casualty’s airway using the modified head-tilt/chin-lift unless a head or spinal injury is suspected. If you suspect a spinal or head injury, use the modified jaw-thrust. The likelihood of a spinal or head injury is great if a child or infant is found at the scene of an accident.
(1) Modified head-tilt/chin-lift.
(a) Kneel at the side of the casualty.
(b) Place two or three fingers of your hand that is closest to the casualty’s head on his forehead. In older children, apply enough pressure to tilt the head back slightly. In infants, the fingers keep the head in proper position.
(c) Lift the casualty’s jaw using one or two fingers of your hand that is closest to his feet. Be sure that your fingers rest on the bony part of the chin and not on the soft part under the chin. The child’s teeth (infant’s gums) should be separated so that air can enter and leave his mouth. Do not use your thumb to perform the lift. As with an adult, the chin-lift moves the tongue forward so that it is not blocking the casualty’s airway.
(2) Modified jaw-thrust.
(a) Position yourself above the casualty’s head.
(b) Place one hand on each side of the casualty’s head. Let your elbows rest on the surface on which the casualty is lying.
(c) Place the tips of two or three fingers of each hand under the angles of the casualty’s jaw. (This is done on both sides of the casualty’s jaw.)
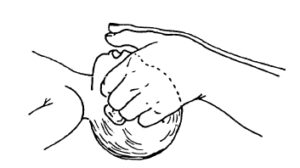
(d) Lift the jaw upward gently with your fingertips (figure 6-1). The mouth should not be closed as this could prevent air from entering the casualty’s airway.

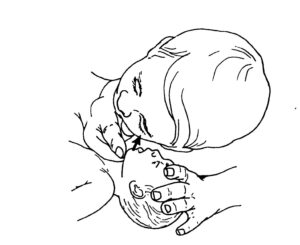
d. Check for Breathing. Position your ear over the casualty’s mouth and face his chest (figure 6-2).
(1) Look for the rising and falling of the chest. If the casualty is an infant, also observe the abdomen since infants use their abdominal muscles to assist in breathing.
(2) Listen for the sound of breathing (inhalation and exhalation).
(3) Feel for air movement on the side of your face caused by the casualty exhaling.

e. Evaluate Your Findings.
(1) If your check shows that the casualty is breathing, maintain his airway and examine him for injuries. Check on the casualty’s breathing periodically. Be prepared to administer rescue breathing or CPR should the casualty stop breathing.
(2) If your check shows that the casualty is not breathing, begin rescue breathing (paragraph 6-3) immediately.
6-3. ADMINISTER TWO VENTILATIONS
If the child or infant is not breathing, administer two ventilations. If you are able to seal your mouth over both the casualty’s mouth and nose at the same time, administer ventilations using the mouth-to-mouth-and-nose method. If you are not able to seal your mouth over both the mouth and nose, administer mouth-to-mouth or mouth-to-nose ventilations as described in paragraph 3-9. Administer smaller breaths with a child or infant since you do not need to blow as much air into his lungs for them to expand fully. The mouth-to-mouth-and-nose method is described in the following paragraphs.
a. Maintain the airway (modified head-tilt/chin lift or modified jaw-thrust).
b. Take a breath. Do not take a deep breath since you will not need to blow much air to inflate the casualty’s smaller lungs.
c. Seal your mouth over the casualty’s mouth and nose. Make sure that your mouth forms an air tight seal so that air will not escape when you blow air into his mouth and nose.
d. Blow a small puff of air (only enough to make his chest rise) into the casualty’s mouth and nose. Observe the chest out of the corner of your eye as you administer the breath.
e. After blowing into the casualty’s mouth and nose, break the seal over his face and allow air to escape. His chest should fall somewhat as air escapes after you break the seal. You may be able to hear or feel the exhaled breath also.
f. Take another breath, seal your mouth over the casualty’s mouth and nose again, and administer a second puff of air. It should take about one second to administer each breath.
6-4. EVALUATE THE EFFECTIVENESS OF THE VENTILATIONS
a. If the casualty is now breathing on his own, maintain his airway and examine the casualty for injuries. Be prepared to administer rescue breathing or CPR should the casualty stop breathing again.
b. If your ventilations made the casualty’s chest rise but the casualty is not breathing on his own, check his pulse (paragraph 6-5).
c. If your ventilations did not make the casualty’s chest rise, reposition the casualty’s head and administer two puffs of air again.
(1) If your second attempt is successful, check the casualty’s pulse (paragraph 6-5).
(2) If your second attempt still does not cause the casualty’s chest to rise, the casualty probably has something blocking his airway. Remove the obstruction using the procedures given in lesson 7.
6-5. CHECK FOR PULSE
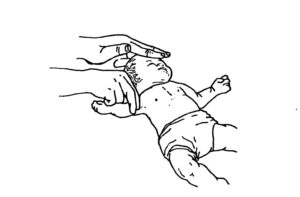
If the casualty is a child, check for a pulse at the carotid artery (same location as in an adult). If the casualty is an infant, however, you may have trouble locating the carotid pulse due to the casualty’s short, chubby neck. Therefore, the brachial artery is usually used to feel for an infant’s pulse. The brachial pulse is taken on the inside of the casualty’s inner arm between the elbow and the shoulder (figure 6-3). Use only two fingers (no thumb) to gently press on the artery. The check should take between 5 and 10 seconds. Continue to monitor the casualty for signs of spontaneous breathing as you check for a pulse.

a. If the casualty has an adequate pulse and has resumed breathing on his own, begin checking for other injuries. Bradycardia is a common terminal rhythm in infants and children; you should not wait for the absence of a pulse to begin chest compressions. If a child has a heart rate less than 60 beats per minute and is showing signs of poor systemic perfusion, you should begin chest compressions. Keep the airway open and monitor his breathing. Administer rescue breathing or CPR if he stops breathing. Evacuate the casualty to a medical treatment facility as soon as possible.
b. If you detect a pulse but the casualty still is not breathing, continue to administer ventilations.
(1) Child. Administer ventilations at the rate of one ventilation every 3 to 5 seconds (12 to 20 ventilations per minute).
(2) Infant. Administer ventilations at the rate of one ventilation every 3 to 5 seconds (12 to 20 ventilations per minute).
c. If you do not detect a pulse and no one has responded to your previous call for help, call for help again. If a telephone or radio unit is readily available, use it to summon additional medical help. In the pediatric patient, it is important to phone “fast” versus phoning “first” in the adult. Pediatric cardiac arrest is usually secondary to respiratory arrest, phoning “fast” may deliver adequate oxygen fast enough to the heart to prevent permanent damage. Then begin administering CPR (paragraph 6-6).
6-6. ADMINISTER CARDIOPULMONARY RESUSCITATION
a. Locate Compression Site.
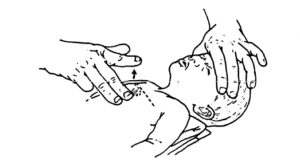
(1) Child. The chest compression site on a child is located on top of the infant’s sternum just below an imaginary line connecting the nipples (figure 6-4).
(2) Infant. The chest landmarks on an infant are the same as for the child.

b. Administer Thirty Chest Compressions.
(1) Child.
(a) Use one or two hands to administer chest compressions to a child, depending on the size of the child. The 30:2 compression ratio will be used for one rescuer CPR in the child and infant. For two rescuers the ratio will be 15:2. Press straight down on the heel of your hand over the compression site so that the sternum is depressed 1/3 to 1/2 the total depth of the chest (1 to 1 1/2 inches).
(b) Repeat the compressions at a rate of 100 per minute.
(c) Allow the chest to return to its resting position after each thrust, but do not remove your heel from the compression site. If the compression site is lost, repeat the location procedures before administering more chest thrusts. The thrust and the relaxation parts of the compression should be of equal duration.
(2) Infant.
(a) The infant should be lying on a firm, flat surface before CPR is begun. If needed, you can provide a firm support by slipping your nondominant hand under his back and using your dominant hand to administer compressions.
(b) Chest compressions on an infant should be administered with the tips of the middle and ring fingers. Press straight down so that the sternum is depressed from 1/3 to 1/2 the total depth of the chest (1/2 to 1 inch).
(c) Repeat the compressions at a rate of at least 100 per minute.
(d) Compressions should be smooth, not jerky. Allow the chest to return to its resting position after each thrust, but do not remove your fingertips from the compression site. The thrust and the relaxation parts of the compression should be of equal duration.
c. Administer Two Breaths. After administering the thirtieth compression, administer two slow ventilations. Observe the casualty’s chest out of the corner of your eye. Blow just enough air into the casualty’s airway to expand his lungs fully.
(1) If possible, seal your mouth over the casualty’s mouth and nose and administer mouth-to-mouth-and-nose resuscitation.
(2) If the casualty is an infant, do not remove your fingers from the compression site on his chest. Use only one hand to maintain the infant’s airway (fingers on the forehead if the modified head-tilt/chin-lift is used or fingers under one angle of his jaw if the jaw-thrust is used).
d. Perform Four Additional Cardiopulmonary Resuscitation Cycles. Perform four more cycles of 30 compressions and two ventilations.
(1) If the casualty is a child, you should be able to visually relocate the compression site after each set of ventilations without having to repeat the procedures listed in paragraph 4-1d.
(2) If the casualty is an infant, your fingers should still be on the compression site, thus eliminating the need to relocate the site.
e. Check Pulse. After five cycles, check the casualty’s pulse again. The check should not take longer than 5 seconds. As you check the pulse, also check for spontaneous breathing.
(1) If the casualty has a pulse and he has resumed breathing on his own, stop administering CPR and begin checking for other injuries. Keep the airway open and check his breathing every few minutes if he does not regain consciousness. Resume administering rescue breathing or CPR if he stops breathing.
(2) If the casualty has a pulse but has not resumed breathing on his own, proceed to administer rescue breathing. Recheck the casualty’s pulse every few minutes. If you find the casualty’s pulse to be absent, resume administering CPR.
(a) For a child, administer ventilations at the rate of one ventilation every 3 to 5 seconds (12 to 20 ventilations per minute).
(b) For an infant, administer ventilations at the rate of one ventilation every 3 to 5 seconds (12 to 20 ventilations per minute).
(3) If the casualty does not have a pulse, continue to administer thirty chest compressions followed by two breaths. Recheck the pulse again every few minutes. Continue administering CPR until one of the following occurs:
(a) The casualty’s heart resumes beating on its own. (If this happens, continue rescue breathing.)
(b) The casualty’s heart resumes beating on its own and he also resumes breathing on his own. (If this happens, look for injuries.)
(c) You are relieved by a physician or other medical personnel. (If this happens, provide information on the casualty and follow instructions.)
6-7 EVACUATE THE CASUALTY
Evacuate the casualty to a medical treatment facility as soon as possible. Continue administering CPR or rescue breathing en route if needed. If the casualty is breathing on his own, continue to observe him and be prepared to resume rescue breathing or CPR should it become necessary.
