TEXT ASSIGNMENT Paragraphs 5-1 through 5-7.
TASK TAUGHT
-
- 081-831-0019, Clear an Upper Airway Obstruction.
LESSON After completing this lesson, you should be able to:
5-1. Identify common causes of upper airway obstruction.
5-2. Identify signs of respiratory distress.
5-3. Given a situation, determine the best way to aid a casualty with an airway blockage.
5-4. Identify the proper procedures for performing abdominal thrusts on a casualty with an airway obstruction if the casualty is standing or sitting.
5-5. Identify the proper procedures for performing chest thrusts on a casualty with an airway obstruction if the casualty is standing or sitting.
5-6. Identify the proper procedures for performing abdominal thrusts on a casualty with an airway obstruction if the casualty is unconscious or lying down.
5-7. Identify the proper procedures for performing chest thrusts on a casualty with an airway obstruction if the casualty is unconscious or lying down.
SUGGESTION After you have completed the text assignment, work the exercises at the end of this lesson before beginning the next lesson. These exercises will help you to achieve the lesson objectives.
5-1. RECOGNIZE COMMON CAUSES OF UPPER AIRWAY OBSTRUCTION
An object lodged in the airway of a casualty who is conscious can result in unconsciousness, clinical death, and biological death. An airway obstruction can also prevent proper ventilation of an unconscious casualty when rescue breathing or CPR is being administered. Common causes of airway obstruction are discussed below.
a. Food. Food which is not swallowed properly can enter the trachea (part of the respiratory system) instead of the esophagus (part of the digestive system). In conscious adults, meat which has not been properly chewed is the most common food obstruction. In small children, objects that can be treated like food (small buttons, for example) are common causes of airway obstruction.
b. Vomitus. Stomach contents expelled during the act of vomiting are referred to as vomitus. A casualty who inhales while vomitus is still in his mouth or pharynx can cause the vomitus to enter the airway. Inhaling vomitus is a common cause of airway obstruction in unconscious or semiconscious casualties. An elevated blood alcohol level can contribute to this problem.
c. Blood Clots. Injuries to the head or facial areas (nose, cheeks, and so forth) can cause blood clots to form in the mouth, nose, or nasal cavities. These clots can become loose and be inhaled into the trachea. Obstructions caused by blood clots are more likely to occur in unconscious casualties than in conscious casualties.
d. Tongue. The tongue can block the airway if the tongue muscles relax and fall back into the pharynx. A relaxed tongue is the most common cause of airway obstruction in unconscious casualties.
e. Other Objects. Other objects, such as dentures, can also result in blockage. Objects lodged in the upper esophagus can also press against the trachea and reduce the airflow through the trachea.
5-2. RECOGNIZE A PERSON IN RESPIRATORY DISTRESS
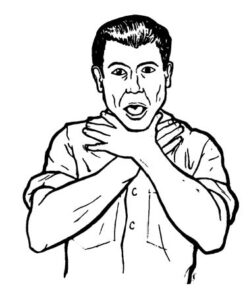
A casualty who is conscious and has an object lodged in his airway will begin to cough or at least try to cough. He will probably have a distressed look on his face and be clutching his throat. This clutching action is natural, but it has also been adopted as the universal signal for choking (figure 5-1). Bluish coloration (cyanosis) of the lips, interior of the mouth, and nail beds are indications of low oxygen content in the blood. Any unconscious casualty should be examined to see if he is breathing. Even if the casualty is breathing, perform periodic checks to make sure he is continuing to breathe.
5-3. CLASSIFY THE SEVERITY OF THE BLOCKAGE
Airway blockage can be divided into two major classifications–partial blockage and complete blockage. In partial blockage, some air can still be inhaled and exhaled. In complete blockage, air flow stops. Partial blockage can be further divided into partial blockage with “good” air exchange and partial blockage with “poor” air exchange. In order to evaluate the severity of the obstruction, tell the casualty to speak to you (“Talk to me. Are you choking?” and so forth).
a. Partial Airway Obstruction with Good Air Exchange. If a casualty with a partial obstruction can speak or can cough forcefully, he has “good” air exchange. Good air exchange indicates that the casualty can still inhale and exhale enough air to carry on all life processes. A casualty may have good air exchange even if he makes a wheezing sound between coughs.
b. Partial Airway Obstruction with Poor Exchange. “Poor” air exchange is indicated by a weak and ineffective cough, high-pitched noises (strider, like crowing) while inhaling, and increasing difficulty in breathing. Cyanosis may also be present. A casualty with poor air exchange is not inhaling and exhaling a sufficient amount of air. If the casualty is not helped, he will probably loose consciousness and die.
c. Complete Airway Obstruction. A casualty who has a complete airway obstruction cannot breathe, speak, or cough. If the obstruction is not removed quickly, he will become unconscious due to the decreased supply of oxygen to the brain. If respiration is not restored, his heart will stop beating about 30 seconds after he looses consciousness.
5-4. ASSIST A CASUALTY WITH GOOD AIR EXCHANGE
a. Encourage the Person. A casualty who has an obstruction in his airway and still has good air exchange will naturally attempt to clear his airway by coughing. Do not interfere with the casualty’s attempts to expel the obstruction. If possible, have the casualty to lower his head below chest level. When the head is lower than the chest, gravity will help to expel the obstruction. Do not use manual thrusts described in the following paragraphs as long as the casualty is making adequate attempts to expel the blockage himself.
b. Call for Help. If the casualty cannot expel the obstruction through his own efforts, you may need someone to assist you in your efforts and/or to obtain medical help.
c. Remain With the Casualty. Good air exchange can quickly change to poor air exchange or complete blockage. Do not leave the casualty to seek additional medical help, but do send someone else to obtain aid if anyone is available. Give the casualty calm support. Be prepared to administer the procedures given in the following paragraphs if his condition goes from good air exchange to poor air exchange or complete blockage or if he looses consciousness. Even if the casualty does remove the airway obstruction on his own, the casualty may still need medical attention if his trachea has been injured.
5-5. ASSIST A STANDING OR SITTING CONSCIOUS CASUALTY WITH POOR AIR EXCHANGE OR COMPLETE BLOCKAGE
A casualty with poor air exchange is treated as though he has a complete blockage since both conditions can result in unconsciousness and death if the obstruction is not removed.
a. Call for Help. If you are alone, yell for help unless a combat situation dictates otherwise. If you have someone with you, have him obtain medical help (telephone, radio, run to get professional medical help, and so forth) if it can be done quickly. If only one person is available, have him obtain medical help and then return to assist you. You may need his help to perform two-rescuer cardiopulmonary resuscitation should the casualty’s heart stop beating.
b. Position Yourself Behind the Casualty. Stand behind the casualty, slide your arms under his arm, and try to wrap your arms around his waist. This helps to support the casualty and helps you to determine whether abdominal thrusts or chest thrusts should be used.
c. Administer Manual Thrusts. A manual thrust acts like an artificial cough by forcing air out of the casualty’s lungs. The increased air pressure caused by the thrusts should dislodge the obstruction and cause it to be expelled. The thrust may be administered either to the casualty’s abdomen or to the casualty’s chest. The abdominal thrust is usually preferred, but the chest thrust is used if the casualty is noticeably pregnant, if the casualty has abdominal injuries, or if the casualty is so large that you cannot wrap your arms around his waist. Do not alternate between abdominal and chest thrusts. Each manual thrust is performed with the intent of dislodging the obstruction.
(1) Abdominal thrusts.
(a) Wrap your arms around the casualty’s waist.
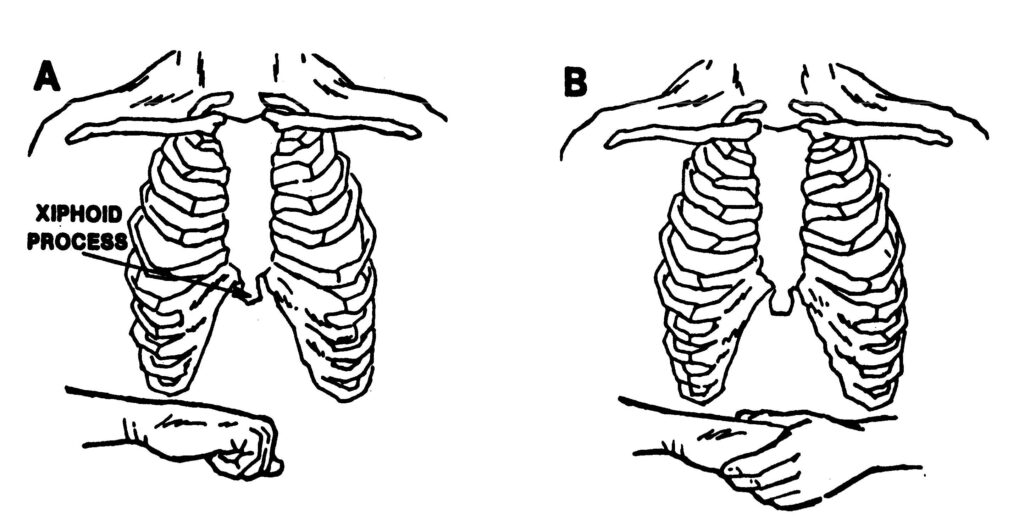
(b) Make a fist with one hand. Place the fist against the casualty’s abdomen in the midline slightly above the navel and well below the tip of the xiphoid process. The thumb side of your fist should be against the abdomen (figure 5-2 A). Never place your fist over the xiphoid process or over the lower margin of the rib cage. A thrust delivered directly to the xiphoid process or ribs can result in a fractured sternum (xiphoid process separated from sternum) and/or fractured ribs.
(c) Grasp your fist with your other hand (figure 5-2 B).
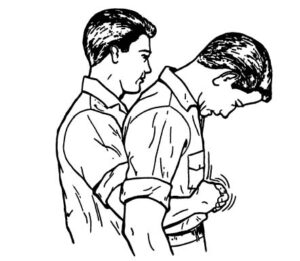
(d) Thrust into the casualty’s abdominal region (figure 5-3) using a quick inward and upward motion, and then relax the hold.
(e) Continue administering abdominal thrusts until the obstruction is expelled or until the casualty loses consciousness. If the casualty loses consciousness, proceed to administer the finger sweep and modified abdominal thrusts described in paragraph 5-6. Vomiting may occur when the abdominal thrust is used. Clear any vomitus from the casualty’s mouth so he will not inhale the vomitus.
(2) Chest thrusts.
(a) Place your arms directly under the casualty’s armpits and encircle his chest with your arms.
(b) Make one hand into a fist and place the thumb side of the fist against the lower half of the casualty’s sternum. Make sure that the fist is placed above the xiphoid process and the lower margin of the rib cage. Also make sure that the fist rests on the sternum and not on the ribs.
(c) Grasp your fist with your free hand.
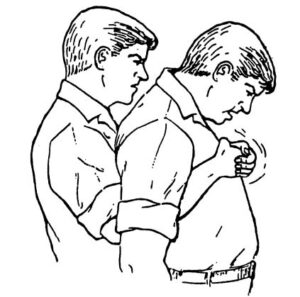
(d) Deliver a quick inward thrust (figure 5-4); then relax the hold. The thrust should depress the casualty’s sternum 1 1/2 to 2 inches.
(e) Continue administering chest thrusts until the obstruction is expelled or until the casualty loses consciousness.
d. Position Casualty for Modified Thrusts, If Needed. If the casualty loses consciousness while you are performing manual thrusts, continue to support the casualty’s weight and gently lay the casualty on his back with his arms at his sides. Support the casualty’s head as you lower him. Make sure that the casualty is lying on a firm surface since you may need to administer CPR once the obstruction is expelled.
5-6. REMOVE AN AIRWAY OBSTRUCTION IN AN UNCONSCIOUS CASUALTY OR A CASUALTY WHO IS LYING ON HIS BACK
The procedures given in this paragraph are used to expel an airway obstruction when a casualty with poor air exchange or complete blockage is conscious and lying down, when a standing or sitting casualty becomes unconscious during efforts to expel the obstruction, or when an obstruction is discovered during an attempt to perform rescue breathing or CPR.
a. Position Casualty. Place the casualty on a flat, hard surface in a supine (on his back) position if he is not already in this position.
b. Call for Help. If you have not already sent for help, send someone to get additional medical help.
c. Administer Finger Sweep. A finger sweep is performed in an attempt to remove blockage. Finger sweeps are performed only if the casualty is unconscious. Manual thrusts may dislodge an object which could not be reached when you began your rescue efforts. When you can remove a foreign object from a casualty’s mouth, do so. Care must be used in helping a conscious casualty remove an object from his mouth because your actions may trigger his “gag reflex.” Do not use the finger sweep technique with a conscious casualty. The procedures for performing a finger sweep are given below and in figure 5-5.
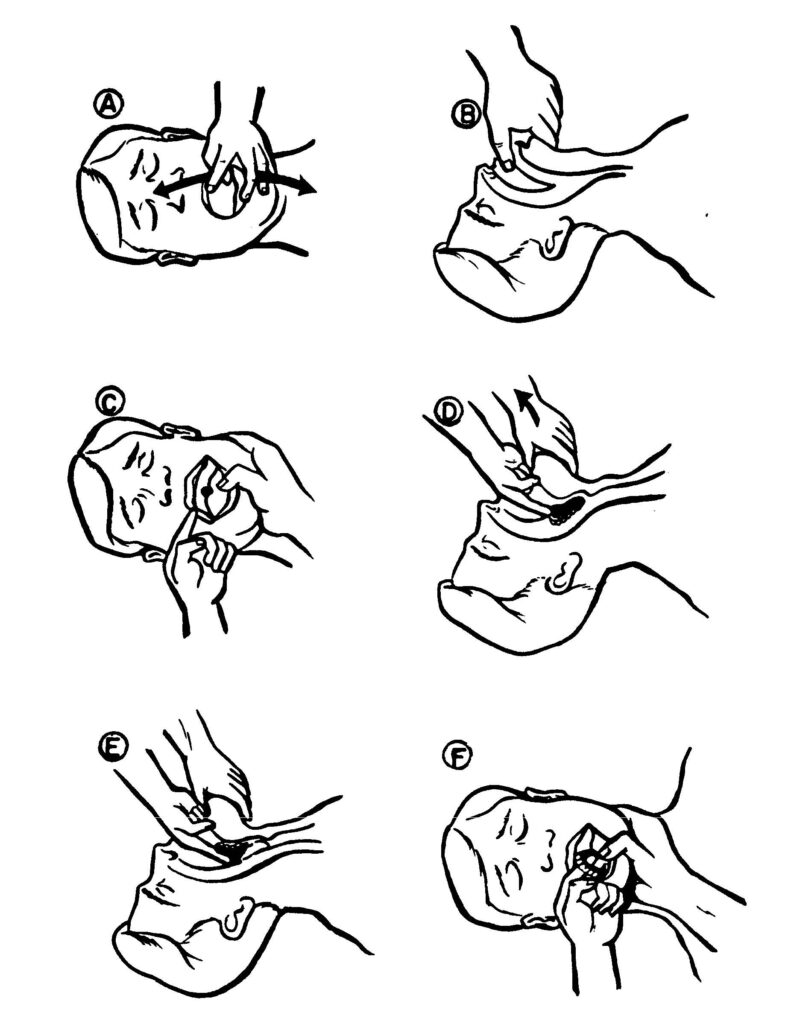
A Cross-finger method of opening mouth.
B Tongue-jaw lift.
C Inserting finger.
D Sweeping motion.
E Trapping obstruction.
F Removing obstruction.
(1) Position the casualty’s head so that his face is up.
(2) Open the casualty’s mouth. If the casualty’s mouth does not open readily, use the crossed-finger method of opening the mouth.
(a) Cross the index finger and thumb of one hand.
(b) Place the tip of the thumb and the tip of the index finger against opposite sets of teeth on the cutting or grinding edge of the teeth.
(c) Slide the thumb and index finger across each other in opposite directions to separate the upper and lower teeth and open the casualty’s mouth.
(3) Open the casualty’s airway by grasping his tongue and lower jaw between your thumb and finger and lifting the tongue and jaw. This procedure, called the tongue-jaw lift, moves the tongue away from the back of the casualty’s throat. By lifting the tongue and jaw, the casualty’s airway is opened further and foreign objects are easier to locate. In addition, repositioning the casualty’s tongue and jaw may loosen an object in the airway enough to allow air to move past it.
(4) Look into the casualty’s mouth to see if you can locate the object causing the blockage. Perform the finger sweep even if you cannot visually locate the object.
(5) Insert the index finger of your free hand along the inside of the casualty’s cheek down to the base of his tongue.
(6) Sweep the throat with a “hooking” motion. A foreign object may be dislodged as you move your finger from the side of his throat toward the center. You may need to push the object to the side of the throat and trap it before removing the object. Be sure that you do not force the object deeper into the airway. If the casualty is wearing dentures, remove the dentures if they interfere with sweeping the mouth.
(7) If an object is located and can be removed, lift the object with your “hooking” finger and remove the object from the casualty’s throat and mouth.
d. Administer Two Ventilations. After performing the finger sweep, open the casualty’s airway using the head-tilt/chin-lift or jaw-thrust (paragraph 3-6) and attempt to administer two full breaths (paragraph 3-9). This procedure should take between 3 to 5 seconds.
(1) If your attempts to ventilate are successful, check for spontaneous breathing. If the casualty does not breathe on his own, perform rescue breathing or CPR as appropriate.
(2) If your attempts are not successful (chest does not rise), reposition the airway and try to ventilate the casualty again.
(a) If your second attempt to ventilate is successful, check for spontaneous breathing. If the casualty does not breathe on his own, perform rescue breathing or CPR if needed.
(b) If your attempts are still not successful, the airway is still being blocked. Call again for help (if appropriate) and proceed to administer modified abdominal or modified chest thrusts.
e. Maintain Airway. Adjust the casualty’s head so that it is face up and the airway is open. If an assistant is present, have him keep the casualty’s airway open using the head-tilt/chin-lift or jaw-thrust method, as appropriate.
f. Administer Modified Manual Thrusts. Manual thrusts are performed in an attempt to expel the object blocking the casualty’s airway. The procedures for administering abdominal and chest thrusts given in paragraph 5-5c must be modified since the casualty is now lying on his back. Each thrust is delivered with the aim of expelling the obstruction without having to administer additional thrusts. Administer modified abdominal thrusts unless the casualty is in the latter stages of pregnancy, the casualty has abdominal injuries, or the casualty is so overweight that abdominal thrusts will not be effective. If one of these conditions exists, administer modified chest thrusts.
(1) Abdominal thrusts.
(a) Straddle the casualty’s thighs. If the casualty is larger than you, it may be necessary to straddle only one of his thighs.
(b) Place the heel of one hand against the casualty’s abdomen on the midline slightly above his navel and well below his xiphoid process. (This is the same location as for the standing abdominal thrust.)
(c) Place your other hand on top of the hand on the casualty’s abdomen. Fingers can be interlaced or extended away from your body.
(d) Press down with an inward and upward thrust (figure 5-6). Keep your arms straight and do not push to either side. Use your body weight to help you perform the thrust. After the thrust, release the pressure on the abdominal area by leaning back.
NOTE: If the thrust causes the casualty to vomit, turn his head to one side and clear the vomitus from his mouth. Then check the casualty for breathing. If additional thrusts are needed, reposition the casualty’s head so his face is in the up position and his airway is open.)
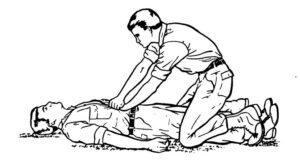
(e) Repeat the modified abdominal thrusts until the obstruction has been expelled or until 5 thrusts have been administered.
(2) Chest thrust.
(a) Position yourself at the side of the casualty’s chest.
(b) Locate the compression site by running two fingers along the lower edge of the rib cage toward the center of his chest until you come to the notch, placing the tip of your lower finger in the notch, placing your other hand next to and above the first finger, and placing the heel of your other hand next to and above the upper finger. The heel is now over the lower half of the sternum and covers the compression site. This is the same site used in administering CPR chest compressions (see figure 4-1). Make sure the long axis of your hand is parallel to the sternum.
(c) Place the heel of the other hand on top of the hand over the compression site. Make sure that the heel on bottom is not resting on any ribs. The fingers of the bottom hand should be straight. The fingers of the top hand should either be straight or be interlaced with the fingers of the first hand. Keep your fingers and palms off the casualty’s chest.
(d) Lean forward so your shoulders are over your hands. Keep your arms straight.
(e) Thrust straight down on the lower half of the casualty’s sternum (figure 5-7). Keep both arms straight and do not thrust to the right or left. The thrust should compress the sternum 1 1/2 to 2 inches in an adult casualty. Release the pressure by leaning back and away from the chest.
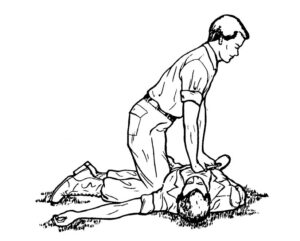
(f) Repeat the modified chest thrusts until the obstruction has been expelled or until 5 thrusts have been administered.
g. Administer Two Ventilations. After expelling the object or after performing 5 modified abdominal or chest thrusts, open the casualty’s airway and attempt to administer two full breaths (paragraph 3-9).
(1) If your attempts to ventilate are successful, check for spontaneous breathing. If the casualty does not resume breathing on his own, perform rescue breathing or CPR as appropriate.
(2) If your attempts are not successful (chest does not rise), continue to perform finger sweeps and modified thrusts until you are able to ventilate the casualty or until you are told to stop your efforts by a qualified person.
5-7. MONITOR CASUALTY
Once the casualty begins to breathe normally, check and treat any other injuries. Evacuate the casualty to a medical treatment facility as soon as practical. If you cannot evacuate him at this time, stay with him until he regains consciousness and can take care of himself. The casualty should be examined by professional medical personnel. If the casualty’s throat has been injured, it may swell and interfere with the casualty’s breathing again.
