3-22. INTRODUCTION
The intravenous infusion is often started by the combat medical specialist or the medical NCO in the field during a battle situation. The following method is essentially a review of the technique that was taught during medical training. This procedure requires practice under the supervision of a trainer who is experienced in the procedure. Mastery of the following material should not be interpreted as mastery of this task. It cannot substitute for hands-on supervised training and practice.
3-23. EQUIPMENT REQUIRED FOR THE INFUSION
The equipment used for both the infusion and the transfusion have many similarities and some differences. The equipment for the infusion is normally available in the field. Usually, the transfusion setup is available where blood products are administered.
a. Containers. There are three types of fluid container systems in current use, the closed system, the open system, and the plastic bag (see figure 3-1).
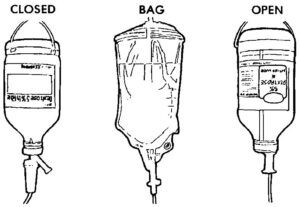
(1) Closed system. The closed system bottle has an air vent through which medication may be added. A filter must be removed and then replaced. The sterility of the solution can be destroyed by careless handling of this filter.
(2) Open system. The open system bottle draws in added medication by vacuum, so this vacuum must be carefully maintained. The level of fluid remaining in the bottle is easily noted in both the open and closed systems.
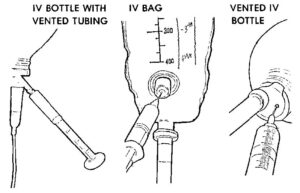
(3) Plastic bag. The plastic bag has a port for adding the medication, but has no vacuum. Special care must be taken to be sure that the set is clamped off and medication is well mixed to prevent the patient from getting a toxic dose of the medication. It is difficult to judge the fluid remaining in the bag because it collapses as the fluid is withdrawn. Figure 3-2 shows medication being added to the three systems.
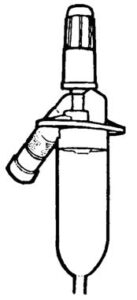
b. Drip Chamber. The drip chamber measures the rate of flow, as ordered by the doctor. There are several types of chambers. An example is shown in figure 3-3.
c. Tubing. The tubing and clamp are part of the administration set. There is enough tubing to allow an ambulatory patient to move around.
d. Filters. Some filters are already in the administration set and some must be attached separately. The type of filter used will depend on the solution being infused.
e. Spikes. Each type of system has a spike, which must be inserted into the fluid container. After this is done, the line must be cleared of all air. This is done by gradually lowering the tubing from the fluid container until the whole line is filled with fluid. All air must be forced from the tubing. Then the tubing is clamped off. Sterility must be maintained throughout the assembly process.
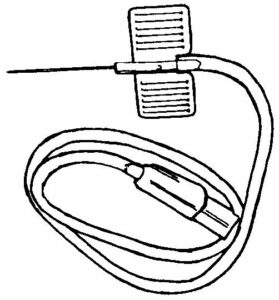
f. Needle. The size and type of needle will depend on the fluid infused and the local SOP. Sizes used are 14, 16, and 18 gauge (a lower number indicates a larger bore). A commonly used needle is the butterfly type with plastic wings. Some needles allow the catheter to be inserted with the needle while some have over-the-needle catheters. Some examples are shown in figure 3-4.
g. Adhesive Tape. The needle/catheter must be taped in place to prevent dislodging or vein irritation. Tape application will depend on the type of needle/catheter used.
h. Constricting Band. Any firm strip may be used. Examples are rubber tubing, cravats, or a blood pressure cuff. The band must remain in place no longer than two minutes.
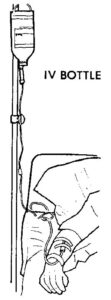
i. Antiseptic and 2 x 2 Gauze. The patient’s skin must be cleansed at the venipuncture site, both before and after venipuncture. Antimicrobial ointment is usually applied at the site before taping the needle/catheter in place. Figure 3-5 shows an infusion in place.
3-24. PROCEDURE FOR VENIPUNCTURE
a.Explain the procedure to the patient. If the patient is conscious and objects to the procedure for religious or other reasons, no further attempt should be made. If the patient is unconscious, consent is implied, and the venipuncture may proceed.
b. Assemble and set up the equipment. (See paragraph 3-23 for equipment)
c. Wash your hands
d. Select an infusion site on the uninjured arm. Site should be at the most distal and accessible vein. Distal pulse should be present.
e. Apply the constricting band above the site and palpate for a fairly straight vein which lies on a hard surface. Vein should feel springy to palpation. Avoid sites near joints.
f. Cleanse the selected site and instruct the patient to clench and unclench his fist several times to improve venous distention.
g. Remove protective cover from catheter/needle unit without contaminating the needle.
h. Apply gentle pressure on the vein about one inch below the injection site and pull the skin taut.
i. Position the needle at a 20- to 30-degree angle and in the direction of the venous flow.
j. Insert needle and decrease the angle until almost parallel to skin surface. Aspirate for blood backflow or note blood in the flash chamber. If the first attempt is unsuccessful, pull the needle back slightly (but not above the flesh surface) and direct the needle point into the vein again. If this second attempt is unsuccessful, release the constricting band and withdraw the needle.
k. Remove the constricting band. Press the skin lightly over the catheter to constrict the vein and prevent excessive blood loss into the catheter. This procedure should be attempted again in another place.
l. Using your dominant hand, remove the protective cover from the needle adaptor and connect it quickly and tightly to the catheter hub.
m. Remove your other hand from the hub, release the clamp and adjust the flow. Check for infiltration.
n. Clean the area around the venipuncture and place ointment/dressing IAW local SOP. Tape the looped tubing securely to the patient’s arm.
3-25. DISCONTINUE AN INTRAVENOUS INFUSION
a. Introduction. An infusion must be stopped if there are complications beyond the capabilities of the medical NCO. The infusion will be discontinued at the physician’s order.
b. Procedure to Discontinue.
(1) Explain to the patient why the infusion is being discontinued and tell him what you are doing while you are working.
(2) Assemble the needed supplies-2 x 2 gauze, self-adhesive bandage, antiseptic.
(3) Turn off the solution flow.
(4) Remove all tape at the venipuncture site.
(5) Open and place a 2 x 2 gauze at the infusion site.
(6) Hold the site steady while gently removing the catheter. Do not apply pressure.
(7) Hold or instruct the patient to hold the gauze at the infusion site for 2 to 3 minutes to avoid hematoma. If infiltration is present, elevate extremity on a support.
(8) Apply a self-adhesive bandage.
(9) Record the amount left in the bag, the amount of fluid received by the patient, and the time the infusion was discontinued. Record any problems.
3-26. SPECIAL CONSIDERATIONS FOR TRANSFUSIONS
a. Introduction. Most of the requirements for the intravenous infusion also apply to the blood or blood component transfusion. There are some additional points that should be noted.
b. Equipment. The needles used are no smaller than 18 gauge (and frequently a larger gauge). A special administration set with filter(s) is required for most blood products.
c. Typing. Unless time and/or access to laboratory services are restricted, all patients should be typed, and the blood used should be cross-matched on all necessary factors. If the transfusion is needed immediately, type O Rh-negative packed red blood cells may be used. In this case, the patient must be checked constantly for hemolytic reaction during the transfusion.
d. Storage. Whole blood, with a preservative added, has a maximum allowable storage time (shelf life) of 35 days. In comparison, many of the parenteral solutions can be stored indefinitely (or at least for several years). During this storage, time the blood must be kept at 1ºC to 6ºC. This temperature is beyond the capabilities of most field refrigeration units. When a blood unit is delivered for use, it should not stand unnecessarily at room temperature. Delayed transfusion will add to the possibility of bacterial growth. If the blood unit must be kept at a field location and adequate refrigeration is not available, it should be stored in a Styrofoam container with a cloth divider covered with a bag of ice.
e. Rejecting Donor Blood. If a blood unit appears abnormal in any way, it should not be used. The blood unit should not be used if:
(1) The blood unit looks purple or brown.
(2) Clots are visible.
(3) There is an obvious breakdown of blood cells.
(4) There is leakage from the container.
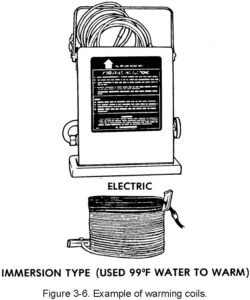
f. Warming of Blood. In cases where a large amount of blood is to be transfused at one time, the blood will need to be warmed. If too much cold blood is transfused at once, the patient can go into shock caused by hypothermia. Examples of blood warming coils are shown in Figure 3-6. Use of these coils should be directed by experienced personnel.
