|
|
|||||
Use a MAST Suit (PASG)While the PASG (Pneumatic Anti-Shock Garment or Military Anti-Shock Trousers (MAST) can be a useful adjunct in the treatment of hemorrhagic shock in certain circumstances, it can worsen the problem in others. One absolute contraindication for the PASG is the presence of pulmonary edema. Relative contraindications include:
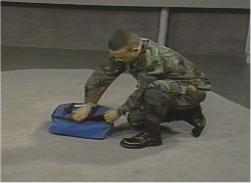
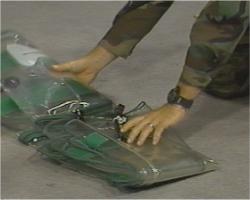
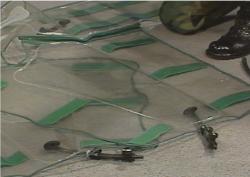
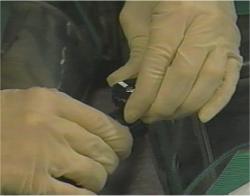
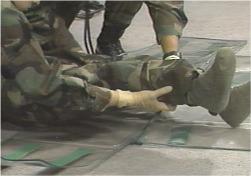
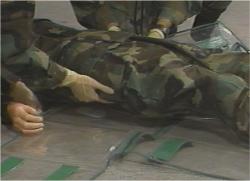
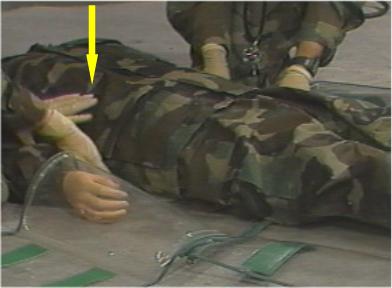
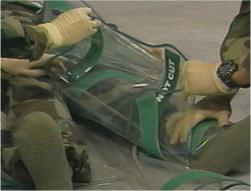
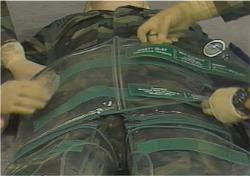
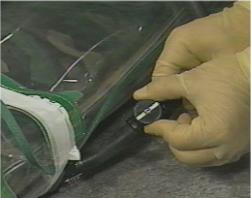
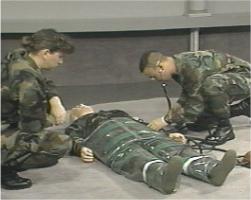
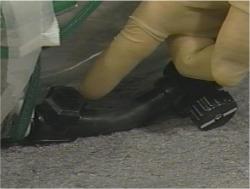
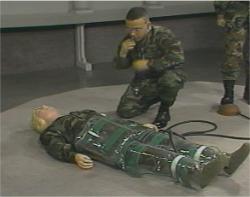
For these reasons, the application of the PASG is usually restricted to qualified medical personnel, under the direction of a physician. If there is a fractured femur, apply a traction splint before applying the PASG. Watch a video showing the use of the PASG. First, open the PASG kit and remove the trousers and accessories. Unfold the anti-shock garment and unfasten the Velcro closures. Make sure the trousers are open and flat. Lay the PASG on the litter or other transport device that will be used to move the patient. If a spinal injury is suspected, lay the PASG on a spine board. Unfold the trousers so that the left leg overlaps the right. Remove any sharp objects, munitions or explosive devices from the casualty's pockets before applying the PASG. Normally, as much clothing as possible is removed from below the waist of the casualty. Bulky clothing over the legs can interfere with the functioning of the PASG. Position the casualty in the supine (face up) position. Elevate the casualty's legs just high enough to slide the PASG up to the buttocks. Then elevate the casualty's buttocks just high enough to slide the PASG up to the waist. Do not lift the casualty any higher than is necessary. Position the top of the PASG so it is slightly lower than the casualty's lowest rib. If a back injury is suspected, log-roll the casualty onto the PASG. Wrap one leg in the PASG. If the PASG extends past the casualty's foot, fold it underneath so the garment stops before the casualty's heel. Smooth the PASG and align the Velcro strips. Press them firmly and securely. If the garment has been folded, reinforce the Velcro closure with adhesive tape. Repeat this procedure with the other leg. Next close the abdominal section of the garment. Align the Velcro strips and press them firmly together to secure the garment. Attach the foot pump to the PASG by connecting the two short rubber tubes to the leg tubes on the trousers, using a twisting motion. Close the stopcock on each leg tube. Connect the long tube to the abdominal section of the garment and close the stopcock. Check the casualty's blood pressure. If the systolic BP has risen above 90 mm/hg, do not inflate. If the systolic BP is 90 or less, go ahead and inflate the garment. The leg sections are inflated before the abdominal section, but either the right or left leg can be inflated first. Open the valve on one leg, while checking to make sure the other two valves are closed. Check the casualties BP and pedal pulse while inflating the leg section. Continue inflating until:
A steady hissing sound from the air release valve indicates that PASG section is over-inflated. Stop inflating, close the valve, and allow the pressure inside the PASG segment to self-adjust. Re-check the casualty's blood pressure. If the systolic pressure has stabilized above 90 mm Hg, inflation of the opposite leg segment will not be necessary. If the systolic BP has not stabilized above 90 mm HG, then close the valve on the other leg segment and inflate it, using the same technique. After inflation of the second leg segment, re-check the casualty's systolic BP. If it is greater than 90 mm HG, inflation of the abdominal segment will not be necessary. If the BP is still not stable and above 90 mm HG, you will need to inflate the abdominal segment. Open the abdominal valve and inflate the abdominal section, checking the casualty's vital signs as you inflate. Continue to monitor the casualty's vital signs as you arrange for prompt evacuation to a medical treatment facility. If the casualty is to be evacuated by air, it should be at low altitudes and low PASG pressures. The anti-shock garment should not be deflated until the casualty has been evacuated to the medical treatment facility. A physician familiar with the PASG must be present during the deflation process. The PASG can be life-saving for a patient in severe shock, but can be life-threateningly dangerous if applied incorrectly.
This section was developed from A1701-95-000022, "Apply the Pneumatic Anti-Shock Garment (PASG)." Health Sciences Media Division, US Army Medical Department C&S, Fort Sam Houston, Texas.
Home · Military Medicine · Sick Call · Basic Exams · Medical Procedures · Lab and X-ray · The Pharmacy · The Library · Equipment · Patient Transport · Medical Force Protection · Operational Safety · Operational Settings · Special Operations · Humanitarian Missions · Instructions/Orders · Other Agencies · Video Gallery · Forms · Web Links · Acknowledgements · Help · Feedback Approved for public release; Distribution is unlimited.
*This web version is provided by The Brookside Associates, LLC. It contains original contents from the official US Navy NAVMED P-5139, but has been reformatted for web access and includes advertising and links that were not present in the original version. The medical information presented was reviewed and felt to be accurate in 2001. Medical knowledge and practice methods may have changed since that time. Some links may no longer be active. This web version has not been approved by the Department of the Navy or the Department of Defense. The presence of any advertising on these pages does not constitute an endorsement of that product or service by either the US Department of Defense or the Brookside Associates. The Brookside Associates is a private organization, not affiliated with the United States Department of Defense.
© 2015, Brookside Associates, LLC. All rights reserved
|
|
||||