First Aid for Soldiers FM 21-11
FM 21-11 First Aid for Soldiers: Chapter 3
First Aid for Special Wounds
Headquarters, Department of the Army, Washington, D.C., October 27, 1988
INTRODUCTION
*Basic lifesaving steps are
discussed in Chapters 1 and 2: clear
the airway/restore the breathing, stop the bleeding, protect the wound, and treat/prevent
shock. They apply to first aid measures for all injuries. Certain types of wounds and
burns will require special precautions and procedures when applying these measures. This
chapter discusses first aid procedures for special wounds of the head, face, and neck;
chest and stomach wounds; and burns. It also discusses the techniques for applying
dressings and bandages to specific parts of the body.
A head injury may consist of one or a combination of the following conditions: a
concussion, a cut or bruise of the scalp, or a fracture of the skull with injury to the
brain and the blood vessels of the scalp. The damage can range from a minor cut on the
scalp to a severe brain injury which rapidly causes death. Most head injuries lie
somewhere between the two extremes. Usually, serious skull fractures and brain injuries
occur together; however, it is possible to receive a serious brain injury without a skull
fracture. The brain is a very delicate organ; when it is injured, the casualty may vomit,
become sleepy, suffer paralysis, or lose consciousness and slip into a coma. All severe
head injuries are potentially life-threatening. For recovery and return to normal
function, casualties require proper first aid as a vital first step.
A head injury may be open or closed. In open injuries, there is a
visible wound and, at times, the brain may actually be seen. In closed injuries, no
visible injury is seen, but the casualty may experience the same signs and symptoms.
Either closed or open head injuries can be life-threatening if the injury has been severe
enough; thus, if you suspect a head injury, evaluate the casualty for the following:
-
Current or recent unconsciousness (loss of consciousness).
-
Nausea or vomiting.
-
Convulsions or twitches (involuntary jerking and shaking).
-
Slurred speech.
-
Confusion.
-
Sleepiness (drowsiness).
-
Loss of memory (does casualty know his own name, where he is, and so forth).
-
Clear or bloody fluid leaking from nose or ears.
-
Staggering in walking.
-
Dizziness.
-
A change in pulse rate.
-
Breathing problems.
-
Eye (vision) problems, such as unequal pupils.
-
Paralysis.
-
Headache.
-
Black eyes.
-
Bleeding from scalp/head area.
-
Deformity of the head.
|
|
a. General Considerations. The casualty with a head injury (or suspected head
injury) should be continually monitored for the development of conditions which may
require the performance of the necessary basic lifesaving measures, therefore be
prepared to--
|
|
b. Care of the Unconscious Casualty. If a casualty is unconscious as the
result of a head injury, he is not able to defend himself. He may lose his sensitivity to
pain or ability to cough up blood or mucus that may be plugging his airway. An unconscious
casualty must be evaluated for breathing difficulties, uncontrollable bleeding, and spinal
injury.
(1) Breathing. The brain requires a constant supply of oxygen. A bluish (or in
an individual with dark skin--grayish) color of skin around the lips and nail beds
indicates that the casualty is not receiving enough air (oxygen). Immediate action must be
taken to clear the airway, to position the casualty on his side, or to give artificial
respiration. Be prepared to give artificial respiration if breathing should stop.
(2) Bleeding. Bleeding from a head injury usually comes from blood vessels
within the scalp. Bleeding can also develop inside the skull or within the brain. In most
instances bleeding from the head can be controlled by proper application of the field
first aid dressing.
CAUTION (081-831-1033)
DO NOT attempt to put unnecessary pressure on the wound or attempt to push any
brain matter back into the head (skull). DO NOT apply a pressure dressing.
|
(3) Spinal injury. A person that has an injury above the collar bone or a head
injury resulting in an unconscious state should be suspected of having a neck or head
injury with spinal cord damage. Spinal cord injury may be indicated by a lack of
responses to stimuli, stomach distention (enlargement), or penile erection.
(a) Lack of responses to stimuli. Starting with the feet, use a sharp pointed
object--a sharp stick or something similar, and prick the casualty lightly while observing
his face. If the casualty blinks or frowns, this indicates that he has feeling and may not
have an injury to the spinal cord. If you observe no response in the casualty's
reflexes after pricking upwards toward the chest region, you must use extreme caution and
treat the casualty for an injured spinal cord.
(b) Stomach distention (enlargement). Observe the casualty's chest and
stomach. If the stomach is distended (enlarged) when the casualty takes a breath and the
chest moves slightly, the casualty may have a spinal injury and must be treated
accordingly.
(c) Penile erection. A male casualty may have a penile erection, an indication
of a spinal injury.
CAUTION
Remember to suspect any casualty who has a severe head injury or who is
unconscious as possibly having a broken neck or a spinal cord injury! It
is better to
treat conservatively and assume that the neck/spinal cord is injured rather than to
chance further injuring the casualty. Consider this when you position the casualty. See
Chapter 4, paragraph 4-9 for treatment procedures of
spinal column injuries.
c. Concussion. If an individual receives a heavy blow to the head or face, he
may suffer a brain concussion, which is an injury to the brain that involves a temporary loss
of some or all of the brain's ability to function. For example, the casualty may not
breathe properly for a short period of time, or he may become confused and stagger when he
attempts to walk. A concussion may only last for a short period of time. However,if a
casualty is suspected of having suffered a concussion, he must be seen by a physician as
soon as conditions permit.
d. Convulsions. Convulsions (seizures/involuntary jerking) may occur after a
mild head injury. When a casualty is convulsing, protect him from hurting himself. Take
the following measures:
(1) Ease him to the ground.
(2) Support his head and neck.
(3) Maintain his airway.
(4) Call for assistance.
(5) Treat the casualty's wounds and evacuate him immediately.
e. Brain Damage. In severe head injuries where brain tissue is
protruding, leave the wound alone; carefully place a first aid dressing over the
tissue. DO NOT remove or disturb any foreign matter that may be in the wound.
Position the casualty so that his head is higher than his body. Keep him warm and seek
medical aid immediately.
NOTE
-
DO NOT forcefully hold the arms and legs if they are jerking because this can lead to
broken bones.
-
DO NOT force anything between the casualty's teeth--especially if they are tightly
clenched because this may obstruct the casualty's airway.
-
Maintain the casualty's airway if necessary.
3-4. Dressings and Bandages
(081-831-1000 and 081-831-1033)
|
*a. Evaluate the Casualty (081-831-1000).
Be prepared to perform lifesaving measures. The basic lifesaving measures may include
clearing the airway, rescue breathing, treatment for shock, and/or bleeding control.
b.
Check Level of Consciousness/Responsiveness (081-831-1033). With a head injury, an
important area to evaluate is the casualty's level of consciousness and responsiveness.
Ask the casualty questions such as--
Any incorrect responses, inability to answer, or changes in responses should be
reported to medical personnel. Check the casualty's level of consciousness every 15
minutes and note any changes from earlier observations.
c. Position the Casualty (081-831-1033).
WARNING (081-831-1033)
DO NOT move the casualty if you suspect he has sustained a neck, spine or severe
head injury (which produces any signs or symptoms other than minor bleeding). See
task 081-831-1000, Evaluate the Casualty.
-
If the casualty is conscious or has a minor (superficial) scalp wound:
o Have the casualty sit up (unless other injuries prohibit or he is unable); OR
o If the casualty is lying down and is not accumulating fluids or drainage in his
throat, elevate his head slightly; OR
o If the casualty is bleeding from or into his mouth or throat, turn his head to the
side or position him on his side so that the airway will be clear. Avoid pressure on the
wound or place him on his side--opposite the site of the injury (Figure
3-1).
|

|
NOTE (081-831-1033)
If the casualty is choking and/or vomiting or is bleeding from or into his mouth (thus
compromising his airway), position him on his side so that his airway will be clear.
Avoid pressure on the wound; place him on his side opposite the side of the injury.
WARNING (081-831-1033)
If it is necessary to turn a casualty with a suspected neck/spine injury; roll the
casualty
gently onto his side, keeping the head, neck, and body aligned while providing
support for the head and neck. DO NOT roll the casualty by yourself but seek
assistance. Move him only if absolutely necessary, otherwise keep the casualty
immobilized to prevent further damage to the neck/spine.
d. Expose the Wound (081-831-1033).
|
WARNING
DO NOT attempt to clean the wound, or remove a protruding object.
NOTE
If there is an object extending from the wound DO NOT remove the object. Improvise
bulky dressings from the cleanest material available and place these dressings around the
protruding object for support after applying the field dressing.
NOTE
Always use the casualty's field dressing, not your own!
|
e. Apply a Dressing to a Wound of the Forehead/Back of Head (081-831-1033).
To apply a dressing to a wound of the forehead or back of the head-- |
(1) Remove the dressing from the wrapper.
(2) Grasp the tails of the dressing in both hands.
(3) Hold the dressing (white side down) directly over the wound. DO NOT touch the white
(sterile) side of the dressing or allow anything except the wound to come in contact with
the white side.
(4) Place it directly over the wound.
(5) Hold it in place with one hand. If the casualty is able, he may assist.
(6) Wrap the first tail horizontally around the head, ensure the tail covers the
dressing (Figure 3-2).
|

(7) Hold the first tail in place and wrap the second tail the opposite direction,
covering the dressing (Figure 3-3).
|

(8) Tie a nonslip knot and secure the tails at the side of the head, making sure they
DO NOT cover the eyes or ears (Figure 3-4).
|

|
f. Apply a Dressing to a Wound on Top of the Head (081-831-1033). To apply a
dressing to a wound on top of the head-- |
(1) Remove the dressing from the wrapper.
(2) Grasp the tails of the dressing in both hands.
(3) Hold it (white side down) directly over the wound.
(4) Place it over the wound (Figure 3-5).
|

(5) Hold it in place with one hand. If the casualty is able, he may assist.
(6) Wrap one tail down under the chin (Figure 3-6), up in front
of the ear, over the dressing, and in front of the other ear.
|

WARNING
(7) Wrap the remaining tail under the chin in the opposite direction and up the side of
the face to meet the first tail (Figure 3-7).
|

(8) Cross the tails (Figure 3-8), bringing one around the
forehead (above the eyebrows) and the other around the back of the head (at the base of
the skull) to a point just above and in front of the opposite ear, and tie them using a
nonslip knot (Figure 3-9).
|


g. Apply a Triangular Bandage to the Head. To apply a triangular bandage to
the head--
(1) Turn the base (longest side) of the bandage up and center its base on center of the
forehead, letting the point (apex) fall on the back of the neck (Figure
3-10 A).
(2) Take the ends behind the head and cross the ends over the apex.
(3) Take them over the forehead and tie them (Figure 3-10 B).
(4) Tuck the apex behind the crossed part of the bandage and/or secure it with a safety
pin, if available (Figure 3-10 C).

h. Apply a Cravat Bandage to the Head. To apply a cravat bandage to the head--
(1) Place the middle of the bandage over the dressing (Figure 3-11 A).
(2) Cross the two ends of the bandage in opposite directions completely around the head
(Figure 3-11 B).
(3) Tie the ends over the dressing (Figure 3-11 C).

Soft tissue injuries of the face and scalp are common. Abrasions (scrapes) of the skin
cause no serious problems. Contusions (injury without a break in the skin) usually cause
swelling. A contusion of the scalp looks and feels like a lump. Laceration (cut) and
avulsion (torn away tissue) injuries are also common. Avulsions are frequently caused when
a sharp blow separates the scalp from the skull beneath it. Because the face and scalp are
richly supplied with blood vessels (arteries and veins), wounds of these areas usually
bleed heavily.
3-6. Neck Injuries
Neck injuries may result in heavy bleeding. Apply manual pressure above and below the
injury and attempt to control the bleeding. Apply a dressing. Always evaluate the casualty
for a possible neck fracture/spinal cord injury; if suspected, seek medical treatment
immediately.
*NOTE
Establish and maintain the airway in cases of facial or neck injuries. If a neck
fracture or
spinal cord injury is suspected, immobilize or stabilize casualty. See Chapter 4 for further information on treatment of spinal injuries.
When a casualty has a face or neck injury, perform the measures below.
a. Step ONE. Clear the airway. Be prepared to perform any of the basic
lifesaving steps. Clear the casualty's airway (mouth) with your fingers, remove any blood,
mucus, pieces of broken teeth or bone, or bits of flesh, as well as any dentures.
b. Step TWO. Control any bleeding, especially bleeding that obstructs the
airway. Do this by applying direct pressure over a first aid dressing or by applying
pressure at specific pressure points on the face, scalp, or temple. (See Appendix E for further information on pressure points.)
If the casualty is bleeding from the mouth, position him as indicated (c below)
and apply manual pressure.
CAUTION
c. Step THREE. Position the casualty. If the casualty is bleeding from the
mouth (or has other drainage, such as mucus, vomitus, or so forth) and is conscious, place
him in a comfortable sitting position and have him lean forward with his head tilted
slightly down to permit free drainage (Figure 3-12). DO NOT use the
sitting position if--
-
It would be harmful to the casualty because of other injuries.
-
The casualty is unconscious, in which case, place him on his side (Figure
3-13). If there is a suspected injury to the neck or spine immobilize the head before
turning the casualty on his side.


CAUTION
If you suspect the casualty has a neck/spinal injury, then immobilize his head/neck and
treat him as outlined in Chapter 4.
d. Step FOUR. Perform other measures.
(1) Apply dressings/bandages to specific areas of the face.
(2) Check for missing teeth and pieces of tissue. Check for detached teeth in the
airway. Place detached teeth, pieces of ear or nose on a field dressing and send them
along with the casualty to the medical facility. Detached teeth should be kept damp.
(3) Treat for shock and seek medical treatment IMMEDIATELY.
3-8. Dressings and Bandages
(081-831-1033)
a. Eye Injuries. The eye is a vital sensory organ, and blindness is a severe
physical handicap. Timely first aid of the eye not only relieves pain but also helps
prevent shock, permanent eye injury, and possible loss of vision. Because the eye is very
sensitive, any injury can be easily aggravated if it is improperly handled. Injuries of
the eye may be quite severe. Cuts of the eyelids can appear to be very serious, but if the
eyeball is not involved, a person's vision usually will not be damaged. However,
lacerations (cuts) of the eyeball can cause permanent damage or loss of sight.
(1) Lacerated/torn eyelids. Lacerated eyelids may bleed heavily, but bleeding
usually stops quickly. Cover the injured eye with a sterile dressing. DO NOT put pressure
on the wound because you may injure the eyeball. Handle torn eyelids very carefully to
prevent further injury. Place any detached pieces of the eyelid on a clean bandage or
dressing and immediately send them with the casualty to the medical facility.
(2) Lacerated eyeball (injury to the globe). Lacerations or cuts to the
eyeball may cause serious and permanent eye damage. Cover the injury with a loose sterile
dressing. DO NOT put pressure on the eyeball because additional damage may occur. An
important point to remember is that when one eyeball is injured, you should immobilize
both eyes. This is done by applying a bandage to both eyes. Because the eyes move
together, covering both will lessen the chances of further damage to the injured eye.
CAUTION
DO NOT apply pressure when there is a possible laceration of the eyeball. The eyeball
contains fluid. Pressure applied over the eye will force the fluid out, resulting in
permanent injury. APPLY PROTECTIVE DRESSING WITHOUT ADDED
PRESSURE.
(3) Extruded eyeballs. Soldiers may encounter casualties with severe eye
injuries that include an extruded eyeball (eyeball out-of-socket). In such instances you
should gently cover the extruded eye with a loose moistened dressing and also cover the
unaffected eye. DO NOT bind or exert pressure on the injured eye while applying a loose
dressing Keep the casualty quiet, place him on his back, treat for shock (make warm and
comfortable), and evacuate him immediately.
(4) Burns of the eyes. Chemical burns, thermal (heat) burns, and light burns
can affect the eyes.
(a) Chemical burns. Injuries from chemical burns require immediate first aid.
Chemical burns are caused mainly by acids or alkalies. The first aid is to flush the
eye(s) immediately with large amounts of water for at least 5 to 20 minutes, or as long as
necessary to flush out the chemical. If the burn is an acid burn you should flush the eye
for at least 5 to 10 minutes. If the burn is an alkali burn, you should flush the eye for
at least 20 minutes. After the eye has been flushed apply a bandage over the eyes and
evacuate the casualty immediately.
(b) Thermal burns. When an individual suffers burns of the face from a fire,
the eyes will close quickly due to extreme heat. This reaction is a natural reflex to
protect the eyeballs; however, the eyelids remain exposed and are frequently burned. If a
casualty receives burns of the eyelids/face, DO NOT apply a dressing; DO NOT TOUCH; seek
medical treatment immediately.
(c) Light burns. Exposure to intense light can burn an individual. Infrared
rays, eclipse light (if the casualty has looked directly at the sun), or laser burns cause
injuries of the exposed eyeball. Ultraviolet rays from arc welding can cause a superficial
burn to the surface of the eye. These injuries are generally not painful but may cause
permanent damage to the eyes. Immediate first aid is usually not required. Loosely
bandaging the eyes may make the casualty more comfortable and protect his eyes from
further injury caused by exposure to other bright lights or sunlight.
CAUTION
In certain instances both eyes are usually bandaged; but, in hazardous surroundings
leave the uninjured eye uncovered so that the casualty may be able to see.
b. Side-of-Head or Cheek Wound (081-831-1033).
Facial injuries to the side of the head or the cheek may bleed profusely (Figure 3-14). Prompt action is necessary to ensure that the airway
remains open and also to control the bleeding. It may be necessary to apply a dressing. To
apply a dressing--
(1) Remove the dressing from its wrapper.
(2) Grasp the tails in both hands.
(3) Hold the dressing directly over the wound with the white side down and place it
directly on the wound (Figure 3-15 A).
(4) Hold the dressing in place with one hand (the casualty may assist if able). Wrap
the top tail over the top of the head and bring it down in front of the ear (on the side
opposite the wound), under the chin (Figure 3-15 B) and up over the
dressing to a point just above the ear (on the wound side).
|


NOTE
When possible, avoid covering the casualty's ear with the dressing, as this will
decrease
his ability to hear.
(5) Bring the second tail under the chin, up in front of the ear (on the side opposite
the wound) and over the head to meet the other tail (on the wound side) (Figure 3-16).
|

(6) Cross the two tails (on the wound side) (Figure 3-17) and
bring one end across the forehead (above the eyebrows) to a point just in front of the
opposite ear (on the uninjured side).
|

(7) Wrap the other tail around the back of the head (at the base of the skull), and tie
the two ends just in front of the ear on the uninjured side with a nonslip knot (Figure 3-18).
|

c. Ear Injuries. Lacerated (cut) or avulsed (torn) ear tissue may not, in
itself, be a serious injury. Bleeding, or the drainage of fluids from the ear canal,
however, may be a sign of a head injury, such as a skull fracture. DO NOT attempt to stop
the flow from the inner ear canal nor put anything into the ear canal to block it.
Instead, you should cover the ear lightly with a dressing. For minor cuts or wounds to the
external ear apply a cravat bandage as follows:

(3) If possible, place some dressing material between the back of the ear and the side
of the head to avoid crushing the ear against the head with the bandage.
d. Nose Injuries. Nose injuries generally produce bleeding. The bleeding may
be controlled by placing an ice pack over the nose, or pinching the nostrils together. The
bleeding may also be controlled by placing torn gauze (rolled) between the upper teeth and
the lip.
CAUTION
DO NOT attempt to remove objects inhaled in the nose. An untrained person who
removes such an object could worsen the casualty's condition and cause permanent
injury.
e. Jaw Injuries. Before applying a bandage to a casualty's jaw, remove all
foreign material from the casualty's mouth. If the casualty is unconscious, check for
obstructions in the airway. When applying the bandage, allow the jaw enough freedom to
permit passage of air and drainage from the mouth.
(1) Apply bandages attached to field first aid dressing to the jaw. After
dressing the wound, apply the bandages using the same technique illustrated in Figures 3-5, 3-6, 3-7,
and 3-8.
NOTE
The dressing and bandaging procedure outlined for the jaw serves a twofold purpose.
In addition to stopping the bleeding and protecting the wound, it also immobilizes a
fractured jaw.
(2) Apply a cravat bandage to the jaw.
(a) Place the bandage under the chin and carry its ends upward. Adjust the
bandage to make one end longer than the other (Figure 3-20 A).
(b) Take the longer end over the top of the head to meet the short end at the
temple and cross the ends over (Figure 3-20 B).
(c) Take the ends in opposite directions to the other side of the head and tie
them over the part of the bandage that was applied first (Figure 3-20 C).

NOTE
The cravat bandage technique is used to immobilize a fractured jaw or to maintain a
sterile dressing that does not have tail bandages attached.
Section III. GIVE PROPER FIRST AID FOR CHEST AND ABDOMINAL
WOUNDS AND BURN INJURIES
Chest injuries may be caused by accidents, bullet or missile wounds, stab wounds, or
falls. These injuries can be serious and may cause death quickly if proper treatment is
not given. A casualty with a chest injury may complain of pain in the chest or shoulder
area; he may have difficulty with his breathing. His chest may not rise normally when he
breathes. The injury may cause the casualty to cough up blood and to have a rapid or a
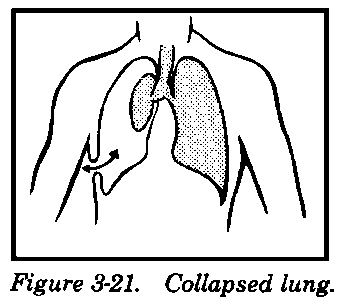
weak heartbeat. A casualty with an open chest wound has a punctured chest wall. The
sucking sound heard when he breathes is caused by air leaking into his chest cavity. This
particular type of wound is dangerous and will collapse the injured lung (Figure 3-21). Breathing becomes difficult for the casualty because the
wound is open. The soldier's life may depend upon how quickly you make the wound airtight.
3-10. Chest Wound(s) Procedure
(081-831-1026)
|
*a. Evaluate the Casualty (081-831-1000).
Be prepared to perform lifesaving measures. The basic lifesaving measures may include
clearing the airway, rescue breathing, treatment for shock, and/or bleeding control.
b.
Expose the Wound. If appropriate, cut or remove the casualty's clothing to expose the
entire area of the wound. Remember, DO NOT remove clothing that is stuck to the wound
because additional injury may result. DO NOT attempt to clean the wound. |
NOTE
Examine the casualty to see if there is an entry and/or exit wound. If there are two
wounds (entry, exit), perform the same procedure for both wounds. Treat the more
serious (heavier bleeding, larger) wound first. It may be necessary to improvise a
dressing for the second wound by using strips of cloth, such as a torn T-shirt, or
whatever material is available. Also, listen for sucking sounds to determine if the chest
wall is punctured.
CAUTION
If there is an object extending from (impaled in) the wound, DO NOT remove the
object. Apply a dressing around the object and use additional improvised bulky
materials/dressings (use the cleanest materials available) to build up the area around the
object. Apply a supporting bandage over the bulky materials to hold them in place.
CAUTION (081-831-1026)
DO NOT REMOVE protective clothing in a chemical environment. Apply dressings
over the protective clothing.
|
c. Open the Casualty's Field Dressing Plastic Wrapper. The plastic wrapper is
used with the field dressing to create an airtight seal. If a plastic wrapper is not
available, or if an additional wound needs to be treated; cellophane, foil, the casualty's
poncho, or similar material may be used. The covering should be wide enough to extend 2
inches or more beyond the edges of the wound in all directions.
(1) Tear open one end of the casualty's plastic wrapper covering the field dressing. Be
careful not to destroy the wrapper and DO NOT touch the inside of the wrapper.
(2) Remove the inner packet (field dressing).
(3) Complete tearing open the empty plastic wrapper using as much of the wrapper as
possible to create a flat surface.
|
d. Place the Wrapper Over the Wound (081-831-1026). Place the inside surface
of the plastic wrapper directly over the wound when the casualty exhales and hold
it in place (Figure 3-22). The casualty may hold the plastic
wrapper in place if he is able. |

e. Apply the Dressing to the Wound (081-831-1026).


NOTE (081-831-1026)
Use the casualty's field dressing, not your own.
(3) Have the casualty breathe normally.
(4) While maintaining pressure on the dressing, grasp one tail of the field dressing
with the other hand and wrap it around the casualty's back.
(5) Wrap the other tail in the opposite direction, bringing both tails over the
dressing (Figure 3-25).
|

(6) Tie the tails into a nonslip knot in the center of the dressing after
the casualty exhales and before he inhales. This will aid in maintaining pressure
on the bandage after it has been tied (Figure 3-26). Tie the
dressing firmly enough to secure the dressing without interfering with the casualty's
breathing.
|

NOTE (081-831-1026)
When practical, apply direct manual pressure over the dressing for 5 to 10 minutes to
help control the bleeding.
f. Position the Casualty (081-831-1026). Position the casualty on his injured
side or in a sitting position, whichever makes breathing easier (Figure
3-27). |

g. Seek Medical Aid. Contact medical personnel.
*WARNING
Even if an airtight dressing has been placed properly, air may still enter the chest
cavity without having means to escape. This causes a life-threatening condition called
tension pneumothorax. If the casualty's condition (for example, difficulty breathing,
shortness of breath, restlessness, or grayness of skin in a dark-skinned individual [or
blueness in an individual with light skin]) worsens after placing the dressing, quickly
lift or remove, then replace the airtight dressing.
The most serious abdominal wound is one in which an object penetrates the abdominal
wall and pierces internal organs or large blood vessels. In these instances, bleeding may
be severe and death can occur rapidly.
a. Evaluate the Casualty. Be prepared to perform basic lifesaving measures. It
is necessary to check for both entry and exit wounds. If there are two wounds (entry and
exit), treat the wound that appears more serious first (for example, the heavier bleeding,
protruding organs, larger wound, and so forth). It may be necessary to improvise dressings
for the second wound by using strips of cloth, a T-shirt, or the cleanest material
available.
|
b. Position the Casualty. Place and maintain the casualty on his back with
his knees in an upright (flexed) position (Figure 3-28). The
knees-up position helps relieve pain, assists in the treatment of shock, prevents further
exposure of the bowel (intestines) or abdominal organs and helps relieve abdominal
pressure by allowing the abdominal muscles to relax. |

|
c. Expose the Wound.
(1) Remove the casualty's loose clothing to expose the wound. However, DO NOT attempt
to remove clothing that is stuck to the wound; it may cause further injury. Thus, remove
any loose clothing from the wound but leave in place the clothing that is stuck.
CAUTION (081-831-1000 and 081-831-1025)
DO NOT REMOVE protective clothing in a chemical environment. Apply dressings
over the protective clothing.
(2) Gently pick up any organs which may be on the ground. Do this with a clean, dry
dressing or with the cleanest available material. Place the organs on top of the
casualty's abdomen (Figure 3-29).
|

NOTE (081-831-1025)
-
DO NOT probe, clean, or try to remove any foreign object from the abdomen.
-
DO NOT touch with bare hands any exposed organs.
-
DO NOT push organs back inside the body.
d. Apply the Field Dressing. Use the casualty's field dressing, not your own.
If the field dressing is not large enough to cover the entire wound, the plastic wrapper
from the dressing may be used to cover the wound first (placing the field dressing on
top). Open the plastic wrapper carefully without touching the inner surface, if possible.
If necessary, other improvised dressings may be made from clothing, blankets, or the
cleanest materials available because the field dressing and/or wrapper may not be large
enough to cover the entire wound. |
WARNING
If there is an object extending from the wound, DO NOT remove it. Place as much of
the wrapper over the wound as possible without dislodging or moving the object. DO
NOT place the wrapper over the object.
(2) Hold the dressing with the white, or cleanest, side down directly over the wound.
(3) Pull the dressing open and place it directly over the wound (Figure
3-30). If the casualty is able, he may hold the dressing in place.
|

(4) Hold the dressing in place with one hand and use the other hand to wrap one of the
tails around the body.
(5) Wrap the other tail in the opposite direction until the dressing is completely
covered. Leave enough of the tail for a knot.
(6) Loosely tie the tails with a nonslip knot at the casualty's side (Figure 3-31).
|

WARNING
When dressing is applied, DO NOT put pressure on the wound or exposed internal
parts, because pressure could cause further injury (vomiting, ruptured intestines, and
so forth). Therefore, tie the dressing ties (tails) loosely at casualty's side, not
directly
over the dressing.
(7) Tie the dressing firmly enough to prevent slipping without applying pressure to the
wound site (Figure 3-32).
|

|
Field dressings can be covered with improvised reinforcement material (cravats, strips
of torn T-shirt, or other cloth), if available, for additional support and protection. Tie
improvised bandage on the opposite side of the dressing ties firmly enough to prevent
slipping but without applying additional pressure to the wound.
CAUTION
(081-31-1025)
|
e. Seek Medical Aid. Notify medical personnel.
3-13. Burn Injuries
Burns often cause extreme pain, scarring, or even death. Proper treatment will minimize
further injury of the burned area. Before administering the proper first aid, you must be
able to recognize the type of burn to be treated. There are four types of burns: (1)
thermal burns caused by fire, hot objects, hot liquids, and gases or by nuclear blast or
fire ball; (2) electrical burns caused by electrical wires, current, or lightning; (3)
chemical burns caused by contact with wet or dry chemicals or white phosphorus (WP)--from
marking rounds and grenades; and (4) laser burns.
|
a. Eliminate the Source of the Burn. The source of the burn must be
eliminated before any evaluation or treatment of the casualty can occur.
(1) Remove the casualty quickly and cover the thermal burn with any large
nonsynthetic material, such as a field jacket. Roll the casualty on the ground to smother
(put out) the flames (Figure 3-33).
|

CAUTION
Synthetic materials, such as nylon, may melt and cause further injury.
(2) Remove the electrical burn casualty from the electrical source by turning
off the electrical current. DO NOT attempt to turn off the electricity if the source is
not close by. Speed is critical, so DO NOT waste unnecessary time. If the electricity
cannot be turned off, wrap any nonconductive material (dry rope, dry
clothing, dry wood, and so forth) around the casualty's back and shoulders and
drag the casualty away from the electrical source (Figure 3-34). DO
NOT make body-to-body contact with the casualty or touch any wires because you could also
become an electrical burn casualty.
|

WARNING
High voltage electrical burns may cause temporary unconsciousness, difficulties in
breathing, or difficulties with the heart (heartbeat).
(3) Remove the chemical from the burned casualty. Remove liquid
chemicals by flushing with as much water as possible. If water is not available, use any
nonflammable fluid to flush chemicals off the casualty. Remove dry chemicals by
brushing off loose particles (DO NOT use the bare surface of your hand because you could
become a chemical burn casualty) and then flush with large amounts of water, if available.
If large amounts of water are not available, then NO water should be applied
because small amounts of water applied to a dry chemical burn may cause a
chemical reaction. When white phosphorous strikes the skin, smother with water, a wet
cloth, or wet mud. Keep white phosphorous covered with a wet material to exclude
air which will prevent the particles from burning.
|
WARNING
Small amounts of water applied to a dry chemical burn may cause a chemical
reaction transforming the dry chemical into an active burning substance.
(4) Remove the laser burn casualty from the source. (NOTE: Lasers produce a
narrow amplified beam of light. The word laser means Light Amplification
by Stimulated Emission of Radiation and sources include range
finders, weapons/guidance, communication systems, and weapons simulations such as MILES.)
When removing the casualty from the laser beam source, be careful not to enter the beam or
you may become a casualty. Never look directly at the beam source and if possible, wear
appropriate eye protection.
|
NOTE
After the casualty is removed from the source of the burn, he should be evaluated for
conditions requiring basic lifesaving measures (Evaluate the Casualty).
b. Expose the Burn. Cut and gently lift away any clothing covering the burned
area, without pulling clothing over the burns. Leave in place any clothing that is stuck
to the burns. If the casualty's hands or wrists have been burned. remove jewelry if
possible without causing further injury (rings, watches, and so forth) and place in his
pockets. This prevents the necessity to cut off jewelry since swelling usually occurs as a
result of a burn.
|
c. Apply a Field Dressing to the Burn. |
(2) Hold the dressing directly over the wound with the white (sterile) side down, pull
the dressing open, and place it directly over the wound. If the casualty is able, he may
hold the dressing in place.
|
(3) Hold the dressing in place with one hand and use the other hand to wrap one of the
tails around the limbs or the body.
(4) Wrap the other tail in the opposite direction until the dressing is completely
covered.
(5) Tie the tails into a knot over the outer edge of the dressing. The dressing should
be applied lightly over the burn. Ensure that dressing is applied firmly enough to prevent
it from slipping.
NOTE
Use the cleanest improvised dressing material available if a field dressing is not
available
or if it is not large enough for the entire wound.
|
d. Take the Following Precautions (081-831-1007):
-
DO NOT break the blisters.
-
DO NOT apply grease or ointments to the burns.
-
For electrical burns, check for both an entry and exit burn from the passage of
electricity through the body. Exit burns may appear on any area of the body despite
location of entry burn.
|
-
For burns caused by white phosphorus (WP), flush the area with water, then cover with a
wet material, dressing, or mud to exclude the air and keep the WP particles from burning.
|
-
For laser burns, apply a field dressing.
-
If the casualty is conscious and not nauseated, give him small amounts of water.
e. Seek Medical Aid. Notify medical personnel.
a. To apply bandages attached to the field first aid dressing--
(1) Take one bandage across the chest and the other across the back and under the arm
opposite the injured shoulder.
(2) Tie the ends with a nonslip knot (Figure 3-35).

b. To apply a cravat bandage to the shoulder or armpit--
(1) Make an extended cravat bandage by using two triangular bandages (Figure 3-36 A); place the end of the first triangular bandage along
the base of the second one (Figure 3-36 B).
(2) Fold the two bandages into a single extended bandage (Figure
3-36 C).
(3) Fold the extended bandage into a single cravat bandage (Figure
3-36 D). After folding, secure the thicker part (overlap) with two or more safety pins
(Figure 3-36 E).
(4) Place the middle of the cravat bandage under the armpit so that the front end is
longer than the back end and safety pins are on the outside (Figure
3-36 F).
(5) Cross the ends on top of the shoulder (Figure 3-36 G).
(6) Take one end across the back and under the arm on the opposite side and the other
end across the chest. Tie the ends (Figure 3-36 H).


Be sure to place sufficient wadding in the armpit. DO NOT tie the cravat bandage too
tightly. Avoid compressing the major blood vessels in the armpit.
To apply a cravat bandage to the elbow--
a. Bend the arm at the elbow and place the middle of the cravat at the point
of the elbow bringing the ends upward (Figure 3-37 A).
b. Bring the ends across, extending both downward (Figure
3-37 B).
c. Take both ends around the arm and tie them with a nonslip knot at the front
of the elbow (Figure 3-37 C).

CAUTION
If an elbow fracture is suspected, DO NOT bend the elbow; bandage it in an extended
position.
a. To apply a triangular bandage to the hand--
(1) Place the hand in the middle of the triangular bandage with the wrist at the base
of the bandage (Figure 3-38 A). Ensure that the fingers are
separated with absorbent material to prevent chafing and irritation of the skin.
(2) Place the apex over the fingers and tuck any excess material into the pleats on
each side of the hand (Figure 3-38 B).
(3) Cross the ends on top of the hand, take them around the wrist, and tie them (Figures 3-38 C, D, and E) with a nonslip knot.


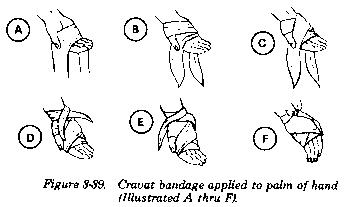
b. To apply a cravat bandage to the palm of the hand--
(1) Lay the middle of the cravat over the palm of the hand with the ends hanging down
on each side (Figure 3-39 A).
(2) Take the end of the cravat at the little finger across the back of the hand,
extending it upward over the base of the thumb; then bring it downward across the palm (Figure 3-39 B).
(3) Take the thumb and across the back of the hand, over the palm, and through the
hollow between the thumb and palm (Figure 3-39 C).
(4) Take the ends to the back of the hand and cross them; then bring them up over the
wrist and cross them again (Figure 3-39 D).
(5) Bring both ends down and tie them with a nonslip knot on top of the wrist (Figure 3-39 E and F).
To apply a cravat bandage to the leg--
a. Place the center of the cravat over the dressing (Figure
3-40 A).
b. Take one end around and up the leg in a spiral motion and the other end
around and down the leg in a spiral motion, overlapping part of each preceding turn (Figure 3-40 B).
c. Bring both ends together and tie them (Figure 3-40 C)
with a nonslip knot.

To apply a cravat bandage to the knee as illustrated in Figure 3-41,
use the same technique applied in bandaging the elbow. The same caution for the elbow also
applies to the knee.

To apply a triangular bandage to the foot--
a. Place the foot in the middle of the triangular bandage with the heel well
forward of the base (Figure 3-42 A). Ensure that the toes are
separated with absorbent material to prevent chafing and irritation of the skin.
b. Place the apex over the top of the foot and tuck any excess material into
the pleats on each side of the foot (Figure 3-42 B).
c. Cross the ends on top of the foot, take them around the ankle, and tie them
at the front of the ankle (Figure 3-42 C, D, and E).

|