![]()
Multimedia Edition
|
Lesson 4: Postoperative Care of the Surgical Patient
Section IV. NURSING IMPLICATIONS BY BODY SYSTEMS OF A POSTOPERATIVE PATIENT
Postoperative nursing intervention to meet respiratory needs is chiefly designed to prevent respiratory complication. Nursing actions include checking the patient's respiratory rate, depth, and rhythm as ordered or according to local policy or whenever vital signs are taken. Being alert to signs of respiratory problems cannot be over emphasized. Measures for encouraging lung expansion and exchange of gas are given below.
a. Reteach the patient coughing and deep breathing exercises (refer to Lesson 1, paras 1-5a(2) and (3)). Coughing is encouraged to dislodge mucous plugs. Deep breathing helps to maximize voluntary lung expansion. Record the procedure and report significant observations to the Charge Nurse. Include the time of procedure, sputum (if present -- color, odor, amount), and patient's tolerance.
b. Turn the patient as ordered (refer to Lesson 1, para 1-5a(1)). Turning the patient allows alternating maximum expansion of the uppermost lung.
c. Ambulate the patient as ordered. If the patient cannot ambulate, periodically assist him to a sitting position in bed if allowed. This position permits the greatest lung expansion. Ambulation promotes deep breathing.
d. Position the patient in a Fowler's position to facilitate lung expansion, if permitted.
Nursing measures to meet the patient's circulatory needs are provided to prevent thrombophlebitis.
a. Reteach lower extremity exercises while the patient is on bedrest (refer to Lesson 1, para 1-5a(4)).
b. Ambulate the patient, as ordered.
-
(1) Provide physical support for first attempts.
-
(2) Have patient dangle feet at bedside before ambulation.
-
(3) Monitor patient's blood pressure while he dangles.
NOTE: Do not ambulate patient if he is hypotensive when dangling. Report this event to the Charge Nurse.
As previously mentioned, anesthetics temporarily depress urinary bladder tone. Urinary bladder tone usually returns within six to eight hours after surgery. The length of time a patient may be permitted to go without voiding after surgery varies considerably with the type of surgery performed. However, in the mean time, nursing responsibilities in relation to urinary elimination are those listed below.
a. Report to the Charge Nurse if the patient without a Foley catheter has not voided within eight hours of return to ward from the recovery room.
-
(1) Patients who have had abdominal surgery, particularly if in the lower abdominal and pelvic regions, often have difficulty voiding after surgery.
(2) Operative trauma in the region near the bladder may temporarily decrease the sensation of needing to void (urinate).
(3) The fear of pain may cause tenseness and difficulty in voiding.
b. Palpate patient's bladder for distention and assess patient's response.
-
(1) The patient will tell you if he has to void (he will feel a sense of fullness and urgency).
-
(2) Report this event to the Charge Nurse.
c. Assist the patient to void.
-
(1) Position the patient comfortably on bedpan, with urinal, or in bathroom.
-
(2) Provide the patient with privacy.
d. Measure and record the patient's urinary output.
e. Notify the Charge Nurse if less than 30 cc of urine is voided during first experience after surgery.
f. Report to the Charge Nurse if the patient complains of bleeding when voiding or urine shows blood.
g. Follow ward infection control SOP for care of a patient with a Foley catheter.
a. Normal Function of the Gastrointestinal System. Regaining normal function of the gastrointestinal system as soon as possible is very important. The following nursing implications also apply to the patient who has had abdominal surgery.
-
(1) Report to the Charge Nurse if the patient complains of abdominal distention.
-
(2) Ask the patient if he has "passed gas" within 24 hours of return to the ward from the recovery room.
(3) Auscultate for bowel sounds and report assessment to the Charge Nurse.
(4) Provide the patient with a quiet environment in a private bathroom so he feels comfortable expelling flatus. (5) Encourage the patient to take warm or hot liquids and solids rather than cold, if he is not NPO. Warm or hot liquids help to reduce distention. (6) Ambulate the patient to assist peristalsis.
-
(7) Administer medications or enema as ordered by the physician if nursing measures are not effective in relieving abdominal distention. Both treatments will facilitate peristalsis and relieve distention.
-
(8) Tell the patient to report his first postoperative bowel movement to you.
-
(9) Record patient's bowel movement on Intake and Output (I & O) Work Sheet.
(10) Document nursing measures and results in the Nurse's Notes.
NOTE: Last measures to reduce abdominal distention may require the insertion of a nasogastric (N/G) tube or use of a rectal tube.
b. Nasogastric Tube. The procedures to insert a nasogastric tube to administer intestinal decompression therapy to a postoperative patient are given below.
(1) Wash your hands and assemble all needed equipment.
(a) NG (Levin) tube.
-
(b) Irrigating set which includes: a basin, lubricant (water-soluble), towel, solution container, irrigating syringe, and protector cap or tube plug.
-
(c) Tape.
-
(d) Tissues.
-
(e) Stethoscope.
-
(f) Glass of water and straw.
-
(g) Nasogastric suction apparatus (as needed).
-
(2) Identify and approach the patient, explain what you are going to do, and gain his cooperation.
-
(a) The Fowler's position is usually assumed because it enables the tube to move by gravity down the digestive tract.
-
(b) Hand the emesis basin and the tissues to the patient or place the emesis basin close beside the patient's face with the tissues near the pillow.
-
(a) Close one side of the patient's nose and check the airflow through the other.
-
(b) Pass the tube through the nostril with the best airflow.
-
(c) If changing the NG (Levin) tube, insert it in the nostril other than the one previously used to avoid further irritation of the tissue.
-
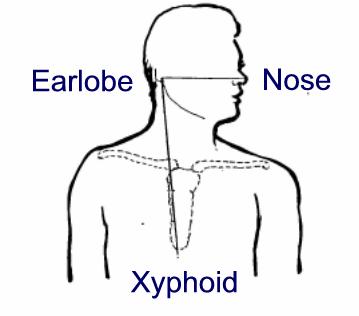
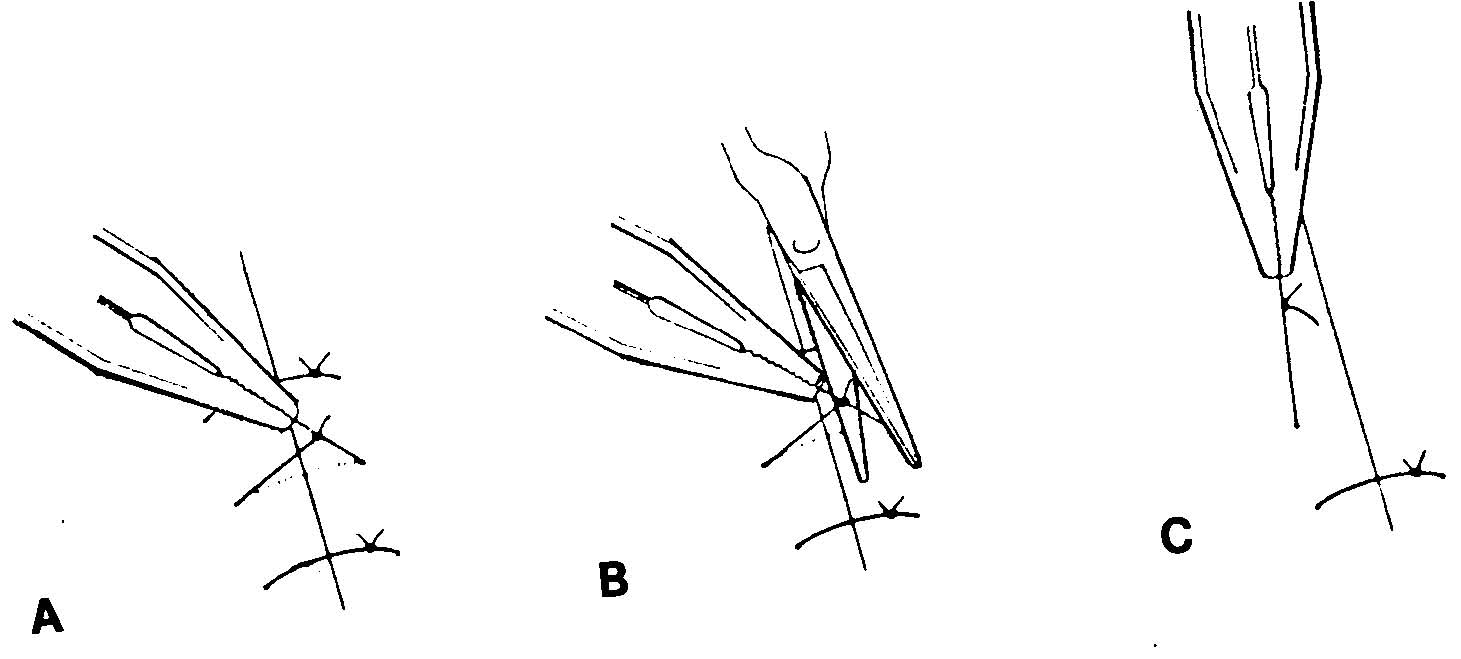
(a) Find the target distance for inserting the tube by measuring from the tip of the nose to the tip of the ear, and then to the tip of the xiphoid process (see Figure 4-3. Mark it with a small piece of tape.
-
(b) A scale (commercial) is available that measures the distance more precisely since NEX may be too long for short patients and too short for taller adults.
(c) Some tubes have approximate target marking on them.
-
1 One black band indicating the length of the tubing needed to reach the stomach.
-
2 Two bands for the pylorus.
-
3 Three bands for the duodenum.
-
-
(a) Aim the tube down and toward the ear.
-
(b) For easier insertion, use water or a water-base lubricant to moisten the tip of the tube.
-
(c) Do not use an oil-base lubricant. The possibility of lipoid (fat) aspirational pneumonia is to be avoided.
-
(d) If you encounter a severe resistance, withdraw the tube and insert it in the other nostril.
-
(e) Do not forcibly push it because you could injure tissues and cause bleeding.
-
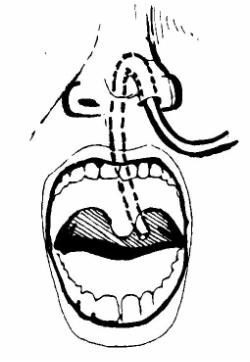
Figure 4-4. Nasogastric Tube Insertion(8) Have the patient drop his head forward and begin to swallow as the tube reaches the back of the throat.
-
(a) Tell the patient to bend his head forward and (if permitted) to swallow sips of water as the tube is passed down the esophagus to the stomach.
-
(b) Check the position of the tube as it passes down the back of the patient's throat by having the patient open his mouth. Hold down the patient's tongue with a tongue depressor.
-
(c) Withdraw the tube into the nose and begin again by having the patient bend head forward and swallow; restart if the tube is coiled up in his mouth.
-
(d) Avoid long waits (long delays can increase the patient's anxiety/discomfort). However, the patient can signal you to stop for a moment to rest, if necessary.
-
(3) Provide for patient's privacy.
(4) Position the patient.
(5) Check the airflow through the patient's nostril.
(6) Measure the tube for distance to be inserted.
(7) Lubricate the tip of the tube and insert it in the patient's nose.

(9) Advance the tube each time the patient swallows or sucks air. See Figure 4-4.
(a) If permitted, continue to have the patient swallow water or ice. This helps as the tube is passed.
-
(b) The esophageal peristalsis and the fact that you work in a reassuring manner will help the patient tolerate the procedure.
-
(10) Check the placement of the tube.
-
(a) When the target point on the tube has reached the nose, the tube should be in the stomach.
-
(b) Verify placement by one of the following methods:
1 The return of gastric juices is an obvious sign. Use the irrigating syringe to pull back using gentle suction and aspirate the stomach contents. If none are obtained, turn the patient onto his left side, insert the tube another one or two inches, and try again.
2 Inject 10 to 20 ml of air into the tube with the irrigating syringe and listen with the stethoscope placed to the left of the xiphoid. The air will make a swishing sound as it enters the stomach. The patient may belch if the tube is in the esophagus.
-
(c) If the patient has dyspnea, coughing, or cyanosis or is unable to talk or hum, the tube is in the trachea and must be immediately removed and reinserted.
-
(a) Make sure the machine is plugged in and turned on low pressure.
-
(b) If suction has not been ordered, clamp, plug, or cover the end of the NG (Levin) tube so that is will not leak gastric contents.
-
(c) When the patient is allowed out of bed, loosely loop the tubing in a circle, secure it with adhesive tape, and pin to the patient's gown.
-
(d) This will help prevent pulling that would be uncomfortable to the patient as well as tube dislodgement.
-
(15) Record procedure and report significant observations to the Charge Nurse.
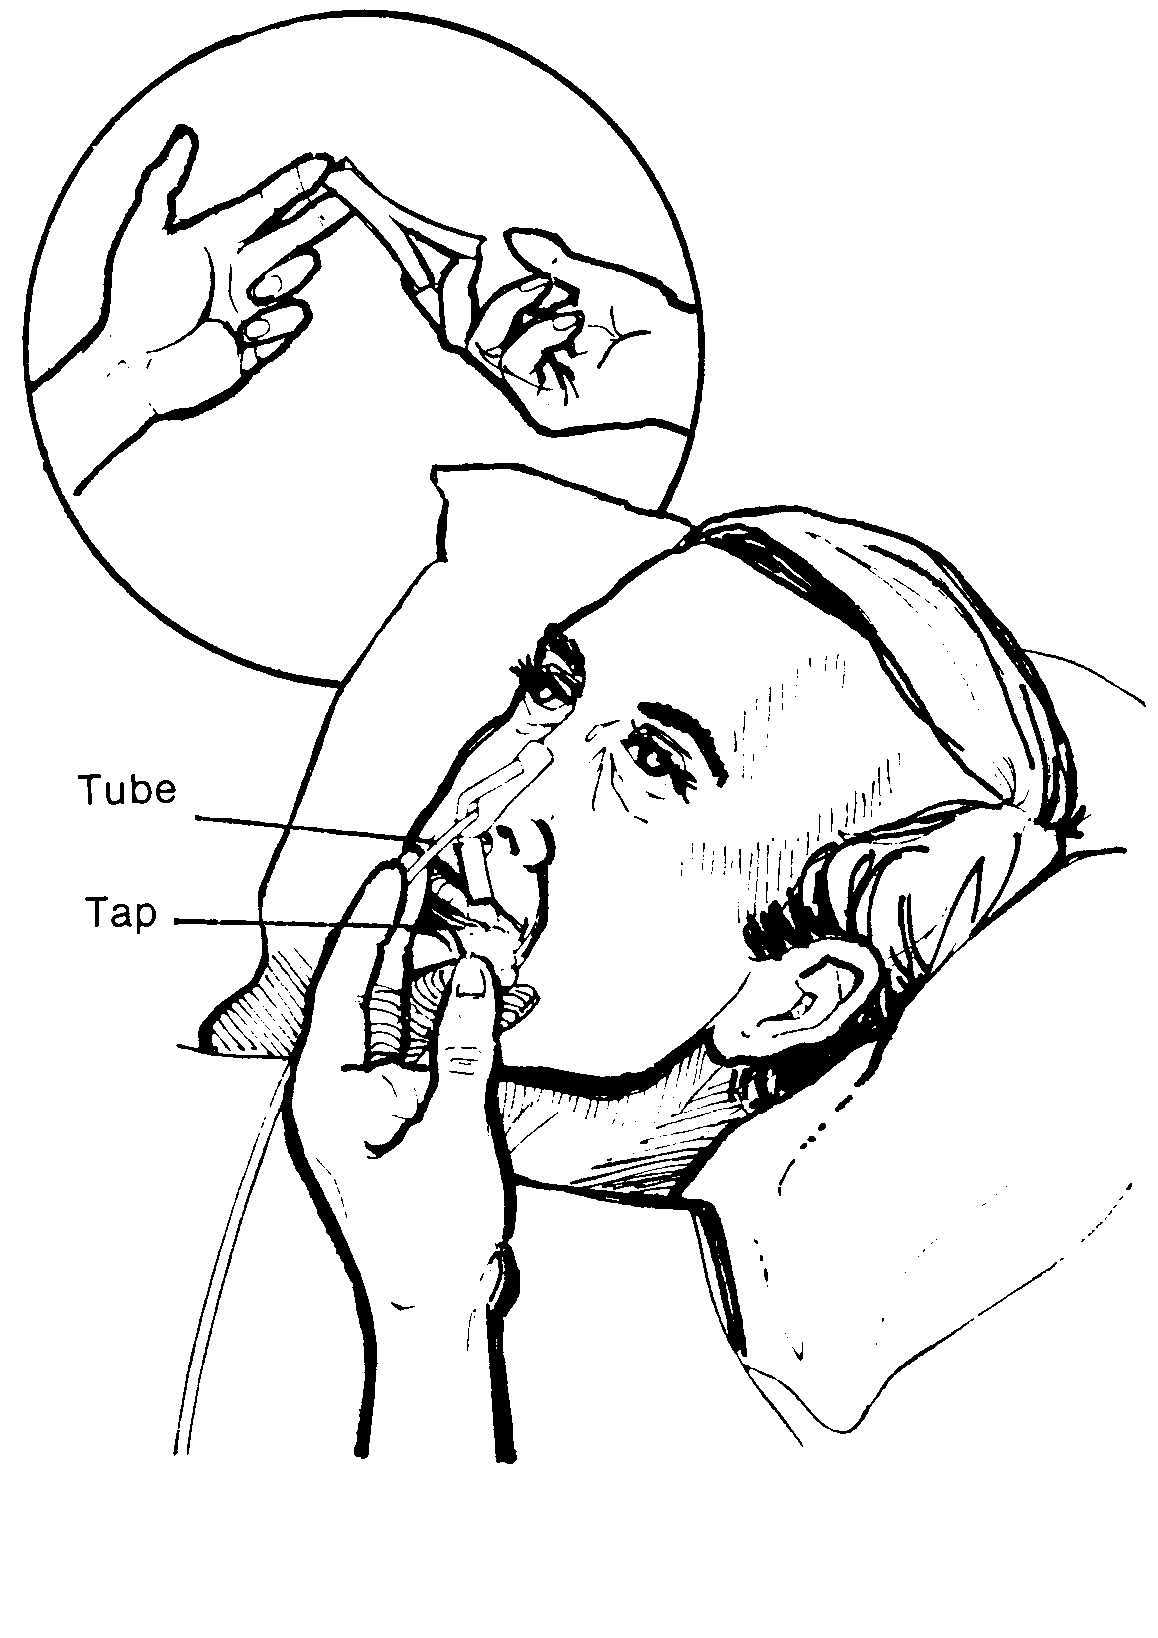
(11) Tape the tube securely to the face, avoiding pressure caused by the tube against the nasal tissues (see Figure 4-5).
(12) As ordered, attach the free end of the tube to the suction machine.
(13) Provide for the patient's comfort.
(14) Remove used articles and leave bedside unit neat and tidy.
c. Rectal Tube. The procedures for using a rectal tube to administer intestinal decompression therapy to a postoperative patient are as follow.
-
(1) Wash hands and assemble all equipment.
-
(a) Rectal tube with attached vented bag (22 to 24 Fr).
-
(b) Water-soluble lubricant.
-
(c) Chux (R).
-
(d) Exam gloves.
-
(e) Wash cloth and towel.
-
(2) Verify the physician's order.
-
(3) Identify and approach the patient, explain what you are going to do, and gain his cooperation.
-
-
(5) Assist the patient to a left side-lying position with knees slightly flexed.
(6) Place the Chux (R) under the patient's buttocks.
(7) Cover the patient with a sheet.
(8) Wash your hands.
(9) Put on exam gloves.
(10) Lubricate the tip of the rectal tube with water-soluble lubricant.
-
(11) Separate the patient's buttocks and gently insert the tip of the tube 3 to 5 inches into the rectum. See Figure 4-6. DO NOT FORCE THE TUBE.
-
-
(13) Leave the tube in place for 20 minutes or as ordered by the physician.
(14) Remove the tube after the prescribed time.
(15) Wash and dry the anal area.
(16) Position the patient comfortably.
(17) Observe the bag for inflation.
(18) Discard equipment or return it to the appropriate location.
(19) Wash your hands.
-
(20) Record procedures and report significant observations to the Charge Nurse.
-
(a) Time the rectal tube was inserted and removed.
-
(b) The patient's reaction to the procedure; if he feels less full.
-
(c) All patient teaching done and the patient's apparent level of understanding.
Being knowledgeable of the location of every wound and drainage tube is very important. The practical nurse must practice aseptic techniques in collecting specimens, avoiding accidental contamination of the specimen, and the spread of infection to others.
a. Procedures for Collecting/Submitting a Wound Culture Specimen From a Postoperative Patient.
(1) Wash hands and assemble all equipment.
(a) Antiseptic swabs.
(b) Sterile culturette tube or sterile applicator with a culture medium tube.
(c) Exam gloves.
(d) Sterile gloves.
(e) Sterile dressings, as appropriate.
(f) Waste receptacle.
(2) Verify the physician's order.
(3) Identify and approach the patient, explain what you are going to do, and gain his cooperation.
-
(4) Provide adequate lighting and for patient's privacy.
-
(5) Wash your hands.
-
(6) Position and drape the patient as indicated for the site of the specimen collection.
-
(12) Cleanse the skin around the area to be cultured with antiseptic swabs to prevent contamination of the specimen by surface bacteria.
-
(13) Obtain the specimen. The break stick technique or the culturette method may be used.
(7) Put on exam gloves.
(8) Remove patient's wound dressings, if appropriate, and discard.
(9) Remove exam gloves.
(10) Open sterile supplies using aseptic technique.
(11) Apply the sterile gloves.
(a) Break stick technique.
1 Remove the cap from the culture tube and hold the cap in your nondominant hand, maintaining sterility of the inside of the cap.
2 Using sterile applicator, swab the exudate from the site.
3 Insert the swab portion of the applicator into the sterile culture tube.
4 Break off the upper portion of the applicator.
5 Replace the cap on the culture tube.
(b) Culturette method.
1 Remove the cap with the sterile applicator attached from the culturette tube.
2 Swab the exudate from the site.
3 Replace the swab in the culturette tube, securing the cap.
4 Turn the culturette tube cap down.
5 Crush the ampule in the bottom of the tube by squeezing it between your index finger and thumb at midpoint.
6 Push the cap down to bring the swab into contact with the culture medium.
-
(14) Redress the patient's wound with the appropriate dressing, if necessary.
-
(21) Send the specimen to the laboratory immediately. The specimen can be destroyed if it is not plated to a culture medium at once.
-
-
(a) DA Form 4578, Therapeutic Documentation Care Plan --Nonmedication.
(15) Remove the sterile gloves.
(16) Label the specimen container.
(17) Reposition the patient comfortably.
(18) Discard equipment or return it to the appropriate area.
(19) Wash your hands.
(20) Complete the laboratory request slip, if not already prepared.
1 Time, site, and method of specimen collection.
2 Appearance of the patient's wound site and the specimen collected.
3 The patient's tolerance of the procedure.
4 Disposition of the specimen.
5 All patient teaching done and the patient's apparent level of understanding.
|
|
b. Maintain the Postoperative Patient's Wound/Nasogastric Drainage Tubes. The nurse must connect and maintain the tubes to the ordered suction device, must avoid introduction of microorganisms into wound or drainage system, and must also avoid dislodging tubes. The procedures are as follow.
(1) Wash hands and assemble all equipment.
-
(a) Suction unit (Hemovac, electric or wall vacuum continuous unit, or intermittent suction).
-
(b) Graduated container.
-
(3) Identify and approach the patient, explain what you are going to do, and gain his cooperation.
-
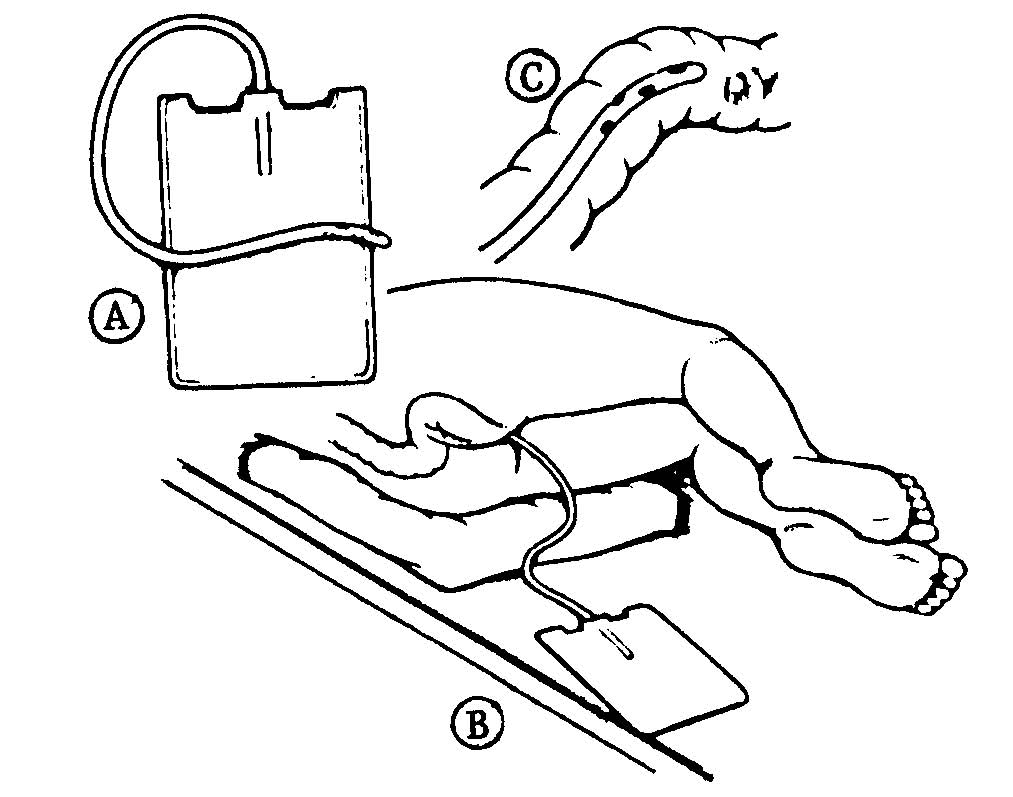
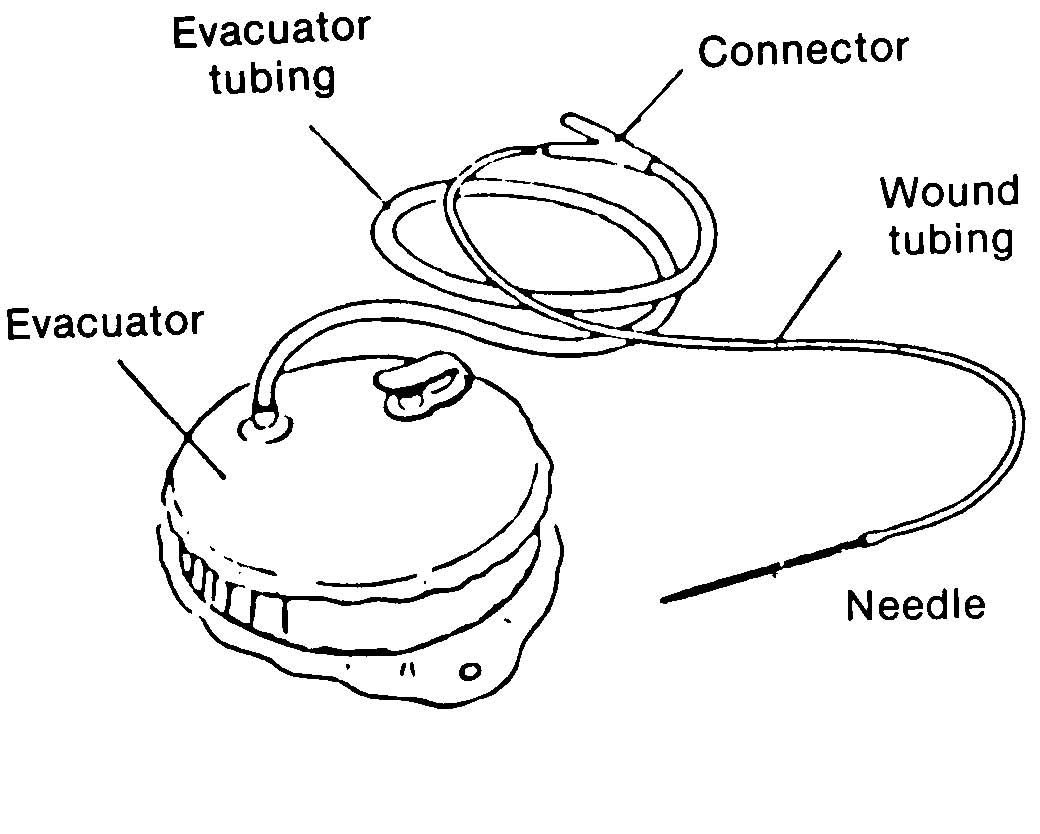
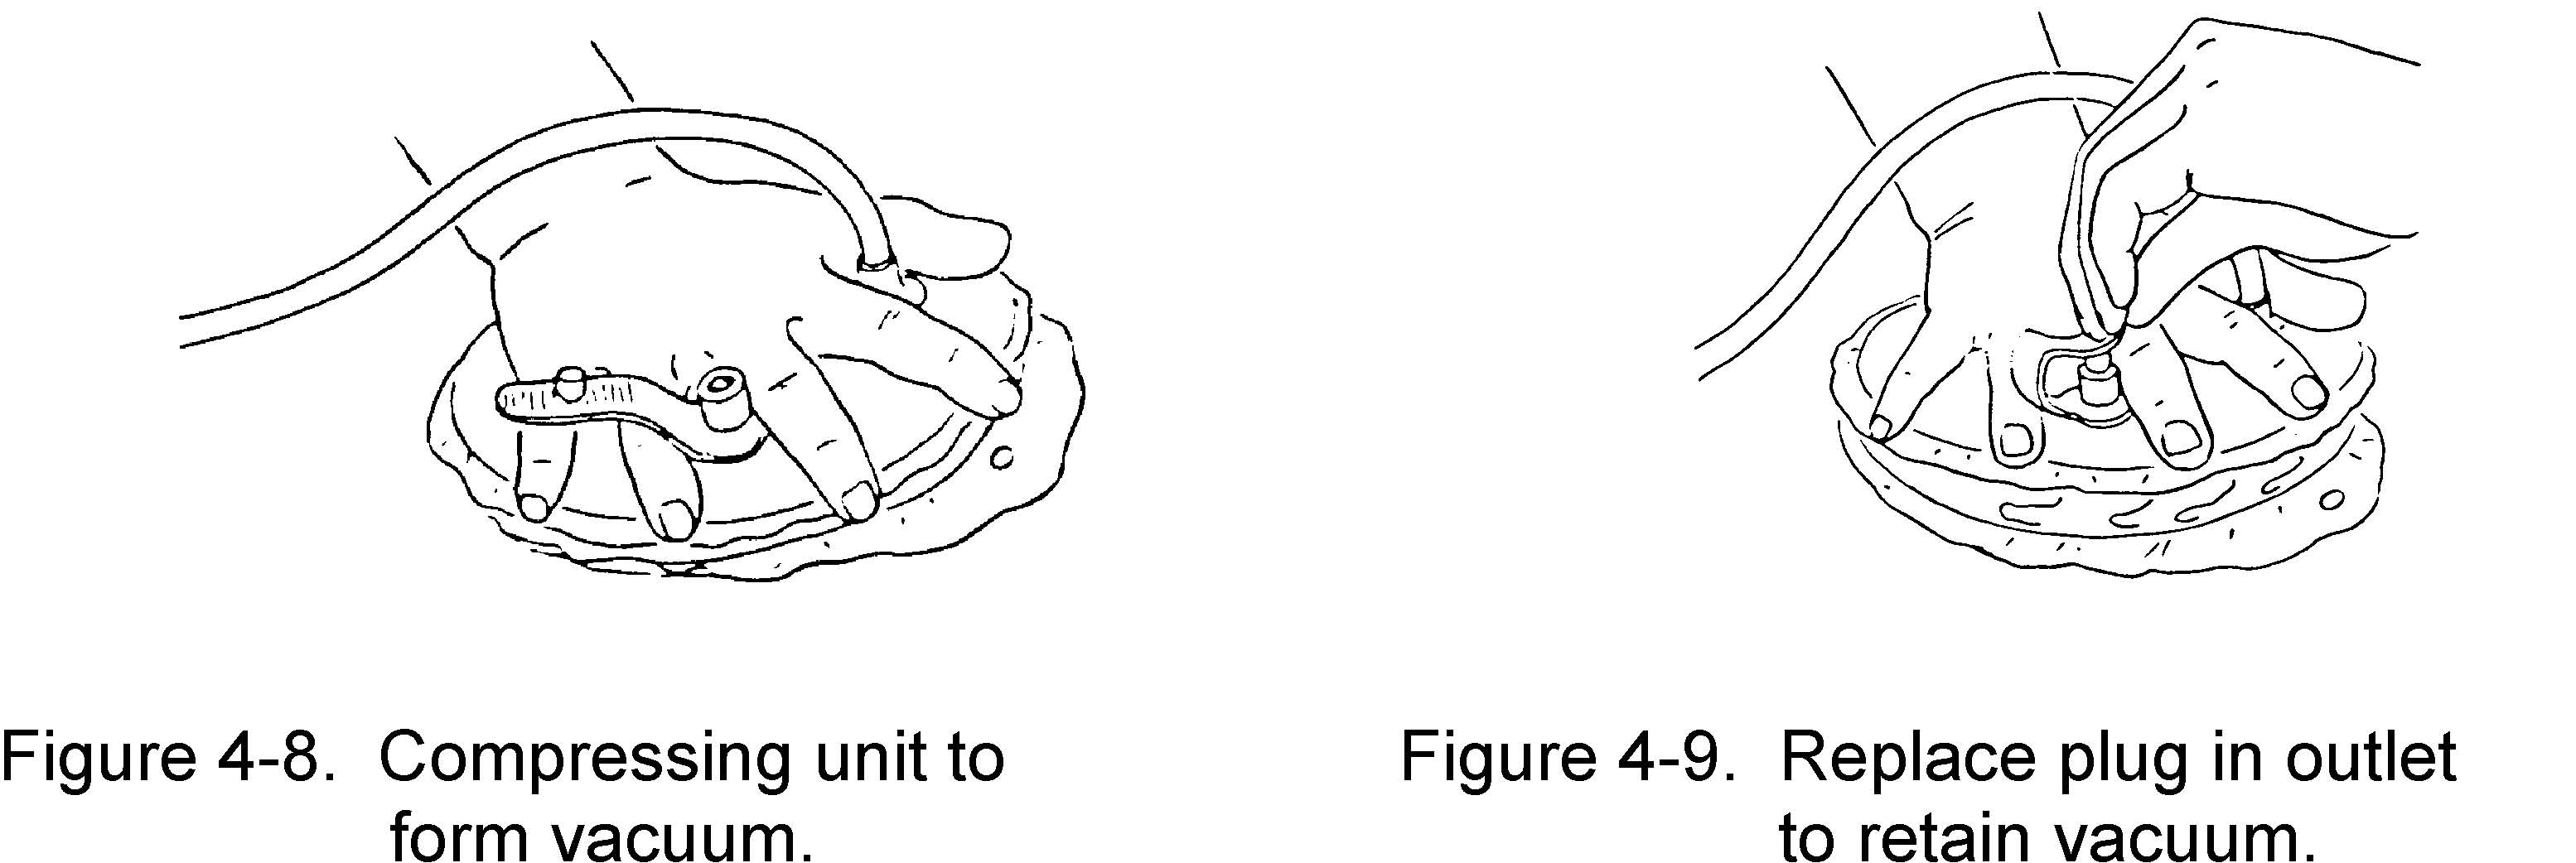
(a) Hemovac (wound drainage tube suction) (see Figure 4- 7).
-
1 Remove the plug cap aseptically and place the portable suction unit upright on a firm surface.
-
2 Compress the suction unit as flat as possible (see Figure 4-8).
-
3 Replace the plug cap immediately (see Figure 4-9).
-
4 Position the suction unit to prevent kinking of the tubes or dropping of the unit.
-
5 Observe the suction unit for proper compression and patency.
-
(2) Verify physician's order.
(4) Provide for the patient's privacy and position the patient to facilitate access to the drainage tube.
(5) Provide adequate lighting.
(6) Wash your hands.
(7) Activate the appropriate/ordered tube drainage/suction unit.
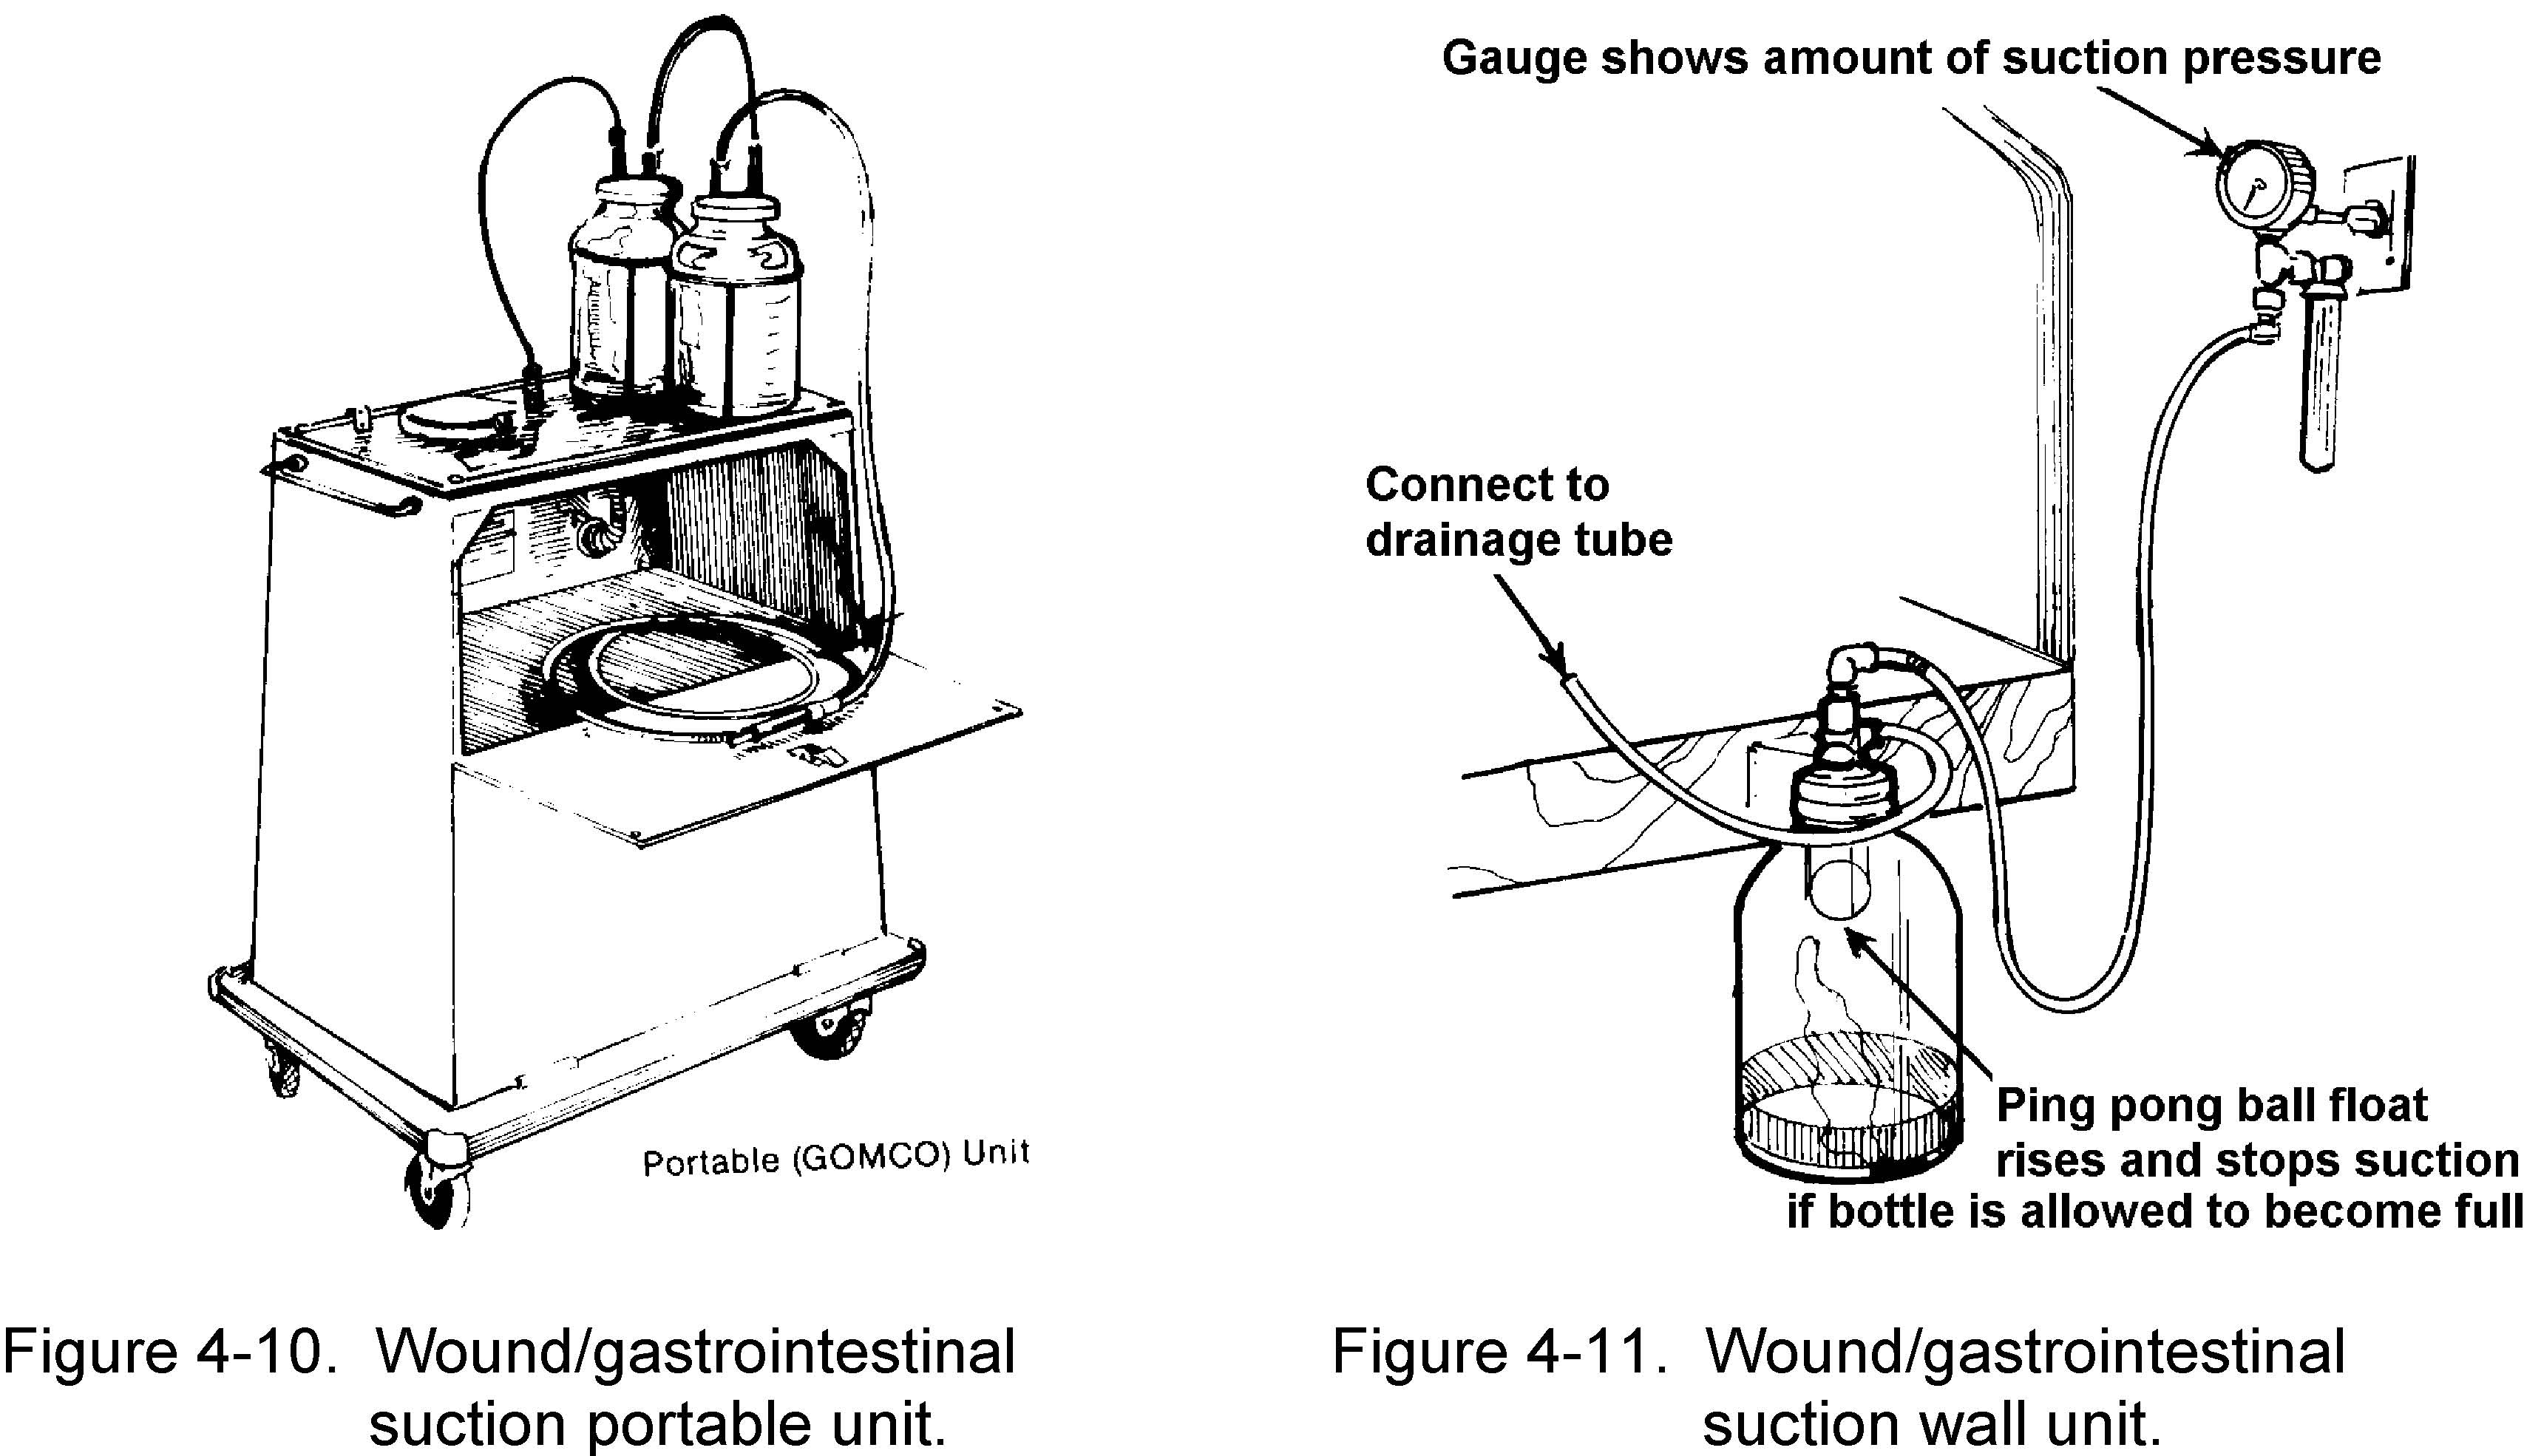
(b) Electric or wall vacuum continuous or intermittent wound/gastrointestinal suction unit (see Figures 4-10 and 4-11).
1 Plug the unit into an electrical outlet or attach to a wall system vacuum.
2 Connect the suction tube to the patient's drainage tube, using aseptic technique.
3 Tape the connection. Ensure that the tubing is not pulling on the drainage tube.
4 Turn the suction unit on "Low" unless specifically ordered differently.
5 Observe the suction system for proper functioning.
(8) Empty the drainage collection device, as necessary.
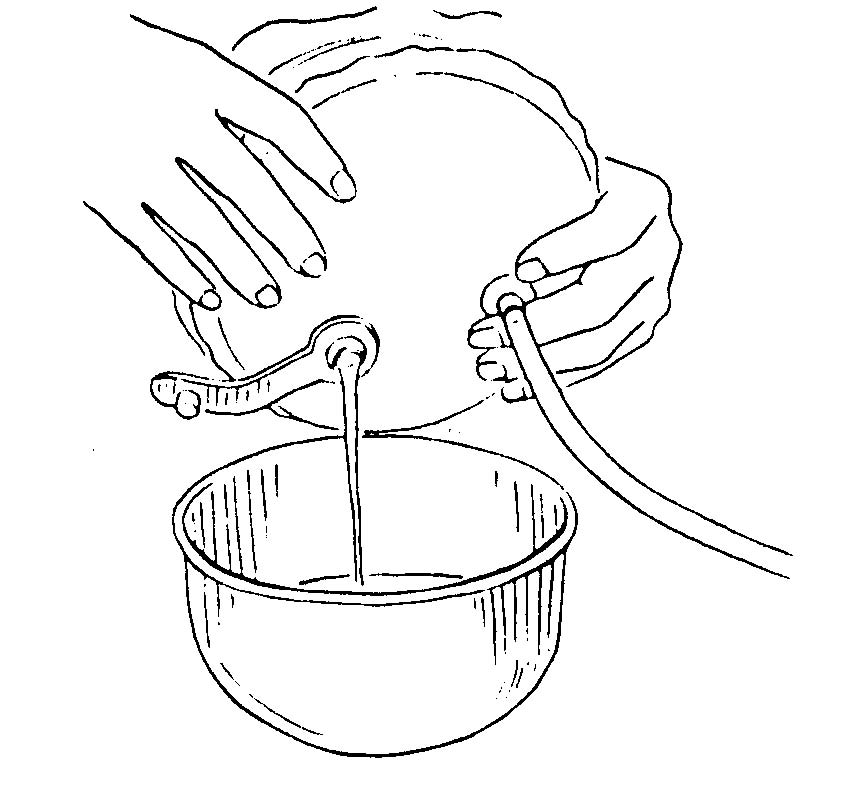
(a) Hemovac. 1 Remove the plug cap, using aseptic technique. 2 Invert the suction unit over the graduated container and empty the contents (see Figure 4-12). 3 Return the unit to an upright position and reactivate the unit. Measure and read the drainage and discard.
(b) Electric wall vacuum continuous or intermittent wound section unit.
1 Turn the suction unit off.
2 Empty the drainage bottle.
3 Measure and record the drainage and discard.
4 Reattach the drainage bottle.
5 Turn the suction unit on and observe for proper function.
(9) Discard equipment or return it to the appropriate location.
(10) Wash your hands.
-
(11) Record procedure and report significant observation to the Charge Nurse.
-
(a) Type of wound catheter and suction.
-
(b) Amount, color, characteristics, and odor of drainage.
-
(c) The patient's reaction to the procedure.
-
(d) Function of suction system.
-
(e) Any observations of the wound area or dressing.
-
(f) All patient teaching done and the patient's apparent level of understanding.
c. Remove Sutures from a Postoperative Patient's Surgical Wound. The nurse must avoid introduction of skin surface contaminants into wound site and interference with wound healing. He must also avoid causing unnecessary pain/discomfort for the patient.
-
(1) Verify the physician's order.
-
(2) Wash hands and assemble needed equipment.
-
(a) Prepackaged suture removal supplies/equipment.
-
(b) Antiseptic pledgets.
-
(c) Smooth forceps.
-
(d) Scissors
-
(e) Dressings/sterile wipes.
-
(f) Hydrogen peroxide (as required).
(3) Identify and approach the patient, explain what you are going to do, and gain his cooperation.
(4) Remove the patient's wound dressing to expose suture line.
-
(5) Cleanse the stitch area carefully and thoroughly with hydrogen peroxide.
-
(8) Cut the shortened end of each stitch as close to the skin as possible and pull each stitch free from the wound.
-
(a) Allows the stitch to be pulled free of wound so that when stitch is removed, only that part of the stitch which is under the skin touches the subcutaneous tissues.
-
(b) No segment of the stitch that is on the surface of the skin should be drawn below the skin surface. That could introduce skin surface contaminants subcutaneously with risk of infection.
-
(c) If the suture does not pull free when cut or is embedded into healed suture line, report immediately to the Charge Nurse or to the physician for assistance.
-
-
(d) For continuous suture removal, cut the suture at each skin orifice on one side and remove suture from the opposite side. The objective is to avoid subcutaneous contamination.
(9) Pat the suture removal sites with an alcohol sponge.
(10) Reapply dressing as appropriate.
(11) Record procedure and report significant observations to the Charge Nurse.
-
(a) Wound site condition.
-
(b) Surface healing.
-
(c) Evidence of infection.
-
(d) Poor wound adhesiveness.
(6) Use hydrogen peroxide to remove dried secretions or encrustations, as necessary.
(7) Grasp the knot of each suture with a pair of smooth forceps and gently pull upward to pull stitch away from the skin (see Figure 4-13).
|
|
|
The Brookside Associates Medical Education Division is dedicated to the development and dissemination of medical information that may be useful to medical professionals and those in training to become medical professionals. This website is privately-held and not connected to any governmental agency. The views expressed here are those of the authors, and unless otherwise noted, do not necessarily reflect the views of the Brookside Associates, Ltd., any governmental or private organizations. All writings, discussions, and publications on this website are unclassified.
© 2007 Medical Education Division, Brookside Associates, Ltd. All rights reserved
![]()